In one of the previous tutorials, we have created our project and configured Identity using Entity Framework Core. Now we will create RESTful APIs to perform Login and Registration Using Identity In ASP.NET Core.
If you have not implemented Identity Read my previous tutorial to implement it by clicking on the above-attached link. It seems difficult but believe me it’s pretty simple. Just follow my instructions and practice the code with me.
First of all, we have to write services to perform signup/registration, login/sign in, and logout then we will call these services from our controller.
I have added a class into my model section into the “ViewModel” Section to return and handle responses from my services.

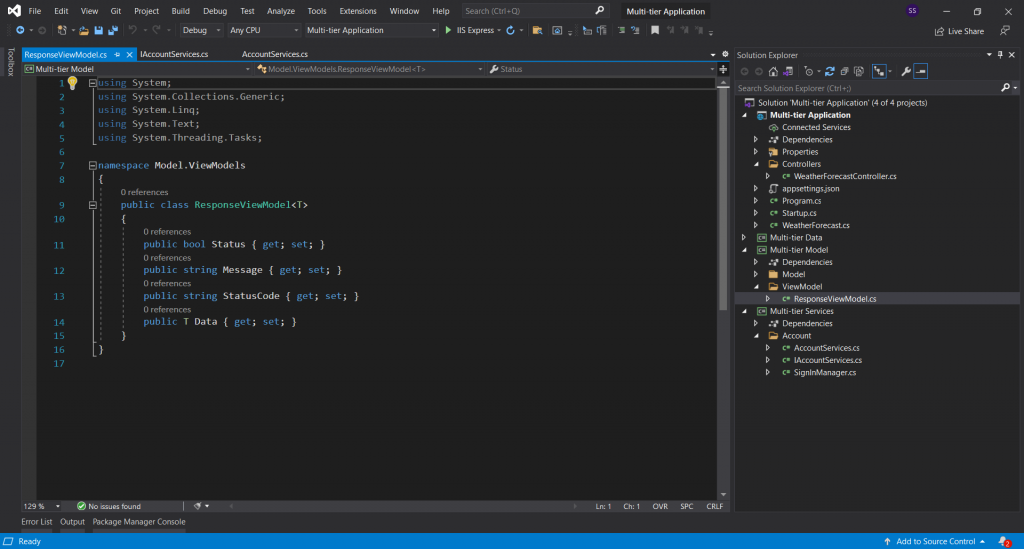
And here is the “ResponseViewModel.cs” class.
using System;
using System.Collections.Generic;
using System.Linq;
using System.Text;
using System.Threading.Tasks;
namespace Model.ViewModels
{
public class ResponseViewModel<T>
{
public bool Status { get; set; }
public string Message { get; set; }
public string StatusCode { get; set; }
public T Data { get; set; }
}
}
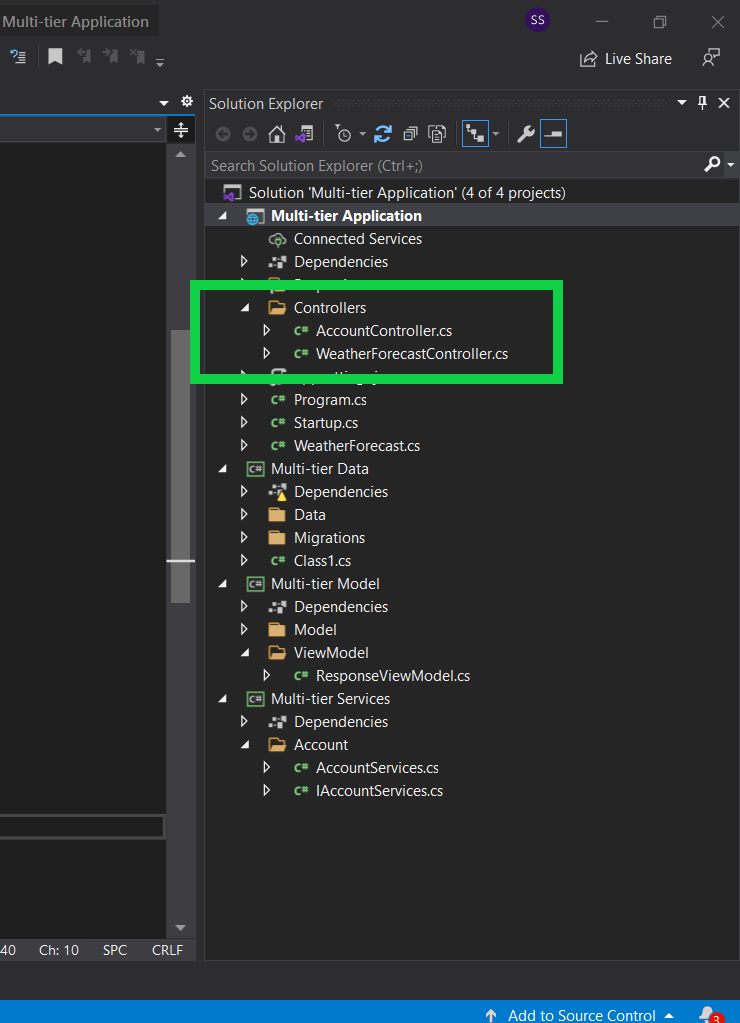
Add folder into your services section and name it “AccountService”.

Now add class into your “AccountService” folder and name it “AccountServices.cs” and drive it from “IAccountServices” to create our method signatures. And we will implement these methods into our “AccountServices.cs” class.
First Create signatures of your methods into your “IAccountServices.cs”
using Microsoft.AspNetCore.Mvc;
using Multi_tier_Model.Model;
using System.Threading.Tasks;
namespace Multi_tier_Services.Account
{
public interface IAccountServices
{
public Task<ResponseViewModel<object>> Post(ApplicationUser user);
public Task<ResponseViewModel<object>> LogIn(ApplicationUser user);
public Task<ResponseViewModel<object>> LogOut(string username);
}
}
After the signature of the methods implement these methods in the “AccountClass.cs”
using Microsoft.AspNetCore.Identity;
using Model.ViewModels;
using Multi_tier_Data.Data;
using Multi_tier_Model.Model;
using System;
using System.Collections.Generic;
using System.Linq;
using System.Text;
using System.Threading.Tasks;
namespace Multi_tier_Services.Account
{
public class AccountServices: IAccountServices
{
private readonly ApplicationDbContext _context;
private readonly UserManager<ApplicationUser> _userManager;
private readonly SignInManager<ApplicationUser> _signInManager;
public AccountServices(ApplicationDbContext context,
UserManager<ApplicationUser> userManager,
SignInManager<ApplicationUser>signInManager)
{
_context = context;
_userManager = userManager;
_signInManager = signInManager;
}
public async Task<ResponseViewModel<object>>Post(ApplicationUser data)
{
try
{
await _userManager.CreateAsync(data);
return new ResponseViewModel<object>
{
Status = true,
Message = "Data Added Succesfully",
};
}
catch (Exception e)
{
return new ResponseViewModel<object>
{
Status = false,
Message = e.Message,
};
}
}
public async Task<ResponseViewModel<object>> LogIn(ApplicationUser data)
{
try
{
var user = await _userManager.FindByNameAsync(data.UserName);
if(user == null)
{
return new ResponseViewModel<object>
{
Status = false,
Message = "Invalid UserName",
};
}
var result = _signInManager.PasswordSignInAsync(user, user.PasswordHash, false, false);
if (result.IsCompleted == true)
{
return new ResponseViewModel<object>
{
Status = true,
Message = "SignIn Succesfully",
};
}
return new ResponseViewModel<object>
{
Status = false,
Message = "Wrong Password",
};
}
catch (Exception e)
{
return new ResponseViewModel<object>
{
Status = false,
Message = e.Message,
};
}
}
public async Task<ResponseViewModel<object>> LogOut(string username)
{
var user = await _userManager.FindByNameAsync(username);
await _userManager.UpdateSecurityStampAsync(user);
return new ResponseViewModel<object>()
{
Status = true,
Message = "User Logged Out",
StatusCode = System.Net.HttpStatusCode.OK.ToString()
};
}
}
}
To logout, use add this code into your "startup.cs" class
//to logout User
services.Configure<SecurityStampValidatorOptions>(options =>
{
// enables immediate logout, after updating the user's stat.
options.ValidationInterval = TimeSpan.Zero;
});
Do not forget to configure your “AccountServices” into your startup class.
services.AddTransient<IAccountServices, AccountServices>();
Now we have implemented our business logic in service now we have to make calls to these services through our APIs.
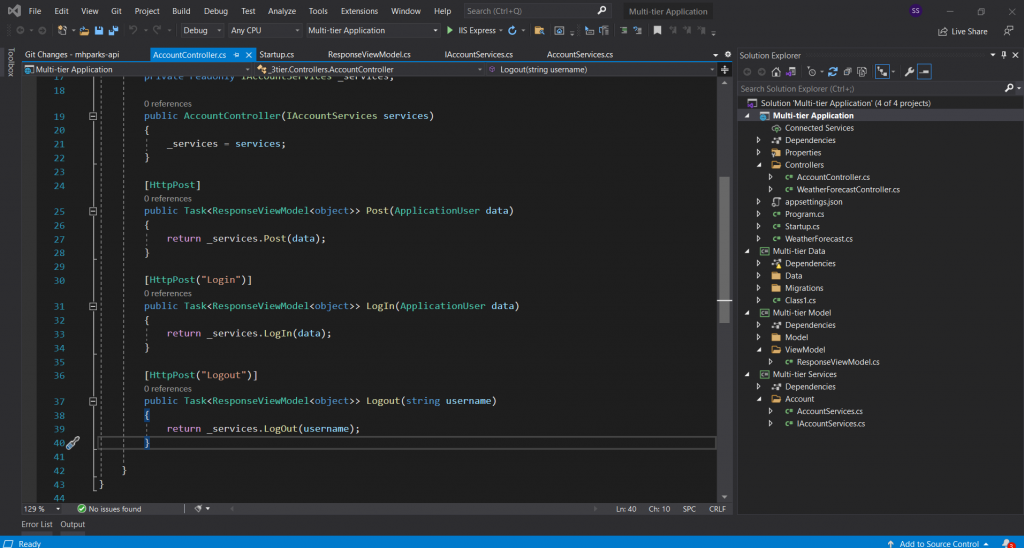
Create an API controller “AccountController.cs” into your main API project under the Controller folder.

Here is the “AccountController.cs” Code
using Microsoft.AspNetCore.Http;
using Microsoft.AspNetCore.Mvc;
using Model.ViewModels;
using Multi_tier_Model.Model;
using Multi_tier_Services.Account;
using System;
using System.Collections.Generic;
using System.Linq;
using System.Threading.Tasks;
namespace _3tier.Controllers
{
[Route("api/[controller]")]
[ApiController]
public class AccountController : ControllerBase
{
private readonly IAccountServices _services;
public AccountController(IAccountServices services)
{
_services = services;
}
[HttpPost]
public Task<ResponseViewModel<object>> Post(ApplicationUser data)
{
return _services.Post(data);
}
[HttpPost("Login")]
public Task<ResponseViewModel<object>> LogIn(ApplicationUser data)
{
return _services.LogIn(data);
}
[HttpPost("Logout")]
public Task<ResponseViewModel<object>> Logout(string username)
{
return _services.LogOut(username);
}
}
}
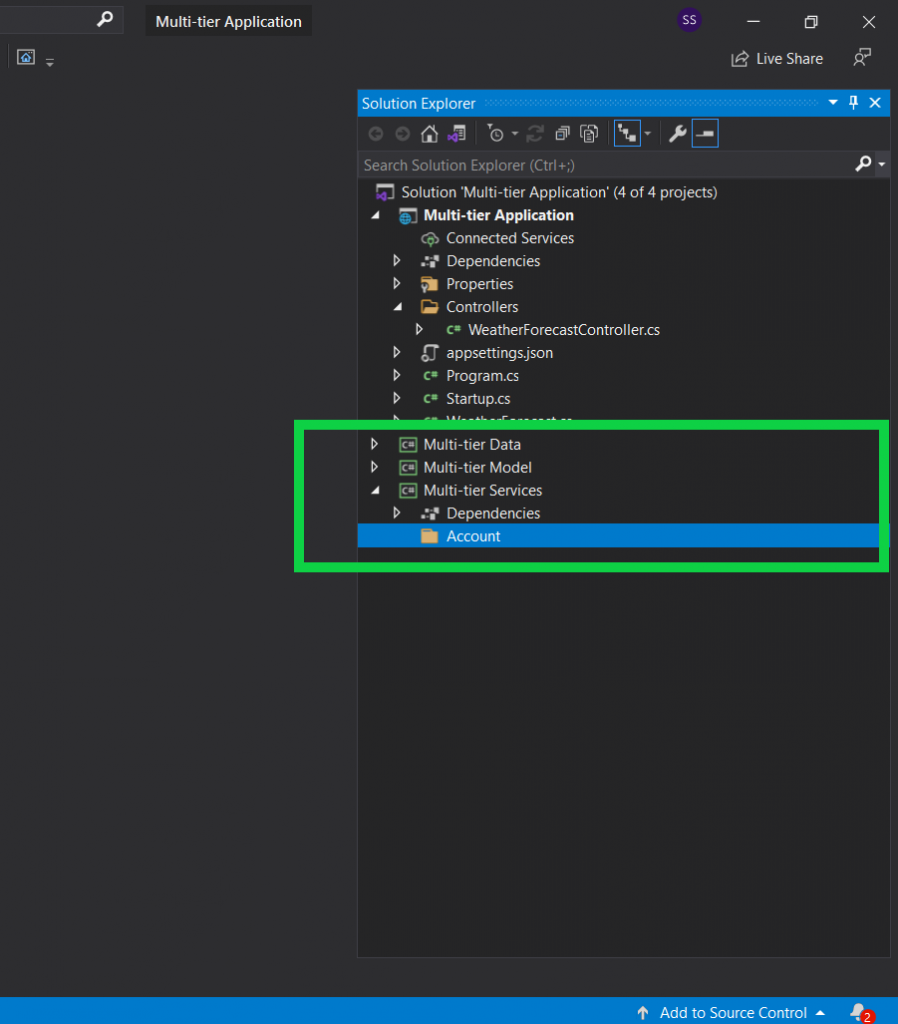
Here is how my project solution looks like.

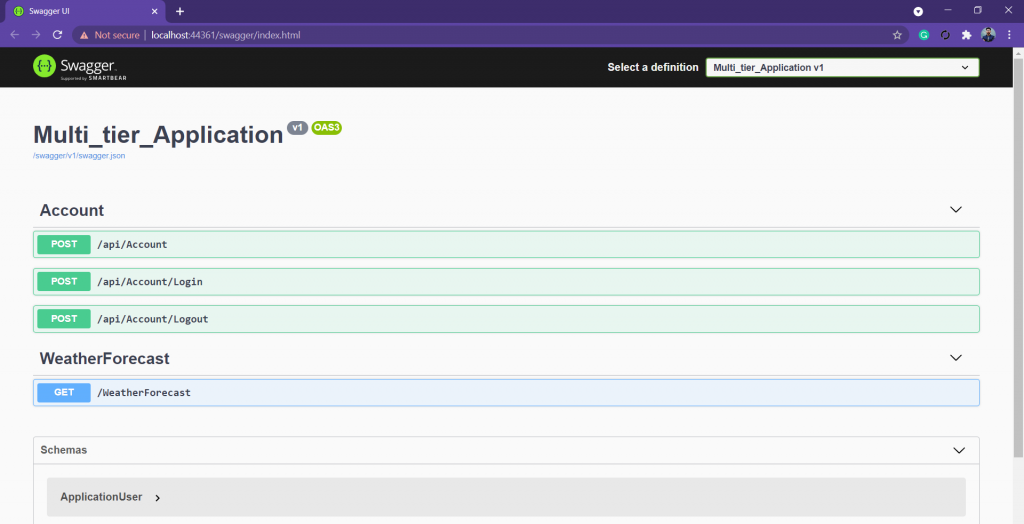
run the project and you will get the screen something like this.

Securing resources and pages
When building web applications, it is crucial to implement secure authentication and authorization to protect sensitive resources and pages. The Identity Framework in ASP.NET Core provides several mechanisms to accomplish this. In this section, we will cover the following topics:
Implementing authentication and authorization
The first step to securing resources and pages is to implement authentication and authorization. Authentication is the process of verifying a user’s identity, whereas authorization is the process of granting or denying access to specific resources or pages based on the user’s identity and role.
ASP.NET Core provides built-in authentication schemes like cookies, JWT, and OAuth 2.0. You can choose the appropriate authentication scheme based on your application’s requirements. Once you have implemented authentication, you can then focus on authorization.
Creating secure pages and resources
To secure a page or resource, you need to add an authorization policy that defines who can access the page or resource. An authorization policy is a collection of requirements that a user must satisfy to access a resource.
ASP.NET Core provides several ways to create authorization policies, including the use of roles, claims, and custom requirements. You can define roles to group users based on their job functions or access levels. Claims are pieces of information associated with a user’s identity, such as their name, email, or role. You can use claims to create fine-grained authorization policies that grant or deny access based on specific user attributes.
Testing the application’s security
Once you have implemented authentication and authorization, it’s important to test your application’s security. ASP.NET Core provides a built-in tool called the Authorization Middleware, which allows you to test your authorization policies by simulating different user roles and claims.
You can also use tools like Fiddler or Postman to test your application’s security by sending requests with different authentication and authorization headers. This will help you identify any security vulnerabilities in your application and fix them before deploying to production.
Configuring password policies
Enforcing strong password policies is an important aspect of user authentication. Weak passwords can be easily guessed or hacked, putting your users’ data at risk. In this section, we will cover the following topics related to configuring password policies in ASP.NET Core’s Identity Framework:
ASP.NET Core’s Identity Framework provides several built-in password policies that you can configure to ensure that your users’ passwords are secure. These policies include requirements for password length, complexity, and expiration.
Configuring password policies in your application
To configure password policies in your application, you can modify the settings in the IdentityOptions object. You can set the minimum required password length, require non-alphanumeric characters, and set a password expiration policy. You can also specify the number of failed login attempts before the user’s account is locked out.
Customizing password policies
In addition to the built-in password policies, you can also create custom password policies that suit your application’s requirements. For example, you might want to enforce a policy that prevents users from using commonly used passwords, such as “password” or “123456”. You can implement this by creating a custom password validator that checks the password against a list of common passwords.
Educating users on creating secure passwords
Configuring strong password policies is essential, but it’s also important to educate your users on creating secure passwords. You can provide tips on creating strong passwords, such as using a combination of uppercase and lowercase letters, numbers, and symbols. You can also implement a password strength meter that provides feedback to the user on the strength of their password.
Testing password policies
Once you have configured your password policies, it’s important to test them to ensure that they are working as intended. You can use automated testing tools to test different password scenarios, such as a password that is too short or does not meet the complexity requirements.
Implementing two-factor authentication
Two-factor authentication (2FA) is an extra layer of security that requires users to provide two forms of identification to log in, such as a password and a code sent to their phone. In this section, we will cover the following topics related to implementing 2FA in ASP.NET Core’s Identity Framework:
Implementing 2FA can greatly improve your application’s security. It provides an additional layer of protection against unauthorized access, even if a user’s password is compromised. 2FA is becoming increasingly common, and many users expect it as an option for logging in to online services.
Configuring 2FA in your application
To configure 2FA in your application, you need to enable it in the IdentityOptions object. You also need to configure a two-factor authentication provider, such as Google Authenticator or Microsoft Authenticator, which generates the one-time codes that users need to log in.
Enabling 2FA for users
Once you have configured 2FA in your application, you need to enable it for your users. Users can enable 2FA in their account settings, and they will need to scan a QR code or manually enter a secret key to set up the 2FA app on their device.
Customizing 2FA settings
In addition to the default 2FA settings, you can also customize 2FA to suit your application’s requirements. For example, you might want to allow users to choose the 2FA provider they want to use or require 2FA only for certain users or roles.
Testing 2FA
Once you have implemented 2FA in your application, it’s important to test it to ensure that it’s working as intended. You can use test accounts to verify that users can successfully log in with 2FA enabled.
Using external authentication providers
Allowing users to sign in using external authentication providers like Google, Facebook, or Twitter can be a convenient and user-friendly way to authenticate users. In this section, we will cover the following topics related to using external authentication providers in ASP.NET Core’s Identity Framework:
Using external authentication providers can provide several benefits for your users. It eliminates the need for users to create new accounts for your application, reducing friction and increasing user adoption. It also provides a secure and streamlined authentication experience, as the authentication is handled by the external provider.
Configuring external authentication providers in your application
To configure external authentication providers in your application, you need to create an account with the external provider and configure the authentication settings in your application’s startup code. You also need to create a callback URL that the external provider will use to redirect the user back to your application after authentication.
Enabling external authentication for users
Once you have configured external authentication providers in your application, you need to enable them for your users. Users can select the external authentication provider they want to use during the authentication process. Once they have authenticated with the external provider, they will be redirected back to your application, and a user account will be created if one does not already exist.
Customizing external authentication settings
In addition to the default external authentication settings, you can also customize external authentication to suit your application’s requirements. For example, you might want to require that users verify their email address or prompt users to provide additional information after they authenticate.
Testing external authentication
Once you have implemented external authentication in your application, it’s important to test it to ensure that it’s working as intended. You can use test accounts to verify that users can successfully authenticate using external authentication providers.
Logging and monitoring
Monitoring your application’s logs and metrics is an important aspect of maintaining the security of your application. In this section, we will cover the following topics related to logging and monitoring in ASP.NET Core’s Identity Framework:
Logging and monitoring allow you to detect and respond to security threats and unauthorized access attempts. By monitoring your application’s logs and metrics, you can identify suspicious activity and take corrective action before it becomes a security incident.
Configuring logging and monitoring in your application
To configure logging and monitoring in your application, you need to use a logging framework like Serilog or NLog. You also need to set up monitoring tools like Application Insights or Elasticsearch to collect and analyze your application’s logs and metrics.
Setting up alerts and notifications
Once you have set up logging and monitoring in your application, you need to configure alerts and notifications to notify you when a security event occurs. You can set up alerts based on specific log events or metrics thresholds, and receive notifications via email, SMS, or a messaging app like Slack.
Analyzing logs and metrics
After you have set up logging and monitoring and configured alerts and notifications, you need to analyze your application’s logs and metrics regularly to identify potential security threats. You can use tools like Kibana or Grafana to visualize your application’s logs and metrics and identify patterns or anomalies that may indicate a security incident.
Responding to security incidents
In the event of a security incident, it’s important to respond quickly and appropriately to minimize the impact on your application and users. You should have a defined incident response plan that outlines the steps you will take to investigate and contain the incident.
Best practices for secure authentication and authorization
Implementing secure authentication and authorization is essential to protect your users’ data and prevent unauthorized access to your application. In this section, we will cover the following best practices for secure authentication and authorization in ASP.NET Core’s Identity Framework:
Use HTTPS for secure communication
Using HTTPS ensures that all communication between your application and the user’s browser is encrypted and secure. This prevents unauthorized access to sensitive data, such as passwords or authentication tokens.
Store passwords securely
Storing passwords in plain text or using weak encryption algorithms can put your users’ data at risk. To ensure that passwords are stored securely, you should use a secure hashing algorithm like BCrypt or PBKDF2.
Limit the use of cookies
Cookies can be used to store authentication tokens and session data, but they can also be used to track user activity or steal sensitive data. To minimize the risk of cookie-based attacks, you should use HttpOnly and Secure cookies, which prevent client-side access to cookies.
Use role-based access control
Role-based access control (RBAC) allows you to grant or deny access to specific resources based on a user’s role or job function. This provides a fine-grained level of control over who can access sensitive data or perform specific actions.
Implement least privilege access
Implementing least privilege access means granting users only the minimum level of access required to perform their job function. This minimizes the risk of privilege escalation attacks, where an attacker gains access to sensitive data or performs unauthorized actions by exploiting a user’s excessive permissions.
Use multi-factor authentication
Multi-factor authentication (MFA) adds an extra layer of security to the authentication process, requiring users to provide two or more forms of identification to log in. This can include a password and a code sent to the user’s phone or an authentication app.
Keep your application up-to-date
Keeping your application and its dependencies up-to-date is essential to ensure that you are using the latest security patches and fixes. Regularly updating your application’s packages and dependencies can help prevent known security vulnerabilities.
Summary
In this article, we have performed registration And Login Functionality In ASP.NET Core 5 Web API Application Using 3-tier Identity. If you face any problem or have any query in your mind do not hesitate to leave a comment below or contact us.
Soon we will write an article about “Asp.net core mvc login and registration using identity” Stay Tuned!