
Welcome to mycodebit. When we work with ASP.NET (Core) MVC we have to submit the forms through razor pages so, in this article, we discuss How To Post Data In ASP.NET Using AJAX Form Serialization. I’m using visual studio 2019 for this tutorial.
If you have not created the project yet please follow this link to create a new project.
Steps:
Let’s first create a model that we will use to submit the form data and we will create this model class as per our requirement to transfer data.
public class SubmitPersonalInfo
    {
        public string Name { get; set; }
        public string Gender { get; set; }
        public string Age { get; set; }
        public string Height { get; set; }
    }
I have created a model class with the name “SubmitPersonalInfo” with the required fields that I want to submit.
I’m creating a page for submitting this specific information.
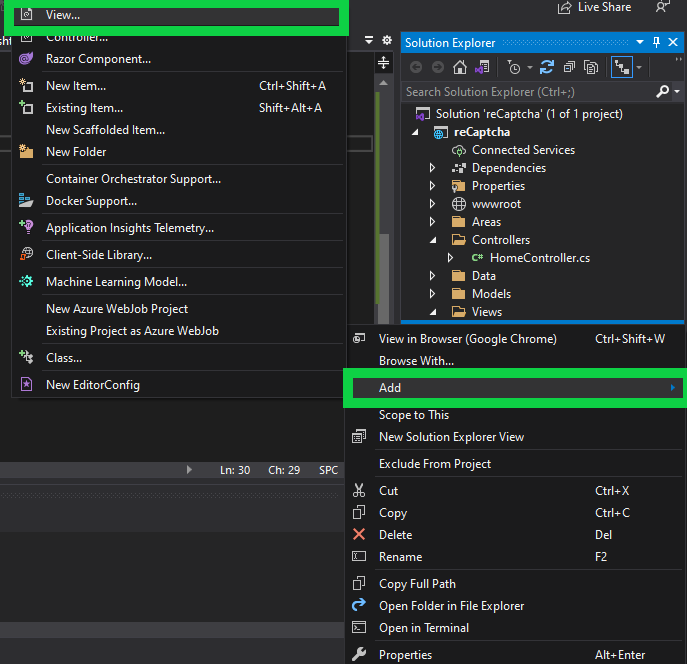
After Clicking on View you will have a screen like this.
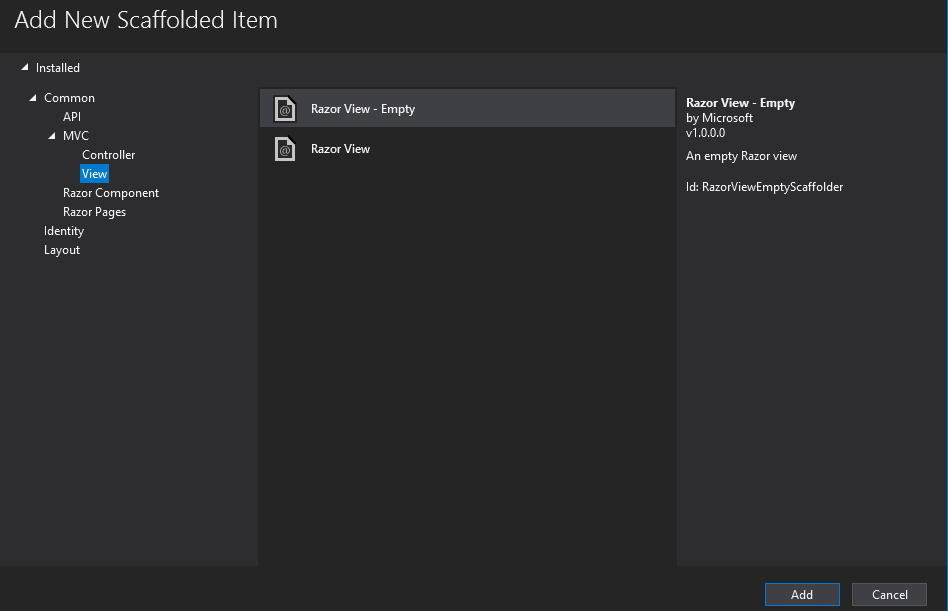
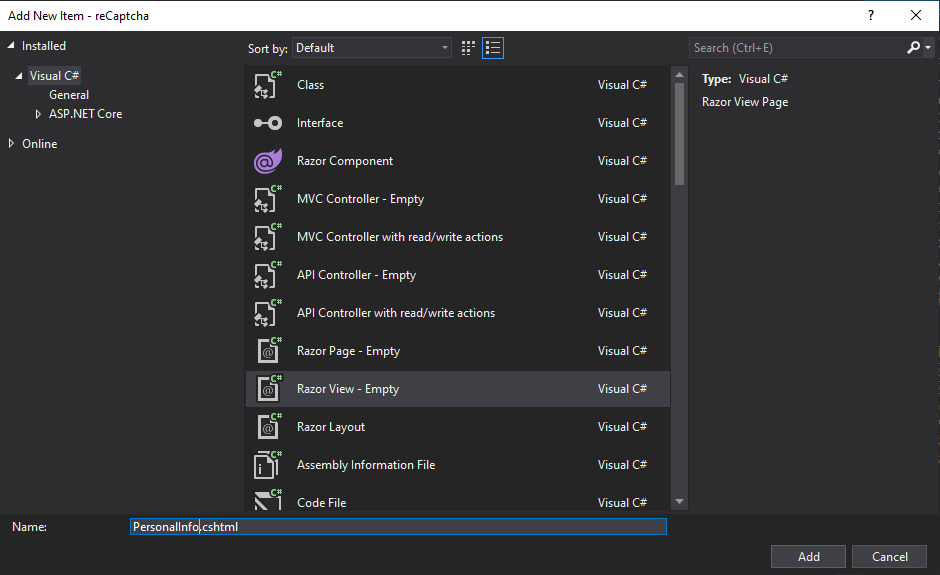
Click on Add after selecting “Razor View – Empty”. and after clicking on Add give a name to your page and Add the page.
After adding the page add the action method to return the view from the controller.
 public IActionResult PersonalInfo()
        {
            return View();
        }
Do not forget to add the page link to the home page. Open “_Layout.cshtml” and paste.
<li class="nav-item">
                            <a class="nav-link text-dark" asp-area="" asp-controller="Home" asp -action="PersonalInfo">Personal Info</a>
                        </li>
In the asp-controller tag give the name of your controller and in the asp-action give the name of your action method as I did.
Now let’s add the form fields that we want to submit. Paste this HTML code into your razor view page that we created.
@model SubmitPersonalInfo
<h4>Submit Personal Information</h4>
<hr />
<div class="row">
    <div class="col-md-4">
        <form id="personalInfo" novalidate class="needs-validation">
            <div asp-validation-summary="ModelOnly" class="text-danger"></div>
            <div class="form-group">
                <label asp-for="Name" class="control-label"></label>
                <input asp-for="Name" type="text" class="form-control" id="name" required />
                <span asp-validation-for="Name" class="text-danger"></span>
            </div>
            <div class="form-group">
                <label asp-for="Age" class="control-label"></label>
                <input asp-for="Age" type="number" class="form-control" id="age" />
                <span asp-validation-for="Age" class="text-danger"></span>
            </div>
            <div class="form-group">
                <label asp-for="Gender" class="control-label"></label>
                <input asp-for="Gender" type="text" class="form-control" id="gender" />
                <span asp-validation-for="Gender" class="text-danger"></span>
            </div>
            <div class="form-group">
                <label asp-for="Height" class="control-label"></label>
                <input asp-for="Height" type="number" class="form-control" id="height" />
                <span asp-validation-for="Height" class="text-danger"></span>
            </div>
            <div class="form-group">
                <button type="button" class="btn btn-primary" onclick="submitPersonalInfo()">Submit</button>
            </div>
        </form>
    </div>
</div>
You can see that I have imported the model at the top of the page and used its properties in the form. If we do not import the data model the page will give the runtime error.
Let’s have look at our Javascript code snippet.
<script type="text/javascript">
    function submitPersonalInfo() {
        var data = $("#personalInfo").serialize();
        console.log(data);
        alert(data);
        $.ajax({
            type: 'POST',
            url: '/Home/SubmitInfo',
            contentType: 'application/x-www-form-urlencoded; charset=UTF-8', // when we use .serialize() this generates the data in query string format. this needs the default contentType (default content type is: contentType: 'application/x-www-form-urlencoded; charset=UTF-8') so it is optional, you can remove it
            data: data,
            success: function (result) {
                alert('Successfully received Data ');
                console.log(result);
            },
            error: function () {
                alert('Failed to receive the Data');
                console.log('Failed ');
            }
        })
    }
</script>
In this script you can see in the data variable I have used my form id “personalInfo” and serialized all my data into the string format. After that, I have provided the Url of my controller action “url: ‘/Home/SubmitInfo'”.
Lets see the controller action that I have created in the home controller.
[HttpPost]
        public async Task<IActionResult> SubmitInfo(SubmitPersonalInfo info)
        {
            if (!ModelState.IsValid) return BadRequest("Enter required fields");
            //Write your Insert code here;
            return this.Ok("Form Data received!");
        }
You can see the controller action type is post and our ajax is also post.
Complete the code of the razor view page.
@model SubmitPersonalInfo
@{
    ViewData["Title"] = "Personal Information";
}
<script type="text/javascript">
    function submitPersonalInfo() {
        var data = $("#personalInfo").serialize();
        console.log(data);
        alert(data);
        $.ajax({
            type: 'POST',
            url: '/Home/SubmitInfo',
            contentType: 'application/x-www-form-urlencoded; charset=UTF-8', // when we use .serialize() this generates the data in query string format. this needs the default contentType (default content type is: contentType: 'application/x-www-form-urlencoded; charset=UTF-8') so it is optional, you can remove it
            data: data,
            success: function (result) {
                alert('Successfully received Data ');
                console.log(result);
            },
            error: function () {
                alert('Failed to receive the Data');
                console.log('Failed ');
            }
        })
    }
</script>
<h4>Submit Personal Information</h4>
<hr />
<div class="row">
    <div class="col-md-4">
        <form id="personalInfo" novalidate class="needs-validation">
            <div asp-validation-summary="ModelOnly" class="text-danger"></div>
            <div class="form-group">
                <label asp-for="Name" class="control-label"></label>
                <input asp-for="Name" type="text" class="form-control" id="name" required />
                <span asp-validation-for="Name" class="text-danger"></span>
            </div>
            <div class="form-group">
                <label asp-for="Age" class="control-label"></label>
                <input asp-for="Age" type="number" class="form-control" id="age" />
                <span asp-validation-for="Age" class="text-danger"></span>
            </div>
            <div class="form-group">
                <label asp-for="Gender" class="control-label"></label>
                <input asp-for="Gender" type="text" class="form-control" id="gender" />
                <span asp-validation-for="Gender" class="text-danger"></span>
            </div>
            <div class="form-group">
                <label asp-for="Height" class="control-label"></label>
                <input asp-for="Height" type="number" class="form-control" id="height" />
                <span asp-validation-for="Height" class="text-danger"></span>
            </div>
            <div class="form-group">
                <button type="button" class="btn btn-primary" onclick="submitPersonalInfo()">Submit</button>
            </div>
        </form>
    </div>
</div>
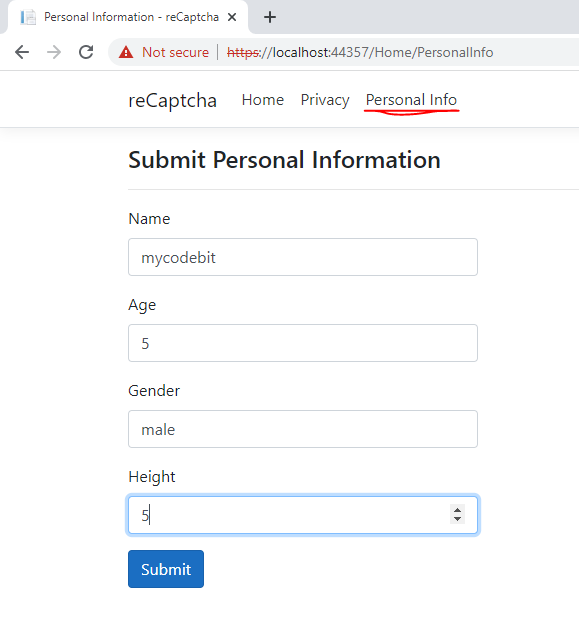
Here are the working results of the code.
By using a debugger we can see the data.

Understanding the basics of AJAX form serialization
If you’re working with web development, chances are you’ve heard of AJAX – Asynchronous JavaScript and XML. This technology allows web pages to update content without reloading the entire page, resulting in a smoother and more responsive user experience. One of the key components of AJAX is form serialization, which is the process of converting form data into a format that can be sent to the server via AJAX.
AJAX form serialization involves taking the data from a form and converting it into a format that can be easily transmitted to the server. The data is then sent to the server without the need for a full page reload, allowing the user to continue interacting with the web page while the data is being sent.
The benefits of using AJAX form serialization are numerous. Firstly, it improves the performance of your web application by reducing the amount of data that needs to be sent between the client and the server. This makes your web application faster and more responsive, which can lead to a better user experience.
Secondly, it can also help to simplify the development process. Instead of manually sending form data to the server and handling the response, AJAX form serialization can automate this process for you. This means less code for you to write, test and maintain, making your development process more efficient.
Finally, AJAX form serialization can help to reduce errors and improve data accuracy. Since the data is transmitted asynchronously, it is less likely to be lost or corrupted during transmission, resulting in more accurate data being received by the server.
Handling responses from the server
After you’ve sent your data to the server using AJAX form serialization in your ASP.NET web application, you’ll need to handle the response that comes back. Depending on the nature of the data you’ve sent, there could be a variety of response types that you’ll need to handle.
For example, if the data was successfully processed by the server, you might receive a success message as a response. Alternatively, if there was an error processing the data, you might receive an error message instead.
To handle responses from the server, you’ll typically use a callback function that is triggered when the response is received. This function can then be used to display the response to the user, update the page content, or perform other actions based on the response.
One common approach to handling responses from the server is to use the jQuery AJAX function, which provides a simple and flexible way to send and receive data via AJAX. To handle responses from the server using jQuery, you can use the success and error callback functions, which are triggered based on the response received from the server.
For example, the success callback function might look something like this:
$.ajax({
url: “your-server-url”,
data: yourFormData,
success: function(response) {
// Handle successful response here
},
error: function(xhr, status, error) {
// Handle error response here
}
});
In this example, the success callback function is triggered if the data was successfully processed by the server, while the error callback function is triggered if there was an error processing the data. Within each callback function, you can perform the necessary actions to handle the response, such as displaying a success or error message to the user.
Conclusion
If you face any issue or problem using this tutorial or have any suggestions to make our content better please do not hesitate to comment below or contact us.


