
In this post, we are going to use Google reCaptcha V3 in ASP.NET Core MVC project.
First thing first how a Google reCaptcha V3 works. In reCaptcha V3 user doesn’t interact with any reCaptcha verification directly or solve any puzzle. In V3 we configure a Google API on the front-end that returns us a token and on the server-side. We call another google API that confirms the token. After confirming the token, Google Server-side API verifies the user’s response/token responses to us with a success score that can be 0 to 0.1. If the score is near 0.1 it means the user is human and if the score is ZERO or near to ZERO. it means the request is from the bot.
First of all, create a project.
open Visual Studio and click on create a new project

Now select a project and click on Next.

Now name your project and click Next.

Now we will select Individual Account in “Authentication type” and check “configure for HTTPS” and click on create.

Now your project will look like this.

Now run your project and register.

Register yourself.

when we click on register we will face an error.

Now click on Apply migration.
After Applying migration click on confirm email or else you will not be able to login.

Now you can login. These were the steps to set up our project now we will move on to the main topic that how can we use Google ReCaptcha V3 in this ASP.NET Core MVC Project.
First of all, we have to configure our project with google reCaptcha V3. To configure reCaptcha go to this link.
After going to the above-mentioned link we will see the screen something like this.

Click on this plus(+) sign and we will get a form to register our site.
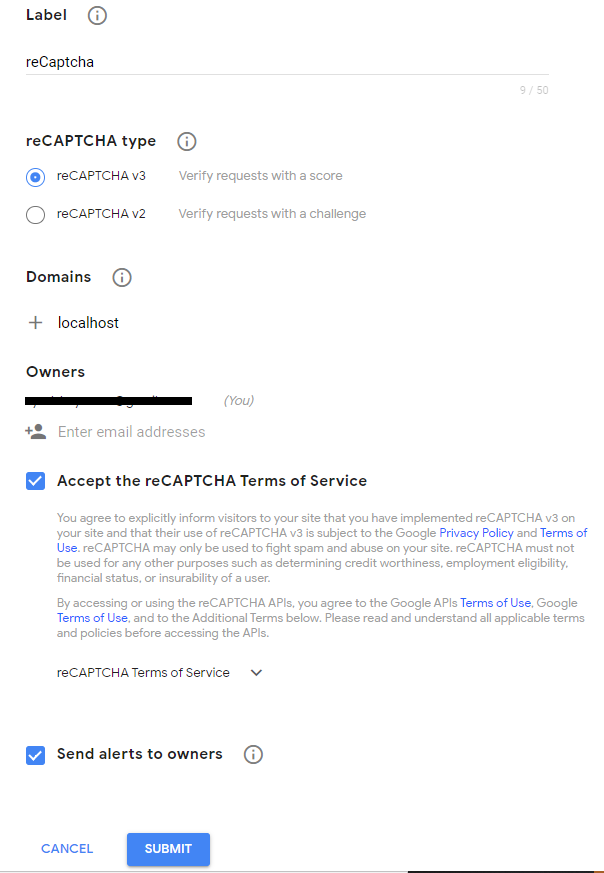
Now we will add info, our domain is localhost now. submit the form.
After registering our ReCaptcha, we will have our “SITEKEY” and “SECRETKEY”.

Now let’s move back to our ASP.NET Core project and scaffold the Identity login and register page so we can add reCaptcha to them.
Right Click on Area -> Add -> New Scaffold Item
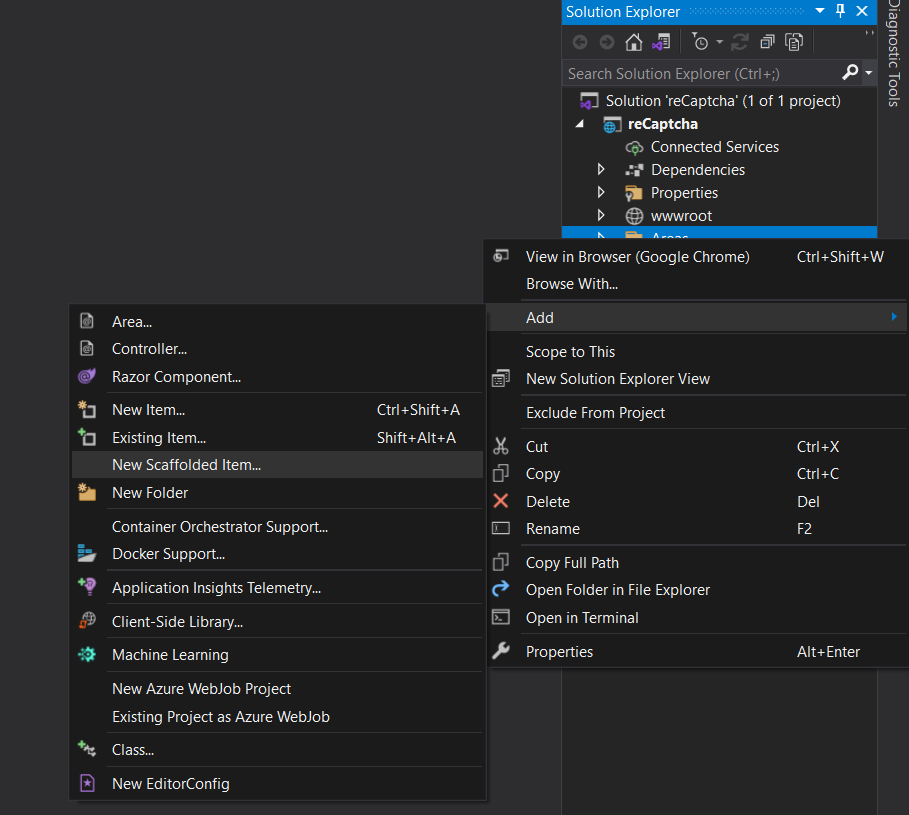
Then we will have a screen like

Select Identity and click on Add. After Adding select login and register as we did and select DB context. If you want to apply on some other page it’s your choice.

Now we have a login.cshtml and register.cshtm page.

Now we will just past this code on our Login page.
<script src="https://www.google.com/recaptcha/api.js?render=reCAPTCHA_site_key"></script>
<script>
        grecaptcha.ready(function () {
            grecaptcha.execute('reCAPTCHA_site_key', { action: 'submit' }).then(function (token) {
                // Add your logic to submit to your backend server here.
                console.log(token);
            });
        });

</script>
Add your replace “reCAPTCHA_site_key” with your Google ReCaptcha Site key. We will replace it and run our project. Now we can see reCaptcha sign our login page.

After calling the reCaptcha API it’s returning a token that we can see in our console.log(token). Now we have to implement our backend configuration to confirm this token on every request.
Now we will add a new class into our project and name it “reCaptchaService.cs” and implement our server-side logic to verify user response. In this “reCaptchaService.cs” class we have created one method and two model classes to send data and get a response from google API. To send Data we have created “reCaptchaData” and to receive a response we have “reCaptchaRespo” class. Let’s move to the main logic we have created a public method “tokenVerify” to call reCaptcha API and deserialize its response into our “reCaptchaRespo” class.
Let’s see the code.
public class reCaptchaService
    {
        public virtual async Task<reCaptchaRespo> tokenVerify(string token)
        {
            reCaptchaData data = new reCaptchaData
            {
                response = token,
                secret = "reCAPTCHA_secret_key"
            };

            HttpClient client = new HttpClient();
            var response = await client.GetStringAsync($"https://www.google.com/recaptcha/api/siteverify?secret={data.secret}&response={data.response}");
            var reCaptcharesponse = JsonConvert.DeserializeObject<reCaptchaRespo>(response);
            return reCaptcharesponse;
        }
    }
    public class reCaptchaData
    {
        public string response { get; set; }
        public string secret { get; set; }
    }
    public class reCaptchaRespo
    {
        public bool success { get; set; }
        public DateTime challenge_ts { get; set; }
        public string hostname { get; set; }
        public long score { get; set; }
    }
We have created our service to verify user’s responses from Google reCaptcha API.
Now configure our service “reCaptchaService.cs” in “Startup.cs” file.
services.AddTransient<reCaptchaService>();Now we will call our method when the user tries to login. we have created an extra field for tokens in our login form.
<input id="input-token" asp-for="Input.token" />and created token property in the input model.
[Required]
 public string token { get; set; }
Now we have to assign google generated token to this input field that we have added into our login form by simple Jquery.
$("#input-token").val(token);after pasting it in our login script our google reCaptcha front-end configuration will look like this.
grecaptcha.ready(function () {
      grecaptcha.execute('reCAPTCHA_site_key', { action: 'submit' }).then(function (token) {
          console.log(token);
              $("#input-token").val(token);
                // Add your logic to submit to your backend server here.
       });
   });
Our Login form will look like this.

To open “Login method” we will open “Login.cshtml.cs”.

Now we will inject the “reCaptchaService.cs” class object in our “Login.cshtml.cs” to call the method from this class.
private readonly reCaptchaService _reCaptchaService;
public LoginModel(reCaptchaService reCaptchaService)
{
  _reCaptchaService = reCaptchaService;
}
Now we will move to “OnPostAsync” method in the same “Login.cshtml.cs” class and call our “tokenVerify” method from the “OnPostAsync”.
//google reCaptcha confirmation
var reCaptcharesult = _reCaptchaService.tokenVerify(Input.token);
if(!reCaptcharesult.Result.success && reCaptcharesult.Result.score <= 0.5)
{
  ModelState.AddModelError(string.Empty, "You are not a human.");
  return Page();

}
After adding this to your “OnPostAsync” method our method will look something like this.
public async Task<IActionResult> OnPostAsync(string returnUrl = null)
{
  returnUrl ??= Url.Content("~/");

  //google reCaptcha confirmation
  var reCaptcharesult = _reCaptchaService.tokenVerify(Input.token);
  if(!reCaptcharesult.Result.success && reCaptcharesult.Result.score <= 0.5)
  {
    ModelState.AddModelError(string.Empty, "You are not a human.");
    return Page();

  }

  ExternalLogins = (await _signInManager.GetExternalAuthenticationSchemesAsync()).ToList();

  if (ModelState.IsValid)
  {
    // This doesn't count login failures towards account lockout
    // To enable password failures to trigger account lockout, set lockoutOnFailure: true
    var result = await _signInManager.PasswordSignInAsync(Input.Email, Input.Password, Input.RememberMe, lockoutOnFailure: false);
    if (result.Succeeded)
    {
      _logger.LogInformation("User logged in.");
      return LocalRedirect(returnUrl);
    }
    if (result.RequiresTwoFactor)
    {
      return RedirectToPage("./LoginWith2fa", new { ReturnUrl = returnUrl, RememberMe = Input.RememberMe });
    }
    if (result.IsLockedOut)
    {
      _logger.LogWarning("User account locked out.");
      return RedirectToPage("./Lockout");
    }
    else
    {
      ModelState.AddModelError(string.Empty, "Invalid login attempt.");
      return Page();
    }
  }

  // If we got this far, something failed, redisplay form
  return Page();
}
When the user clicks “Login” this method will get called and in his method, we have called our “reCaptchaService.cs” method to verify that the request is from a human or not. In this method, we will pass the token to our “tokenVerify(token)” method it will confirm us the user is human or a bot.
After this, we have added the condition if the result is not true and the response score from Google API is less than 0.5 considering the request is from the bot and does not allow the user to login.
I have sorted and enlisted some most important ASP.NET MVC Interview Questions according to the current market. Try to read this before any interview.
Background Information
ReCAPTCHA is a popular service created by Google that aims to protect websites and online applications from spam and abuse. It was first introduced in 2007 as a simple test that asked users to type in distorted letters or numbers displayed on a screen. This test, known as CAPTCHA, was designed to distinguish between humans and bots.
Over time, however, bots became smarter and were able to bypass the CAPTCHA test, which led to the development of reCAPTCHA. The newer version used more sophisticated algorithms to identify bots and required less user input.
There are currently three versions of reCAPTCHA available: v1, v2, and v3. While the first two versions relied on the user to complete a challenge, reCAPTCHA v3 operates in the background and provides a score based on how likely it is that the user is a human. This score is calculated using machine learning algorithms that analyze various user interactions with the website or application.
ASP.NET Core MVC is a popular web application framework developed by Microsoft that enables developers to build and deploy web applications. Integrating reCAPTCHA v3 into an ASP.NET Core MVC application can help protect it from spam and abuse, and ensure that only legitimate users are able to access the application.
Setting up reCAPTCHA v3 in ASP.NET Core MVC
Setting up reCAPTCHA v3 in an ASP.NET Core MVC application is a straightforward process that can be completed in just a few steps.
First, you’ll need to obtain your reCAPTCHA API keys from the Google reCAPTCHA website. Once you have your API keys, you’ll need to install the reCAPTCHA NuGet package into your ASP.NET Core MVC application. This package provides the necessary components to integrate reCAPTCHA v3 into your application.
Next, you’ll need to add the reCAPTCHA script to your view. This script will load the reCAPTCHA widget on the page, and allow users to interact with it. You can customize the appearance of the widget using various options, such as theme, size, and language.
Once the widget is loaded, you’ll need to add reCAPTCHA validation to your controller. This involves sending a POST request to the Google reCAPTCHA API with the user’s response token and your API keys. The API will then respond with a score, which you can use to determine whether the user is human or not.
One important thing to note is that reCAPTCHA v3 does not require the user to perform any actions, such as clicking on checkboxes or solving puzzles. Instead, the user’s behavior on the website is analyzed in the background, and a score is generated based on the likelihood that the user is human.
Customizing reCAPTCHA v3
While reCAPTCHA v3 provides a simple and effective way to protect your ASP.NET Core MVC application from spam and abuse, it also offers several customization options that allow you to tailor the user experience to your needs.
One way to customize reCAPTCHA v3 is by adjusting the score threshold. The score threshold determines the minimum score that a user must achieve in order to be considered human. By default, the score threshold is set to 0.5, but you can adjust this value to suit your specific requirements.
Another way to customize reCAPTCHA v3 is by changing the appearance of the widget. You can choose from a variety of themes, sizes, and languages to match the look and feel of your website or application. You can also use custom CSS to further customize the widget’s appearance.
In addition to appearance customization, reCAPTCHA v3 also offers localization support. This allows you to display the widget in different languages based on the user’s location or language preference. You can choose from a variety of languages, including English, Spanish, French, German, and many more.
Testing reCAPTCHA v3
Before deploying your ASP.NET Core MVC application with reCAPTCHA v3, it’s important to test the implementation to ensure that it’s working correctly. There are two ways to test reCAPTCHA v3: with a mock API response or with a live API response.
Testing with a mock API response involves creating a fake response from the Google reCAPTCHA API to simulate different scenarios, such as a user being identified as a bot or a user being identified as human. This allows you to test different scenarios and ensure that your application is handling them correctly.
To test with a mock API response, you can use the Google reCAPTCHA API documentation to generate test tokens and response data. You can then use this data to simulate different scenarios and ensure that your application is handling them correctly.
Testing with a live API response involves sending a real request to the Google reCAPTCHA API and receiving a real response. This can help ensure that your application is correctly communicating with the reCAPTCHA API and that the API is correctly identifying bots and humans.
To test with a live API response, you’ll need to temporarily disable reCAPTCHA v3 for your application’s domain. This will allow you to submit test requests without affecting your actual users. Once you’ve completed your testing, you can re-enable reCAPTCHA v3 for your domain to protect your application from spam and abuse.
Conclusion
Try this tutorial and if you do not understand anything or face any issues while applying this method. Do not hesitate to comment below. My Code Bit team will try to respond ASAP.
Happy coding!


if a user fails 0.5 score test – how they can fix that? can you promote invisible v3 captcha to a full UI challenge so the user can prove they are human after all?
Thanks for your concern and let us know about this. But normally it doesn’t happen. I will try to make a tutorial on this ASAP.