
In this post, we are going to discuss and learn how we can import Excel file with ASP.NET Core project and save the data into our database. It is very simple and easy to import Excel files in ASP.NET Core. First of all, if you have not created your project you can create your ASP.NET Core 3-tier Application following this.
Tools:
Let’s get started:
Before starting our procedure we have to create a table into our database so that we can store our read data into that table. To create a table we are using the code-first approach.
we will create a Model/Class.
public class Student
{
    public Guid Id { get; set; }
    public string Name { get; set; }
    public string Class { get; set; }
    public string Roll_No { get; set; }
}
After Creating our class we will add a reference to this class in our “ApplicationDbContext.cs” Class.
public DbSet<Student> Students { get; set; }Now Run migration.
Add-migrationNow we will update our database.
update-databaseWe have to install this NuGet Package into our project.
Install-Package ClosedXML -Version 0.95.4Our Excel file looks like this.
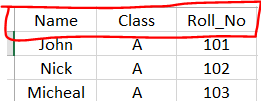
To read this file and save records into our database we will deal with rows and cells. we will show you the code example first then we will elaborate code in detail.
public async Task<ResponseViewModel<object>> UploadData(IFormFile file)
{
  try
  {
     var fileextension = Path.GetExtension(file.FileName);
     var filename = Guid.NewGuid().ToString() + fileextension;
     var filepath = Path.Combine(Directory.GetCurrentDirectory(), "wwwroot","files", filename);
     using (FileStream fs = System.IO.File.Create(filepath))
     {
          file.CopyTo(fs);
     }
     int rowno = 1;
     XLWorkbook workbook = XLWorkbook.OpenFromTemplate(filepath);
     var sheets = workbook.Worksheets.First();
     var rows = sheets.Rows().ToList();
     foreach (var row in rows)
     {
        if (rowno != 1)
        {
           var test = row.Cell(1).Value.ToString();
           if (string.IsNullOrWhiteSpace(test) || string.IsNullOrEmpty(test))
           {
              break;
           }
           Student student;
           student = _context.Students.Where(s => s.Name == row.Cell(1).Value.ToString()).FirstOrDefault();
           if (student == null)
           {
               student = new Student();
           }
           student.Name = row.Cell(1).Value.ToString();
           student.Class = row.Cell(2).Value.ToString();
           state.Roll_No = row.Cell(3).Value.ToString();
           if (student.Id == Guid.Empty)
               _context.Students.Add(student);
           else
               _context.Students.Update(student);
        }
        else
        {
           rowno = 2;
        }
     }
     _context.SaveChanges();
     return new ResponseViewModel<object>
     {
         Status = true,
         Message = "Data Updated Successfully",
         StatusCode = System.Net.HttpStatusCode.OK.ToString()
      };
 }
 catch (Exception e)
 {
    throw e;
  }
}
The above method that we have mentioned is receiving an Excel file as an argument. The method is saving the file in “wwwroot” and reading data. After reading the record we have applied foreach loop on rows. We are ignoring the first row intentionally because the first row will always be a header row. we check if there is a record that already exists in our database if it already exists we will update it and if it doesn’t we add this into our database. We have also initialized the test variable at the beginning that will break the loop when all records will be added and an empty cell will come.
Understanding Excel Files
Excel files are a ubiquitous part of the business world. They are widely used to store and manipulate data, from basic lists to complex financial models. To be able to import Excel files with ASP.NET Core, it’s important to have a good understanding of what Excel files are and how they are structured.
Excel files are essentially a collection of worksheets that are organized into a workbook. Each worksheet is made up of rows and columns, with each cell containing a piece of data. The rows are numbered and the columns are lettered, with the combination of the two creating a unique cell reference.
Excel files come in a variety of file extensions, including .xls, .xlsx, and .xlsm. The older .xls format was replaced by the newer .xlsx format in Excel 2007. The newer format uses XML-based file format which makes it more efficient and easier to work with. The .xlsm format is similar to .xlsx, but allows for macros to be stored in the file.
It’s important to understand the structure of Excel files in order to import them effectively. When importing an Excel file, it’s necessary to know which worksheet(s) and cell(s) contain the data that needs to be imported. It’s also important to know the format of the data, such as whether it’s text, numeric, or a date.
In addition to the basic structure of Excel files, it’s important to understand any special features that may be included in the file. For example, an Excel file may contain formulas, charts, or conditional formatting. These features can be useful when analyzing the data in Excel, but may need to be handled differently when importing the data into another application.
Setting up the Project
Now that we have a good understanding of Excel files, we can move on to setting up the ASP.NET Core project to import them. Setting up the project involves a few steps, but it’s relatively straightforward.
The first step is to create a new ASP.NET Core project in Visual Studio. This can be done by selecting “File” -> “New” -> “Project” and then selecting “ASP.NET Core Web Application”. Choose a suitable name and location for the project, and then click “Create”.
Once the project is created, we need to add the necessary dependencies for importing Excel files. One commonly used library for working with Excel files is the EPPlus library. This library allows us to read and write Excel files using C#. To add the EPPlus library to the project, we can use the NuGet Package Manager in Visual Studio. Simply right-click on the project in the Solution Explorer, select “Manage NuGet Packages”, and then search for “EPPlus”. Click “Install” to add the library to the project.
With the EPPlus library added to the project, we can now start working with Excel files. One important thing to note is that EPPlus requires that the Excel file be saved in the newer .xlsx format. If you are working with an older .xls file, you will need to convert it to the newer format before importing it.
Once the project is set up and the necessary dependencies are added, we can start importing Excel files. The next step is to write the code that will read the data from the Excel file and store it in the application’s database or use it in some other way.
Best Practices
When importing Excel files with ASP.NET Core, there are several best practices that can help ensure that the process runs smoothly and efficiently. In this section, we’ll discuss some of these best practices.
Validating Data
Before importing data from an Excel file, it’s important to validate the data to ensure that it meets the requirements of the application. For example, if the application requires a certain format for dates, it’s important to ensure that the dates in the Excel file are formatted correctly. If the data is not validated, it can cause errors or inconsistencies in the application’s database.
Optimizing the Import Process
Importing large Excel files can be a slow process, especially if the file contains a lot of data. To optimize the import process, it’s important to use techniques such as parallel processing or batch processing. This can help speed up the import process and reduce the amount of time it takes to import the data.
Handling Errors
When importing Excel files, errors can occur for a variety of reasons. For example, the data in the file may be formatted incorrectly, or there may be missing or invalid data. To handle these errors, it’s important to have a robust error handling system in place. This can include logging errors, displaying error messages to the user, or rolling back the import process if an error occurs.
Testing and Debugging
As with any software development project, testing and debugging are essential when importing Excel files with ASP.NET Core. It’s important to test the import process with a variety of different Excel files to ensure that it works correctly under different conditions. Debugging tools such as breakpoints and logging can be useful for identifying and fixing errors in the code.
Security
Importing Excel files can pose a security risk if not done properly. It’s important to ensure that the Excel file is coming from a trusted source and that the data is validated and sanitized to prevent SQL injection attacks or other security vulnerabilities.
Understanding Excel Files
Excel files are a fundamental part of data analysis and management, and being able to import them with ASP.NET Core can be a useful tool for businesses. In this section, we will explore the different aspects of Excel files that need to be understood to import them with ASP.NET Core effectively.
Excel File Structure
Excel files are made up of a collection of worksheets, which are organized into a workbook. Each worksheet consists of rows and columns, with each cell containing a piece of data. The combination of the row number and column letter creates a unique cell reference.
It’s essential to understand the structure of Excel files to import them effectively. When importing an Excel file, it’s necessary to identify which worksheet(s) and cell(s) contain the data that needs to be imported. Understanding the format of the data, whether it’s text, numeric, or a date, is also critical.
File Extensions
Excel files have several file extensions, including .xls, .xlsx, and .xlsm. The older .xls format was replaced by the newer .xlsx format in Excel 2007. The newer format uses XML-based file format, which makes it more efficient and easier to work with. The .xlsm format is similar to .xlsx but allows for macros to be stored in the file.
Understanding the different file extensions is essential when importing Excel files with ASP.NET Core. The EPPlus library, for instance, requires the file to be saved in the newer .xlsx format.
Special Features
Excel files can contain special features like formulas, charts, and conditional formatting. These features can be useful when analyzing data in Excel, but they need to be handled differently when importing data into another application.
For example, if a formula is used to calculate a value in an Excel file, the calculated value may not be visible in the cell. It’s important to understand these special features to ensure that the data is imported correctly.
Converting Older Excel Files
If you’re working with an older .xls file, it will need to be converted to the newer .xlsx format before it can be imported into an ASP.NET Core application. Converting the file can be done in Excel by selecting “Save As” and choosing the .xlsx format.
Conclusion
Try this tutorial “How to import Excel file with ASP.NET Core” and if you do not understand anything or face any issue while applying this method. Do not hesitate to comment below. My Code Bit team will try to respond ASAP.
See Also:
Send Emails in ASP.NET Core 5 Using Gmail API
What Is File Size Upload Limit In NFT Minting? Solution
Email Confirmation with ASP.NET Core Identity


