
In this Asp.Net Core Multi-tier Project. You will Learn How to configure identity ASP.NET Core manually using the code-first approach in Entity Framework Core. We will create a database, and build Identity in MS SQL while running the migration.
What is Identity ASP.NET Core?
In Asp.Net, Core Identity is a set of libraries that provides simple authentication and authorization to web apps and web APIs.
What is Entity Framework Core?
Entity Framework Core is the latest object-relational Database mapper. I’m not going deep into what is object-relational. It simplifies the data manipulation into our Database using simple LINQ queries by using entities as an object.
Tools:
- Windows OS
- Visual Studio Community 2019
- MS SQL Management System
Now Let’s Get started with our project:
In this project, we are going to use the MS SQL database. If you have not read my previous post about setting a project Asp.Net Core 3-tier Project, click on this and set up your project as we did.
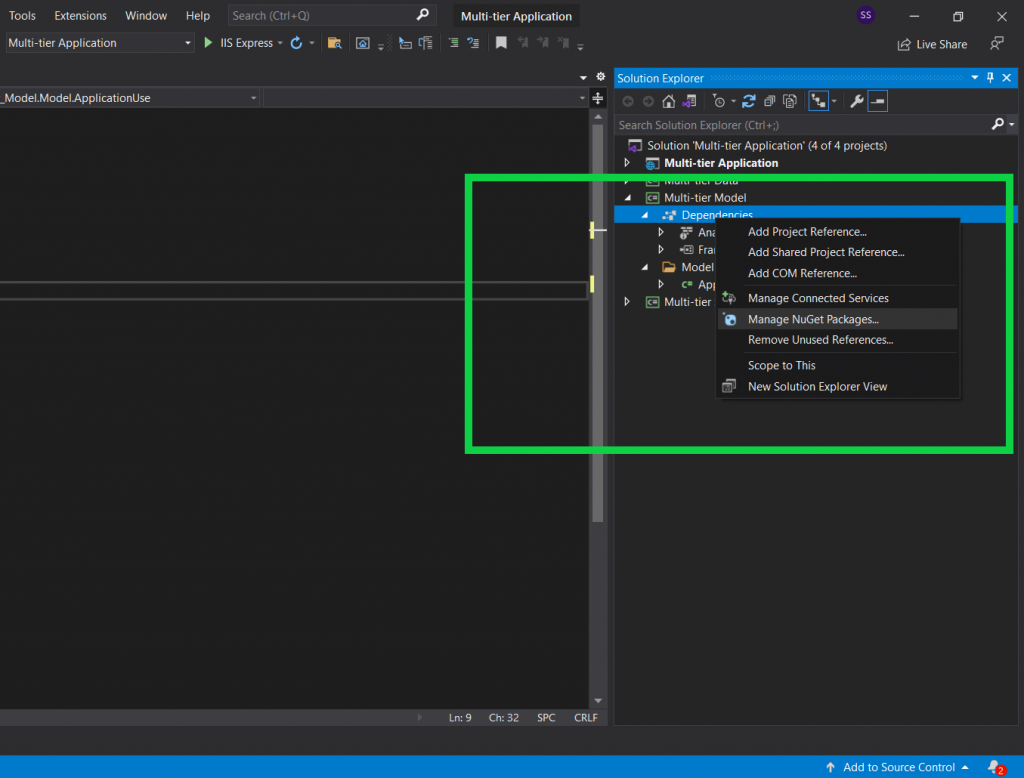
Right Click on Model project Dependencies and click on Manage NuGet Packages.
First Install Required Packages into the Model Section:
- Microsoft.Extensions.Identity.Stores
Now Add Classes into your Model Project:
Open your Model Project and write click on it select add Class and

Now Create a Class for “ApplicationUser” and drive it from “IdentityUser.”
using Microsoft.AspNetCore.Identity;
using System;
using System.Collections.Generic;
using System.Linq;
using System.Text;
using System.Threading.Tasks;

namespace Multi_tier_Model.Model
{
    public class ApplicationUser: IdentityUser<Guid>
    {

    }
}
And now Create another Class for “ApplicationRole” and drive it from “IdentityRole.”
using Microsoft.AspNetCore.Identity;
using System;
using System.Collections.Generic;
using System.Linq;
using System.Text;
using System.Threading.Tasks;

namespace Multi_tier_Model.Model
{
    public class ApplicationRole : IdentityRole<Guid>
    {
    }
}
Now Add NuGet Packages into your Data Section:
- Microsoft.AspNetCore.Identity.EntityFrameworkCore
- Microsoft.EntityFrameworkCore
- Microsoft.EntityFrameworkCore.SqlServer
Now right-click on Data project and Add a folder, and name it Data.

Add a class in this folder and name it “ApplicationDbContext.”
using Microsoft.AspNet.Identity.EntityFramework;
using Microsoft.AspNetCore.Identity.EntityFrameworkCore;
using Microsoft.EntityFrameworkCore;
using Multi_tier_Model.Model;
using System;
using System.Collections.Generic;
using System.Linq;
using System.Text;
using System.Threading.Tasks;

namespace Multi_tier_Data.Data
{
    public class ApplicationDbContext: IdentityDbContext<ApplicationUser, ApplicationRole,Guid>
    {
        public ApplicationDbContext(DbContextOptions<ApplicationDbContext> options
          ) : base(options)
        {

        }
    }
}
And now Configure Identity and ApplicationDbContext Class into your main API Project Startup Class
//configuring Dbcontext
services.AddDbContext<ApplicationDbContext>(options =>
         options.UseSqlServer(
         Configuration.GetConnectionString("DefaultConnection")));
            //configuring Identity
services.AddIdentity<ApplicationUser, ApplicationRole>(config =>
            {
         config.SignIn.RequireConfirmedAccount = false;
         config.User.RequireUniqueEmail = true;

}).AddDefaultTokenProviders().AddEntityFrameworkStores<ApplicationDbContext>();
Add these Packages into your Main API Project:
- Microsoft.AspNetCore.Identity.EntityFrameworkCore
- Microsoft.EntityFrameworkCore
- Microsoft.EntityFrameworkCore.SqlServer
- Microsoft.EntityFrameworkCore.Tools
Now our “Startup.cs” class look like this:
using Microsoft.AspNetCore.Builder;
using Microsoft.AspNetCore.Hosting;
using Microsoft.AspNetCore.HttpsPolicy;
using Microsoft.AspNetCore.Identity;
using Microsoft.AspNetCore.Mvc;
using Microsoft.EntityFrameworkCore;
using Microsoft.Extensions.Configuration;
using Microsoft.Extensions.DependencyInjection;
using Microsoft.Extensions.Hosting;
using Microsoft.Extensions.Logging;
using Microsoft.OpenApi.Models;
using Multi_tier_Data.Data;
using Multi_tier_Model.Model;
using System;
using System.Collections.Generic;
using System.Linq;
using System.Threading.Tasks;

namespace Multi_tier_Application
{
    public class Startup
    {
        public Startup(IConfiguration configuration)
        {
            Configuration = configuration;
        }

        public IConfiguration Configuration { get; }

        // This method gets called by the runtime. Use this method to add services to the container.
        public void ConfigureServices(IServiceCollection services)
        {

            services.AddControllers();
            services.AddSwaggerGen(c =>
            {
                c.SwaggerDoc("v1", new OpenApiInfo { Title = "Multi_tier_Application", Version = "v1" });
            });

            //configuring Dbcontext
            services.AddDbContext<ApplicationDbContext>(options =>
                    options.UseSqlServer(
                        Configuration.GetConnectionString("DefaultConnection")));

            //configuring Identity
            services.AddIdentity<ApplicationUser, ApplicationRole>(config =>
            {
                config.SignIn.RequireConfirmedAccount = false;
                config.User.RequireUniqueEmail = true;

            }).AddDefaultTokenProviders().AddEntityFrameworkStores<ApplicationDbContext>();
        }
        // This method gets called by the runtime. Use this method to configure the HTTP request pipeline.
        public void Configure(IApplicationBuilder app, IWebHostEnvironment env)
        {
            if (env.IsDevelopment())
            {
                app.UseDeveloperExceptionPage();
                app.UseSwagger();
                app.UseSwaggerUI(c => c.SwaggerEndpoint("/swagger/v1/swagger.json", "Multi_tier_Application v1"));
            }
            app.UseHttpsRedirection();
            app.UseRouting();
            app.UseAuthorization();
            app.UseEndpoints(endpoints =>
            {
                endpoints.MapControllers();
            });
        }
    }
}
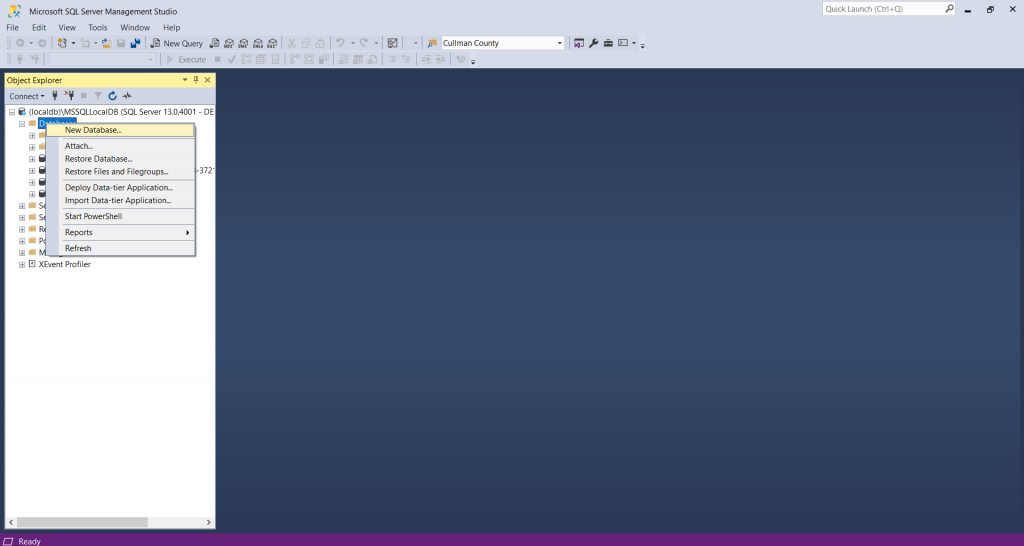
Now create an empty Database like this in your MS SQL Management Studio.
Add “ConnectionString” into your “AppSetting.Json” Class.
"ConnectionStrings": {
    "DefaultConnection": "Server=(localdb)\\mssqllocaldb;Database= multi-tier;Trusted_Connection=True;MultipleActiveResultSets=true"
  },
After Adding ConnectionString, your “Appsetting.Json” will look like
{
  "ConnectionStrings": {
    "DefaultConnection": "Server=(localdb)\\mssqllocaldb;Database= multi-tier;Trusted_Connection=True;MultipleActiveResultSets=true"
  },
  "Logging": {
    "LogLevel": {
      "Default": "Information",
      "Microsoft": "Warning",
      "Microsoft.Hosting.Lifetime": "Information"
    }
  },
  "AllowedHosts": "*"
}
Now run the migration to create Identity Tables into your database
Open package Manager Console by below steps
Click Tools -> Nuget Package Manager -> Package Manager Console

Select Data Project

And run this command to add migration to your project.
Add-migration initialNow update your database by running this command
Update-databaseAfter Successful completion, your database looks like this

Now you can see that the Identity Created its table by running migration using the code-first approach. I have also written a complete tutorial on Login and Registration Using Identity ASP.NET Core to make things easier for beginners.


