Avalanche (Avax) users can enjoy Ethereum Web3 and DeFi applications by connecting to MetaMask. Here are step-by-step instructions for how to connect Avalanche network to Metamask network.
One of the advanced attributes in blockchain technology is the interoperability of different blockchains communicating with each other. Interoperability is crucial when exchanging data and assets such as non-fungible tokens (NFTs) or cryptocurrencies while enjoying the best of two or more platforms to save money. fee savings, such as or faster transactions.
The Avalanche blockchain is a flexible, interoperable cryptocurrency network and platform that solves scalability, security, and decentralization issues with a single type of proof-of-stake (PoS) governance. . It was developed by Ava Labs, a research and development company based in New York, to launch enterprise blockchain applications and decentralized finance (DeFi).
Avalanche is powered by its native token – AVAX has smart contract functionality that puts it in direct competition with Ethereum. The smart contracts of the PoS platform mainly support decentralized applications (Dapps) and self-governing blockchains with fast transaction processing times, a reward structure that incentivizes participation, and interoperability. enhancement work.
Avalanche’s interaction with Ethereum and its DeFi ecosystems is supported by the MetaMask cryptocurrency wallet, a software that has 10 million users. It can be downloaded as a browser extension on Chrome and Firefox, or as an iOS and Android mobile phone app. Before interacting with the Ethereum blockchain and Dapp, users need to add the Avalanche network to their MetaMask wallet and this tutorial will show them how.
How to set up MetaMask?
MetaMask is a cryptocurrency wallet that allows users to connect to Dapps in addition to storing Ether and ERC-20 tokens. Connecting MetaMask to Avalanche allows AVAX users to enjoy all the dapps Ethereum has to offer without leaving the Avalanche network. Avalanche’s interoperability also makes the network more accessible for developers to build on as it shares a smart contract programming language, Solidity, with Ethereum.
It should be noted that there are three blockchains on the Avalanche network: Exchange Chain (X-Chain), Contract Chain (C-Chain), and Platform Chain (P-Chain).
The main use of Avalanche X-chain is to send and receive AVAX and cannot be used on the Web3 platform or added to a Web3 wallet like MetaMask. P-Chain is the metadata blockchain on Avalanche that coordinates validators, keeps track of active subnets – sovereign networks that define their own rules for membership and tokens – and allows the creation of new subnets.
Only Avalanche’s default smart contract C-Chain wallet is compatible with MetaMask, an essential piece of information to keep in mind because if you choose the wrong chain when adding Avalanche to MetaMask, you may lose your funds.
Therefore, to transfer AVAX from the Avalanche wallet, the user’s tokens need to be in the C-Chain wallet or use an exchange wallet integrated with C-Chain, such as Binance. If the token is not in the C-Chain, it can easily be transferred internally from any of the other two Avalanche blockchains by paying a small transaction fee.
MetaMask can be added as an extension for Chrome, Firefox, Opera, Brave and iOS or Android browsers on mobile devices from the MetaMask website; however, for the purposes of this article, a Chrome extension will be considered.
Users must verify the legitimacy of the MetaMask website to avoid being scammed by phishing and compromised websites. We recommend downloading the appropriate extension from the official website.
From the MetaMask website, click “Download for Chrome” and “Add to Chrome” to add the extension. The next steps are listed below:
- Install the MetaMask Chrome extension and click “Get Started” on the MetaMask welcome page.
- You can enter your existing crypto wallet, but you will need to enter the wallet initialization phrase; then click on the option “Import wallet.
- You can also set up a new wallet by clicking the “Create Wallet” button. Here, you must create a secure password to access the wallet from your device.
- The necessary information about your seed phrase will be displayed on the next page and you will have to pay special attention to it. A seed phrase or recovery phrase is an important security feature and a backup for your crypto wallet. It will allow you to access your wallet with tokens even if you lose or forget your password.
- Next, click the lock button to see the seed phrase. Take notes of words in the correct order, store them securely offline, and never share them with anyone. Your assets could be at risk if someone compromises your device and gains access to your root passphrase.
- The system will ask you to repeat the seed phrase on the next page; Make sure you choose the words in the correct order.
- Click “Confirm” to finish and then click “All Done” to access your new wallet.
The process described above will automatically connect MetaMask to Ethereum. However, you must complete the steps marked below to add the Avalanche network to MetaMask.
So, How to Connect Avalanche Network to MetaMask in Details?
Connecting MetaMask to Avalanche is a fairly straightforward process. Once you are logged in to the MetaMask wallet, click on the Ethereum mainnet drop-down menu and select Custom RPC, as shown below.
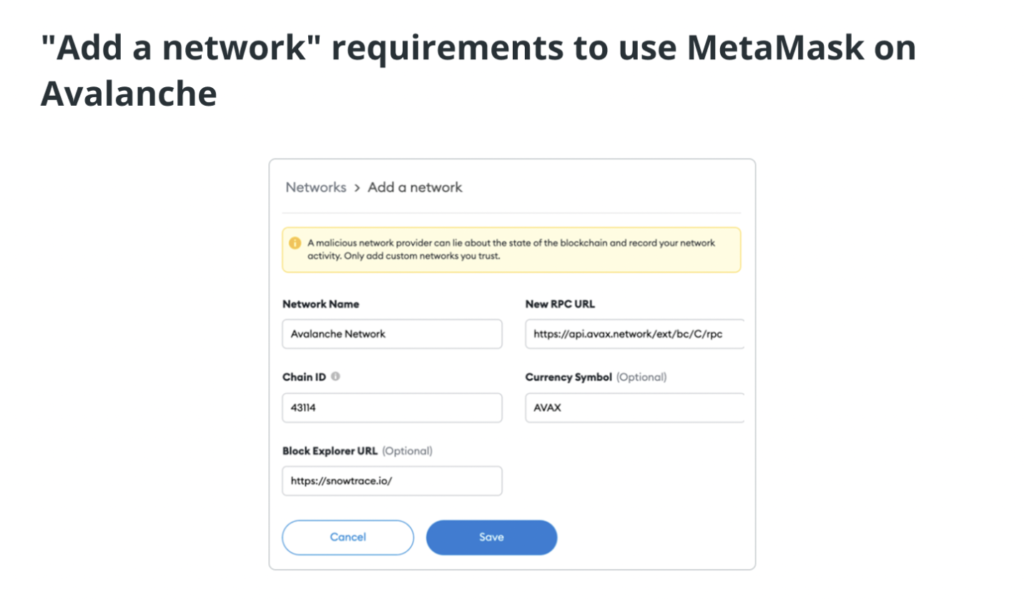
You will be redirected to the “Add Network” page, where you need to add the following information:
- Network name: Avalanche
- New RPC URL: https://api.avax.network/ext/bc/C/rpc
- ChainID: 43114
- Symbol: AVAX
- Explorer: https://snowtrace.io/
You can see the “Add a network” requirements for using MetaMask on Avalanche here:
Click “Save” to complete the process. You are now ready to use MetaMask on Avalanche and all its DeFi and Web3 applications.
How to send AVAX tokens to MetaMask?
- After connecting the Avalanche network to MetaMask, you can send AVAX coins from your Avalanche wallet to your MetaMask wallet. Remember that only C-Chain is compatible with MetaMask.
- Login to your Avalanche wallet and transfer your tokens to the C-Chain blockchain if they are on the P- or X-Chain blockchain.
- Simply click on “Cross Chain” on the left menu bar and select “C-Chain” as the destination chain.
Enter the amount you want to transfer and click “Confirm”. A small transaction fee will be added to the final amount. - You can now send AVAX funds to MetaMask by clicking “Send” from the left menu.
- Select “C Contract” as the source string and enter the amount you want to send to MetaMask.
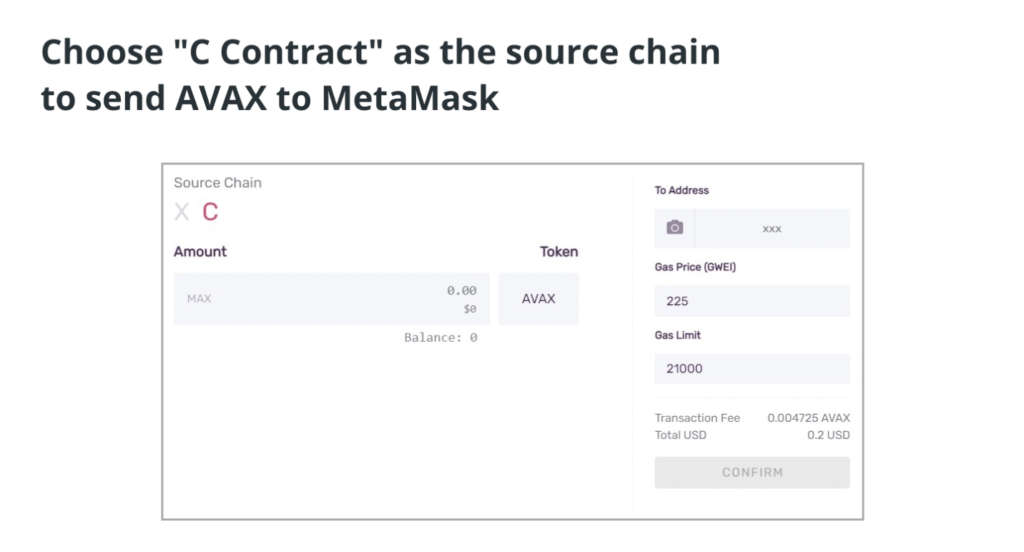
- Now, go to your MetaMask wallet and copy the address that you will paste into the Avalanche wallet under “To Address”.
- Check if you have enough gas for transaction fees.
Confirm and complete the transaction.
Once the transaction is confirmed, you will be able to view the AVAX coins in your MetaMask wallet.
What other Wallets Are Avalanche Compatible?
MetaMask is definitely a flexible DeFi wallet for running smart contracts and Dapps. However, AVAX can be transferred, stored, staking and exchanged in other cold and hot wallets. With over 90 million verified users worldwide, Coinbase wallet is a secure and easy-to-use hot wallet to exchange, earn, and store AVAX. The enhanced security through the software’s two-factor authentication makes it a safe wallet to use for both beginners and advanced users.
Trust Wallet is another hot wallet that supports all DeFi schemes, including NFT storage, Web3 capabilities, staking, swaps and purchases. It supports Avalanche C-Chain along with many other blockchains so that Dapps can be connected to AVAX easily. This hot wallet is one of the most used wallets among Web3 enthusiasts because of its user-friendly interface and flexibility.
The Ledger Nano S or X cold wallet both support Avalanche and users can access and store their AVAX tokens through all Avalanche chain addresses. Cold wallets are recommended over hot wallets, as the private keys for accessing cryptocurrencies are stored offline in a hardware device, making it difficult for hackers and malicious actors to steal them.
Transferring Funds between Avalanche and Metamask
When using Avalanche Network in conjunction with Metamask, one of the key functionalities you’ll want to master is the ability to transfer funds between the two platforms. This will enable you to seamlessly manage your assets and engage in various activities within the Avalanche ecosystem. Here’s a detailed guide on how to transfer funds between Avalanche and Metamask.
Sending funds from Avalanche to Metamask
To send funds from your Avalanche wallet to your Metamask wallet, follow these steps:
- Access your Avalanche wallet: Launch your Avalanche wallet application or connect to your preferred Avalanche wallet interface.
- Obtain the recipient address: In Metamask, locate your Ethereum address by clicking on your account icon and selecting “Copy Address to Clipboard.” Ensure that you have the correct address for your Metamask wallet.
- Enter the recipient address: In your Avalanche wallet, find the option to send funds or initiate a transaction. Paste the copied Metamask address as the recipient of the funds.
- Specify the amount: Enter the desired amount of funds you wish to transfer from Avalanche to Metamask. Ensure that you have enough balance in your Avalanche wallet to cover the transaction fees as well.
- Review and confirm: Carefully review the transaction details, including the recipient address and the amount of funds to be sent. Once you’ve verified the information, confirm the transaction.
- Wait for confirmation: After confirming the transaction, you’ll need to wait for it to be processed and confirmed by the Avalanche network. The time required for confirmation can vary based on network congestion.
- Check Metamask for funds: Once the transaction is confirmed on the Avalanche network, open your Metamask wallet in your browser extension. You should see the transferred funds reflected in your Metamask balance.
Sending funds from Metamask to Avalanche
To send funds from your Metamask wallet to your Avalanche wallet, follow these steps:
- Open your Metamask wallet: Ensure that you have the Metamask browser extension installed and connected to your desired network.
- Access your account: Click on the Metamask extension icon and enter your wallet password or use your preferred authentication method to access your account.
- Obtain the recipient address: In your Avalanche wallet, locate your Avalanche address by navigating to the appropriate section or generating a new address if needed. Copy the Avalanche address to your clipboard.
- Initiate the transaction: In Metamask, click on the “Send” button and paste the copied Avalanche address as the recipient of the funds.
- Specify the amount and token type: Enter the desired amount of funds you wish to transfer from Metamask to Avalanche. Additionally, select the correct token type if you’re transferring a specific asset.
- Review and confirm: Double-check the transaction details, including the recipient address, amount, and token type. Confirm the transaction once you’re certain the information is accurate.
- Approve and confirm the transaction: Metamask will prompt you to approve the transaction and confirm it using your preferred authentication method. Follow the necessary steps to authorize the transaction.
- Wait for confirmation: After confirming the transaction, you’ll need to wait for it to be processed and confirmed on the Ethereum network. The time required for confirmation can vary based on network congestion.
- Check Avalanche wallet for funds: Once the transaction is confirmed on the Ethereum network, access your Avalanche wallet and verify that the transferred funds are reflected in your balance.
Interacting with Avalanche DApps using Metamask
Avalanche Network offers a vibrant ecosystem of decentralized applications (DApps) that can be accessed and utilized through Metamask. Interacting with Avalanche DApps using Metamask provides you with the ability to participate in various activities such as decentralized finance (DeFi), gaming, NFTs, and more. Here’s a detailed guide on how to engage with Avalanche DApps using Metamask.
Browsing Avalanche-compatible DApps
- Research Avalanche DApps: Explore the Avalanche ecosystem and discover the wide range of DApps available. Visit websites, forums, and social media platforms dedicated to Avalanche to stay updated on the latest DApp releases.
- Verify compatibility: Ensure that the DApps you intend to use are compatible with Avalanche Network. Look for information or documentation that explicitly states their support for Avalanche or consult community resources for recommendations.
- Visit DApp platforms: Access DApp platforms that curate and showcase Avalanche-compatible applications. Examples include the Avalanche DApp Directory, community-driven lists, or platforms specifically built for Avalanche DApps.
Authorizing DApps to access Metamask
- Install Metamask: Ensure you have the Metamask browser extension installed and properly set up in your web browser.
- Access the DApp: Navigate to the desired Avalanche DApp website or platform using your web browser.
- Connect Metamask: Once on the DApp website, look for a button or prompt to connect your Metamask wallet. Usually, this is located in the top right corner or somewhere prominently visible on the page.
- Grant permission: Metamask will display a pop-up window asking for permission to connect to the DApp. Review the requested permissions and click “Connect” to authorize the connection.
- Confirm connection: After granting permission, the DApp should detect and connect to your Metamask wallet automatically. You may need to confirm the connection within Metamask by clicking “Connect” or “Authorize” on the Metamask pop-up.
Performing transactions and operations on DApps using Metamask
- Select the desired function: Once connected to a DApp, explore its features and functionalities. Choose the specific actions you want to perform, such as trading tokens, providing liquidity, borrowing, lending, or participating in NFT marketplaces.
- Confirm transaction details: Before executing any transaction, review the details thoroughly. Pay attention to the assets involved, quantities, fees, and any additional information specific to the DApp.
- Approve transactions: Some DApps require you to approve specific token transfers or interactions before proceeding with the main transaction. Metamask will prompt you to approve these transactions. Review the details and click “Approve” to proceed.
- Confirm and sign transactions: After approving any necessary transactions, proceed with the final confirmation. Metamask will display a pop-up window containing the transaction details. Verify the information and click “Confirm” or “Sign” to execute the transaction.
- Monitor transaction progress: Once the transaction is initiated, you can monitor its progress on the Avalanche blockchain. Metamask will provide a link to a block explorer where you can view the transaction status, including confirmations and completion.
- Interact further with the DApp: Once the transaction is confirmed, you can continue interacting with the DApp, whether it’s accessing new features, managing your assets, or exploring additional functionalities.
Security Considerations
When connecting Avalanche Network to Metamask, it’s crucial to prioritize the security of your assets and personal information. By following essential security practices, you can protect yourself from potential risks and ensure a safe and worry-free experience. Here are some important security considerations to keep in mind:
Ensuring the safety of private keys and seed phrases
- Safeguard your private keys: Private keys grant access to your wallet and funds. Keep them secure by storing them in encrypted digital wallets or using hardware wallets, which provide an extra layer of protection.
- Protect your seed phrase: The seed phrase acts as a backup for your wallet and should be kept offline in a secure location. Never share your seed phrase with anyone and be cautious of phishing attempts that may try to trick you into revealing it.
- Be cautious with digital storage: If you choose to store your private keys or seed phrase digitally, use encrypted storage options like password-protected files or password managers. Regularly update and secure your devices with strong passwords and reputable security software.
Verifying network connections and avoiding phishing attempts
- Double-check URLs: Ensure you are accessing legitimate websites and DApps by carefully examining the URL. Avoid clicking on suspicious links and bookmark trusted sources for easy access.
- Be cautious of phishing attempts: Exercise caution when interacting with online platforms. Be wary of unsolicited messages, emails, or social media posts that request your wallet information or seed phrase. Legitimate entities will never ask for sensitive information in this manner.
- Utilize browser extensions: Install reputable browser extensions that provide additional security features, such as blocking malicious websites or warning against potential phishing attacks.
Using hardware wallets for enhanced security
- Consider using hardware wallets: Hardware wallets, such as Ledger or Trezor, provide an extra layer of security by storing your private keys offline. They are designed to protect your assets even when connected to potentially compromised devices.
- Follow hardware wallet setup instructions: When setting up a hardware wallet, carefully follow the provided instructions to ensure the device is genuine and untampered. Always purchase hardware wallets from trusted sources.
- Verify transaction details: Hardware wallets have built-in screens that display transaction details. Review and confirm these details on the device before approving any transactions, ensuring they match your intended actions.
It’s essential to remain vigilant and proactive when it comes to security considerations while connecting Avalanche Network to Metamask. By implementing these practices, you can safeguard your funds, personal information, and maintain a secure environment for your digital assets. Stay informed about the latest security measures and developments in the cryptocurrency space to ensure the ongoing protection of your investments.
Troubleshooting and FAQs
As you connect Avalanche Network to Metamask, you may encounter some common issues or have questions regarding the process. In this section, we’ll address potential troubleshooting scenarios and provide answers to frequently asked questions to assist you in resolving any challenges you may face.
Common issues and their solutions when connecting Avalanche Network to Metamask
- Issue: Metamask doesn’t display the Avalanche Network option. Solution:
- Ensure you have the latest version of Metamask installed.
- Manually add the Avalanche Network by accessing Metamask settings and entering the appropriate network details, including Chain ID, RPC URL, Symbol, and Block Explorer URL.
- Issue: Funds aren’t displaying in Metamask after transferring from Avalanche. Solution:
- Confirm that the transaction is confirmed on the Avalanche network by checking the transaction status on a block explorer.
- Try refreshing your Metamask wallet by clicking on the account icon and selecting “Refresh” to update the balance.
- If the issue persists, double-check the recipient address used during the transfer and ensure it matches your Metamask address.
- Issue: Error messages during transactions on Avalanche DApps. Solution:
- Check if you have sufficient funds to cover transaction fees and any required token balances.
- Ensure that you have approved the necessary token transfers within Metamask before proceeding with the transaction.
- Confirm that the DApp you’re using is compatible with Avalanche Network and doesn’t have any known issues or maintenance periods.
Frequently asked questions related to the connection process
Can I use the same Metamask wallet for both Ethereum and Avalanche?
Yes, Metamask allows you to connect to different networks, including both Ethereum and Avalanche. You can switch between networks within Metamask to manage your assets accordingly.
Are there any fees associated with transferring funds between Avalanche and Metamask?
Yes, transferring funds between Avalanche and Metamask will incur transaction fees on the respective networks. These fees vary based on network congestion and the type of transaction you’re performing.
Can I connect multiple Avalanche wallets to a single Metamask account?
No, Metamask currently supports one active wallet connection per network. If you have multiple Avalanche wallets, you would need to switch between them within Metamask by adding and removing the desired wallets.
What should I do if I forget my Metamask password or lose access to my wallet?
If you forget your Metamask password or lose access to your wallet, you can recover it using the seed phrase. Ensure you have securely stored your seed phrase as it serves as a backup to restore your wallet. Follow the instructions provided by Metamask for wallet recovery.
How can I ensure the security of my transactions when interacting with Avalanche DApps?
To enhance transaction security, verify the authenticity of the DApp website, double-check transaction details before confirming, and utilize hardware wallets for an extra layer of protection. Additionally, follow best practices for securing your private keys and seed phrases.
Conclusion
Above is our tutorial to connect Avalanche Network to Metamask. Hopefully, after this article, you can understand this method well and have a good choice for your long-term crypto investment. Wish you all success and see you in the next guides at our site.