
If your device has memory issues, you can find out using this Windows 11 built-in memory diagnostic tool.
If your device has memory issues, you can find out using this Windows 11 built-in memory diagnostic tool.
On Windows 11, if the computer slows down and the applications hang or the system encounters random blue screen of death errors, crashes or reboots, the first thing you should check is the memory to remove the problem. try with any module. This is not only because memory issues can make the device unstable but also because it can cause data corruption and other errors.
If you suspect a system memory related problem, you can use the Windows Memory Diagnostic Tool, a legacy tool that can perform a variety of tests to check your computer’s RAM (Random Access Memory), via That can determine if one or more memory models have a problem.
In this tutorial, I will guide you through the steps of using the Windows Memory Diagnostic Tool to determine if there is a faulty memory module on your computer.
What are RAM errors?
RAM errors occur when there are problems with the data stored in the RAM. There are different types of RAM errors, such as soft errors, hard errors, and intermittent errors. Soft errors are temporary errors that occur when the electrical charge of a memory cell changes due to external factors such as cosmic rays, electrical interference, or heat. These errors can be corrected by the computer system automatically. Hard errors, on the other hand, are permanent and occur when the physical memory chip or module is damaged. These errors cannot be fixed and require the replacement of the faulty hardware component.
Symptoms of RAM errors can vary depending on the type and severity of the error. Common symptoms include system crashes, blue screen of death (BSOD), frequent program crashes, slow performance, and data corruption. In some cases, you may also see error messages that indicate problems with memory, such as “Memory Management Error” or “Bad Pool Header.”
RAM errors can significantly impact the performance of your Windows 11 computer. If you notice any of the symptoms mentioned above, it’s essential to diagnose the problem and fix it as soon as possible.
In addition to affecting your computer’s performance, RAM errors can also lead to data loss and system crashes. If a RAM error corrupts critical system files or data, you may lose access to them permanently. Therefore, it’s crucial to diagnose RAM errors and fix them promptly to prevent any significant issues.
Why diagnosing RAM errors is important
RAM errors can have severe consequences if not addressed promptly. Here are some of the reasons why diagnosing RAM errors is crucial:
- RAM errors can lead to system crashes and data loss: When a RAM error corrupts critical system files or data, you may lose access to them permanently. In some cases, the entire system can crash, leading to data loss and significant inconvenience.
- The impact of RAM errors on productivity: If your computer is running slow or experiencing frequent crashes, it can significantly impact your productivity. RAM errors can cause your computer to take longer to complete tasks or prevent you from completing them altogether.
- How diagnosing RAM errors can prevent future problems: Diagnosing and fixing RAM errors promptly can prevent future problems from occurring. It can help identify any hardware issues that need to be addressed, preventing further damage to your system.
How to use Windows Memory Diagnostic Tool on Windows 11
To access Windows Memory Diagnostic Tool on Windows 11, follow these steps:
Step 1: Access the Start menu, enter Windows Tools in the search box above, then click the corresponding search result displayed at the top.

Step 2: In the Windows Tools window that appears, double-click the Windows Memory Diagnostic Tool option to activate this tool.
Or you can also press the Windows + R key combination to access the Run utility. Then, enter mdsched.exe in the Open box and click the OK button.

Step 3: You will see the Windows Memory Diagnostic Tool window displayed with two options:
Restart now and check for problems (Recommended): Select this option if you want to restart your computer and fix memory related problems immediately.
Check for problems the next time I start my computer: Click this option to schedule the Windows Memory Diagnostic Tool to run the next time the computer boots.
Basically, no matter which option you choose, when the computer restarts, Windows Memory Diagnostic Tool will automatically start scanning the system for memory related problems in Standard mode. In this mode the Windows memory diagnostic tool will run all scans available in Basic mode with LRAND, Stride6 (cache enabled), CHCKR3, WMATS+ and WINVC tests.
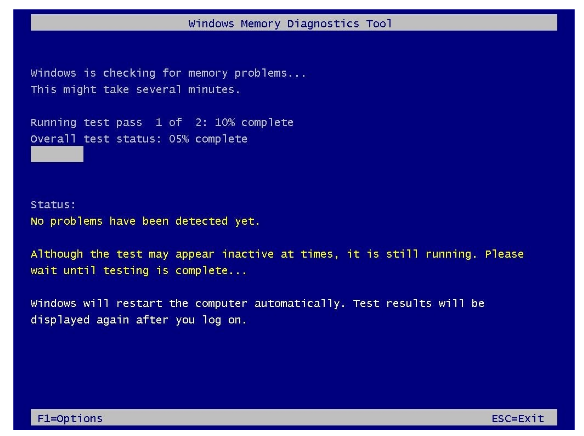
Standard test mode is basically enough to diagnose and find problems with system memory (if any), but you can also use the F1 key to open the Windows Memory Diagnostic page to change the scan options.

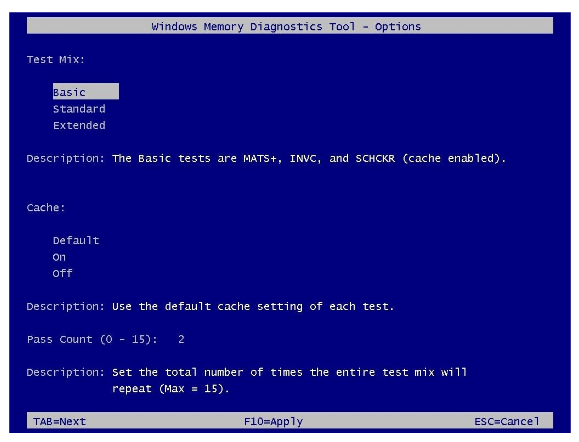
On the settings page you will find options to change the scan mode to Basic, which will run the MATS+, INVC and SCHCKR (cache enabled) tests.
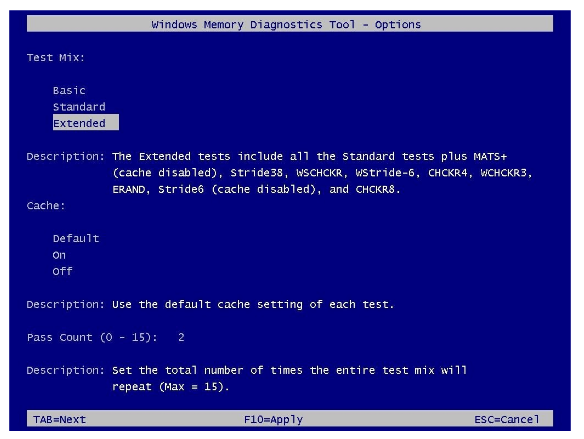
Extended mode performs multiple tests using Standard and MATS+ (cache disabled), Stride38, WSCHCKR, WStride-6, CHCKR4, WCHCKR3, ERAND, Stride6 (cache disabled) and CHCKR8 modes.
You can also use the Tab key to change the cache settings in Windows Memory Diagnostic. If the cache is disabled, Windows Memory Diagnostic will not allow the tool to directly access the data in RAM for a complete test. In addition, you can also specify how long the scan should be repeated to check the system’s memory modules.
Finally, press the F10 key to return to the main page and the scan will automatically start on the computer or Esc to go back and cancel the changes.
How to check memory diagnostic results
After the test is complete, the computer will restart and reload Windows 11. If you want to check the details of the memory test results, you need to use the Event Viewer tool. To check the Windows memory diagnostic results on Windows 11, use these steps:
Step 1: Press Windows key + S to launch Windows Search and enter Event Viewer in the search box. From the displayed search results, click the Open button in the right pane.
Step 2: When the Event Viewer window opens, click the Windows Logs > System option from the left pane. Then right-click the System entry and select the Find option.
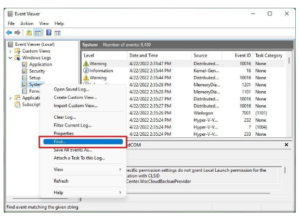
Step 3: When the Find dialog box displays, enter MemoryDiagnostics-Results and then click the Find Next button.
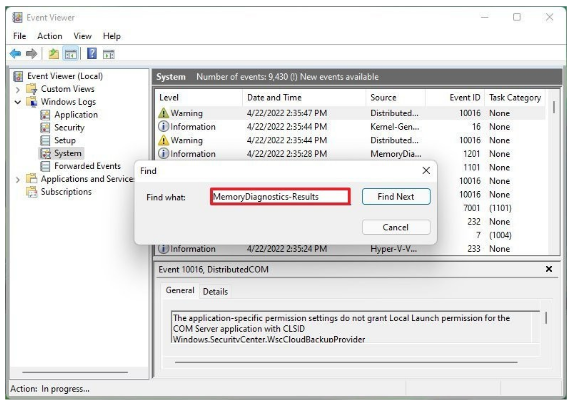
Clicking the Find Next button will help you find the most recent Memory Diagnostic Report. If you want to find older reports, just click the Find Next button to continue.
Step 4: When the relevant report is found using the Find Next button, click the Cancel button.
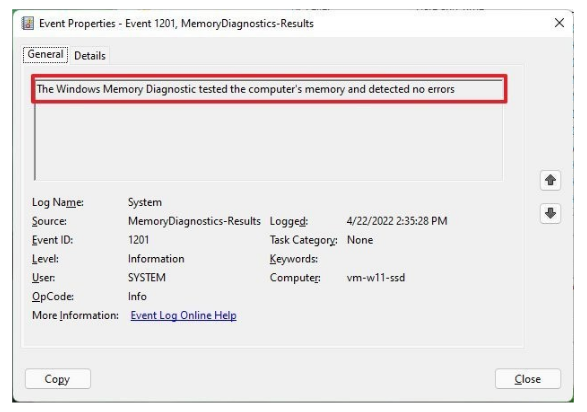
Step 5: Next, double-click the MemoryDiagnostics-Results source on the right side.
Step 6: View a quick report of diagnostic results from the General tab. If the result is The Windows Memory Diagnostic tested the computer’s memory and detected no errors, that means you can rule out the problem as being caused by memory.
Furthermore, you can click the Details tab to view more in-depth reports for the scan. In the event that after scanning, Windows Memory Diagnostic Tool detects memory-related errors, you will find detailed information about problems with RAM on your system. This tool can then indicate which memory module has the problem. If you can’t determine which module is faulty, remove and check each module to find out which module has the problem.
You can remove the RAM then clean and reattach it. Then run Windows Diagnostic again to check if the problem is fixed. If the problem persists after checking, it may be time to replace the RAM. To replace or upgrade RAM on your computer, you can refer to the article How to upgrade computer RAM and what to know.
After following all the steps above, you can quickly fix memory leaks or other RAM-related problems on your Windows 11 computer using the Windows Memory Diagnostic Tool.
Common methods of diagnosing RAM errors on Windows 11
There are several methods of diagnosing RAM errors on Windows 11. Here are the most common ones:
- The built-in Windows Memory Diagnostic Tool: Windows 11 comes with a built-in Memory Diagnostic Tool that can help you diagnose RAM errors. To use this tool, open the Start menu, type “Windows Memory Diagnostic,” and select the option from the search results. Follow the on-screen instructions to complete the diagnostic process.
- Third-party RAM testing software: There are several third-party RAM testing software programs available that can help you diagnose RAM errors. These programs are often more comprehensive than the built-in Windows tool and can provide more detailed information about the errors. Some popular options include MemTest86, PassMark MemTest, and HCI MemTest.
- Testing individual RAM sticks: If you suspect that a specific RAM stick is causing the errors, you can test it individually. To do this, you’ll need to open your computer and remove the suspected RAM stick. Then, run a RAM test using one of the methods mentioned above to see if the stick is causing the errors.
It’s essential to note that diagnosing RAM errors can be a time-consuming process, and it’s important to have patience when diagnosing the issue.
How to use MemTest86 to diagnose RAM errors
MemTest86 is a software program that can accurately diagnose RAM errors on Windows 11. It tests your computer’s RAM using complex algorithms to identify any errors, including soft and hard errors. MemTest86 is a free and open-source program that has a user-friendly interface, making it accessible to anyone who needs to diagnose RAM errors. By using MemTest86, you can ensure comprehensive testing and accurate diagnosis of any RAM problems.
The first step in using MemTest86 to diagnose RAM errors is to download and install the software. To do this, visit the MemTest86 website and download the latest version of the software. Once downloaded, extract the files from the ZIP folder and copy them to a USB drive.
Booting from the MemTest86 USB drive: To use MemTest86, you’ll need to boot your computer from the USB drive. Insert the USB drive into your computer, restart it, and enter the BIOS settings. From there, navigate to the Boot tab and set the USB drive as the first boot device. Save the changes and exit the BIOS. Your computer will now boot from the USB drive, and MemTest86 will start automatically.
Interpreting MemTest86 results: MemTest86 will run several tests on your computer’s RAM modules and display the results in real-time. If MemTest86 detects any errors, it will display them on the screen, along with the memory address of the error. You can use this information to identify which RAM module is causing the problem.
If MemTest86 detects errors, it’s recommended that you run the tests again to confirm the diagnosis. If the errors persist, you may need to replace the faulty RAM module.
It’s important to note that running MemTest86 can take several hours, depending on the amount of RAM installed in your computer. Therefore, it’s essential to have patience and let the program run until it completes all the tests.


![Async Await c# Error Handling [SOLVED!]](https://mycodebit.com/wp-content/uploads/2023/10/rich-tervet-q2GNdFmhxx4-unsplash-360x240.jpg)

![How to Handle Divide by Zero Error in c# [Complete Guide]](https://mycodebit.com/wp-content/uploads/2023/10/clement-helardot-95YRwf6CNw8-unsplash-360x240.jpg)
