
Dig is a simple yet powerful tool in Linux to look up Domain Name System (DNS) information about a particular remote server. Unlike tcpdump, it allows you to better understand how the machine interacts with the nameserver. This tutorial will teach you the basics of how to use the dig command in Linux, Ubuntu and how to use it to understand how DNS works.
So, How to use the dig command in Linux? Detailed Steps
What is DNS and how does dig work?
At its core, DNS is a system that allows machines to seamlessly translate a human-readable domain name into the corresponding IP address. DNS is similar to a phone book, where it lists the machine’s address along with an easy-to-remember label.
The Domain Name System works by storing domain records on a set of hierarchical nameservers, notifying these records whenever a user attempts to resolve a domain name.
For example, whenever you visit “mycodebit.com”, your computer first connects to a known nameserver, then asks the server if it knows the IP address of the domain you are looking for. When your computer knows the appropriate address, it will use that information to connect to the mycodebit website.
The dig utility explains this process by showing you how the computer communicates with the nameserver. It labels and prints every step that needs to be taken from initial connection to name resolution. This makes dig useful in understanding any potential DNS issues with your server.

Install dnsutils on Linux
The dig command comes pre-installed in most Linux distributions. If it is not found in your system, you need to install the dnsutils package to access the dig command.
On Ubuntu and Debian systems, install it with the command:
- sudo apt install dnsutils
- On Fedora:
- sudo yum install bind-utils
- On Arch Linux and its derivatives:
- sudo pacman -S bind-tools
How to Use The Dig Command in Linux to Query DNS
One of the most basic actions you can perform with dig in Linux is to query the A record for a web address. The A record contains the primary IPv4 address for a domain name and is what your web browser queries whenever it tries to access a website.
To query the A record using dig, run the following command:
- dig maketecheasier.com
This will print a long text string showing the actions dig took to resolve the domain. For the most part, you can split this string into 4 parts: Header, question, answer, and nameserver.

The header shows a brief summary of the command you ran. The “opcode” value shows the action that dig took. Whereas the “status” value outputs the overall results of the query.

The question section displays a list of queries you’ve made through dig. The first column prints the complete domain name followed by the query class and DNS record type.
![]()
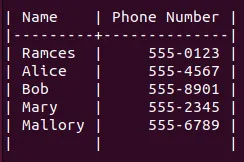
The answer section displays the results of your query. The first column contains the complete domain name followed by its “Time To Live” value. The third and fourth columns show the query type and DNS record type, while the fifth column outputs the results.
![]()
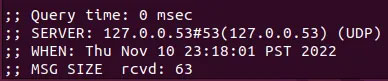
The nameserver section contains details about the DNS server used for this command. “QUERY TIME” is the amount of time the server takes to process the query. The value “SERVER” is the IP address of the nameserver and “MSG SIZE” shows the size of the query in bytes.
If you just want to quickly find the IP address of a website, include the +short option so that the site returns only IP addresses.
dig +short maketecheasier.com
Custom DNS record type query
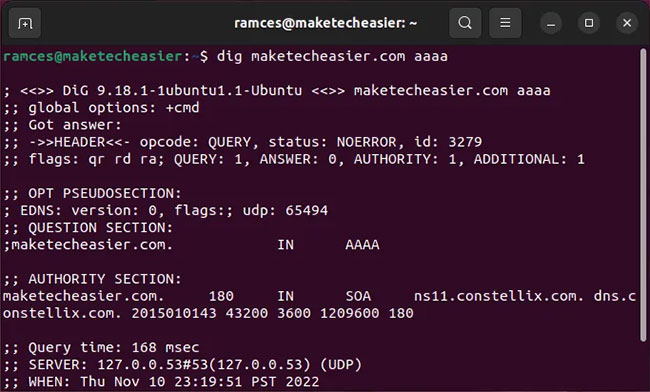
In addition to performing A queries, you can also use dig to look up other types of DNS. You can run the following command to check if the domain has any IPv6 records:
dig maketecheasier.com aaaa
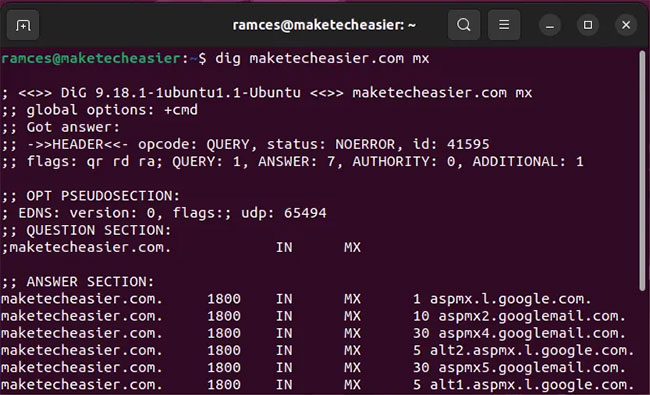
Custom DNS type queries are also useful if you are doing pentesting reconnaissance. For example, you can use dig to check if a domain name is being used in the mail server:
dig maketecheasier.com mx
Finally, dig can also be extremely helpful in learning more about the upstream service for a domain. Both the “CNAME” and “NS” records will show more details about the server and name server it is using:
dig maketecheasier.com cname
dig maketecheasier.com ns

Custom dig queries in Linux
By default, dig works by connecting to a nameserver and asking that server for details about the domain name.
However, the program also offers some additional features that can help with DNS problems.
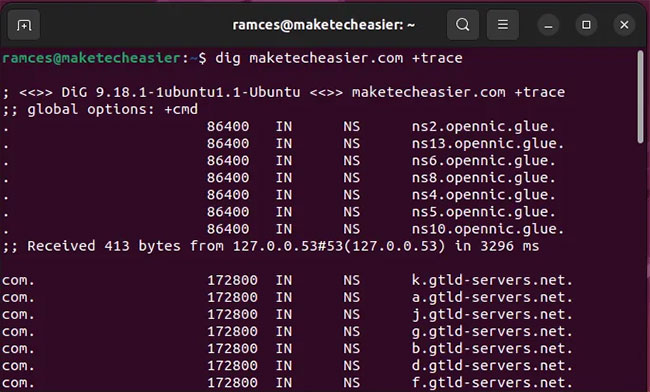
One of the most useful features of dig is +trace. Similar to traceroute, it looks at all the hops your machine makes whenever it connects to a domain.
For example, running the following command will track every hop your machine makes before loading “maketecheasier.com”.
dig maketecheasier.com +trace
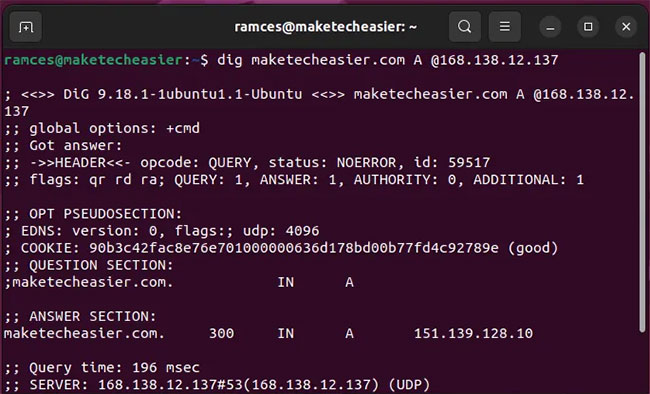
You can also customize the nameservers that dig uses to poll a specific domain. This is useful if you have a nameserver and want to check if it is working properly.
For a custom nameserver to take effect, run the following command:
dig maketecheasier.com A @168.138.12.137
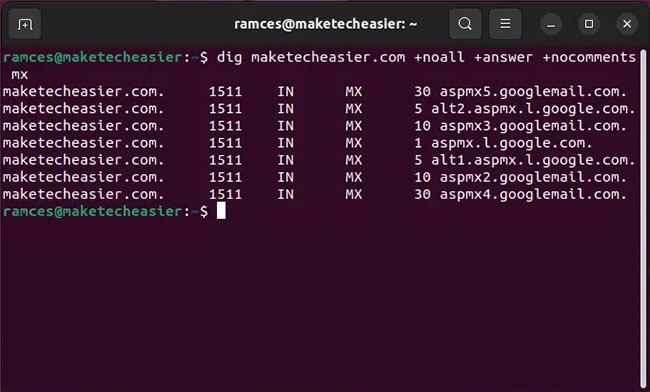
Finally, dig is also a very flexible program that can work in Bash scripts. To do this, force dig to output only the results of your query:
dig maketecheasier.com +noall +answer +nocomments mx
Note: Sometimes the retrieved results are not updated correctly due to DNS cache problems in your system. To fix this, clear the DNS cache in the Linux system.
Batch processing of dig . queries
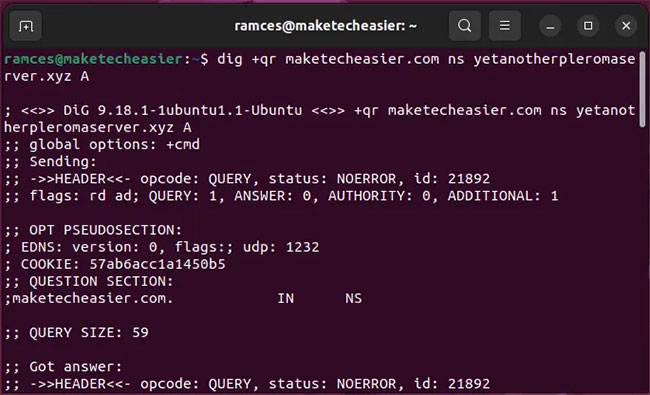
In addition to handling individual domains, dig can also be used to resolve multiple web addresses. This is especially useful if you are a network engineer and want to test multiple domains at once.
For example, the following command will search both the NS record for “maketecheasier.com” and the A record for “yetanotherpleromaserver.xyz”.
dig +qr maketecheasier.com ns yetanotherpleromaserver.xyz a
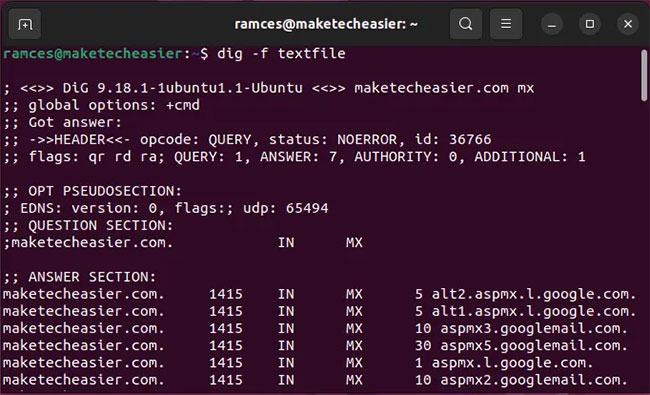
You can also use the -f option to tell dig to receive instructions from an external file. However, you should only write this file in “dig query” format. Knowing that, consider the following lines of text:
- maketecheasier.com mx
- maketecheasier.com ns
- -x maketecheasier.com
Save to a text file and run text file dig -f will perform MX, NS and reverse lookup queries on domain “maketecheasier.com”.
Conclusion
The above article has shown you how to use the dig command in Linux OS to perform DNS queries. Wish you all success and see you in the following tech guides at mycodebit.com


![Async Await c# Error Handling [SOLVED!]](https://mycodebit.com/wp-content/uploads/2023/10/rich-tervet-q2GNdFmhxx4-unsplash-360x240.jpg)

![How to Handle Divide by Zero Error in c# [Complete Guide]](https://mycodebit.com/wp-content/uploads/2023/10/clement-helardot-95YRwf6CNw8-unsplash-360x240.jpg)
