
In this article, we are going to discuss, How to use AutoMapper in C#. We will learn the implementation of AutoMapper in C# with the help of examples. First thing first let’s talk about what is automapper and why we use automapper.
Why we need AutoMapper in C#?
Mapping is performed when we want to copy or transfer one object to another object. Let’s first see how we map normally two objects in C# applications.
Here I have to classes “Student” and “StudentDTO”.
public class Student
    {
        public string  FullName { get; set; }
        public string Address { get; set; }
        public string Department { get; set; }
    }
public class StudentDTO
   {
        public string FullName { get; set; }
        public string Address { get; set; }
        public string Department { get; set; }
    }
If I want to transfer the data of “Student” to “StudentDTO” so the source class is “Student and the destination class on “StudentDTO”. I will do something like this.
class Program
    {
        static void Main(string[] args)
        {
            Student std = new Student();
            std.FullName = "Shayan";
            std.Address = "USA";
            std.Department = "CS";
            StudentDTO stdDTO = new StudentDTO();
            stdDTO.FullName = std.FullName;
            stdDTO.Address = std.Address;
            stdDTO.Department = std.Department;
            Console.WriteLine("Name:" + stdDTO.FullName + ", Address:" + stdDTO.Address + ", Department:" + stdDTO.Department);
            Console.ReadLine();
        }
    }
This is an example of normal and manual mapping of objects. But it becomes so hectic when you are mapping objects multiple times in your application and you have to increase class properties. So you have to write code for each property to transfer data.
To handle this and to avoid hectic we use AutoMapper in C#. Let’s see what is automapper and how can we use it.
What is AutoMapper in C#?
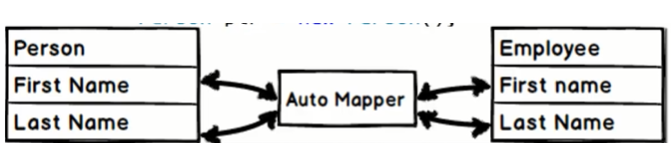
AutoMapper in C# is an object-object mapping library that maps/transform one object to another object that doesn’t require too much configuration. AutoMapper works like a magic by transforming an input object of one type into an output object of a different type.
AutoMapper sits between source and destination object like a bridge and maps the property data of both objects.
How to Use AutoMapper in C#:
AutoMapper is an open-source library that we can use after the installation of the Nuget package.
Let’s get started with step by step implementation of AutoMapper in C#.
Install AutoMapper NuGet Package:
You can install this NuGet package by running this command in your “Package Manager Console”.
Install-Package AutoMapper
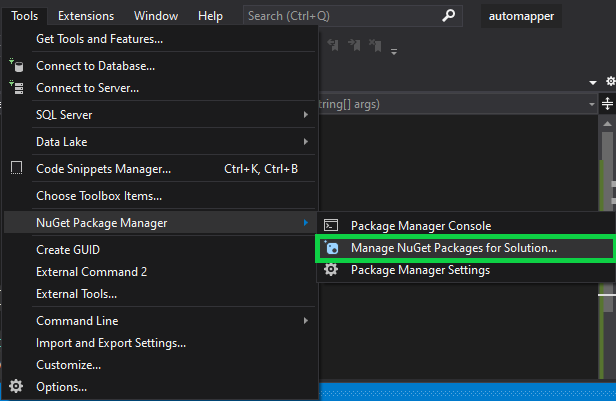
Or you can install this form from “Manage NuGet Packages” by following the below picture,
Now search for autmapper and install the NuGet Package.
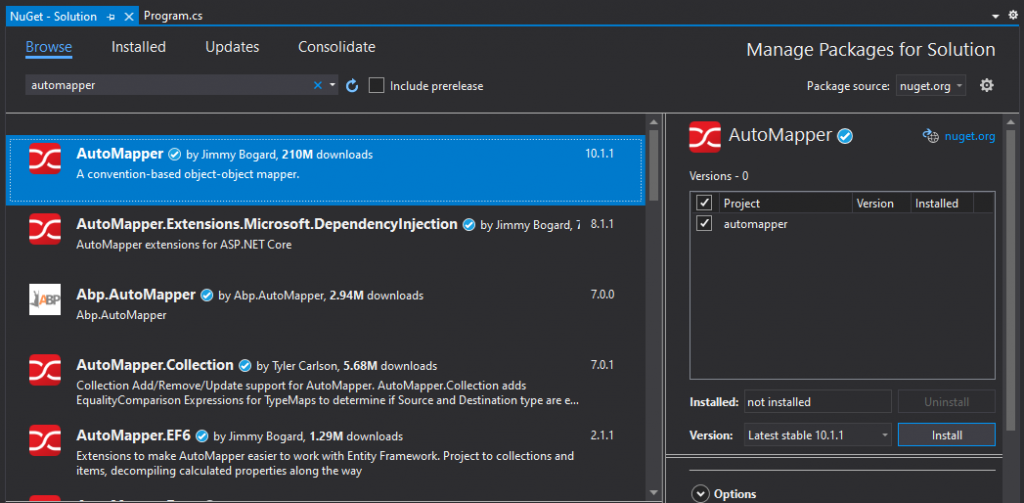
After successful installation, you can find the package under “Dependencies”.
Configuring the AutoMapper:
When we will create your source and destination classes that need to be transformed. We have to initialize our AutoMapper, which we can do through initializing “MapperConfiguration” using the constructor. Let’s see the code
var config = new MapperConfiguration(cfg => {
                cfg.CreateMap<Student, StudentDTO>();
            });
Using AutoMapper complete Example:
class Program
    {
        static void Main(string[] args)
        {
            //Initialize the mapper
            var config = new MapperConfiguration(cfg =>
                    cfg.CreateMap<Student, StudentDTO>()
                );

            //Creating the source object
            Student std = new Student();
            std.FullName = "Shayan";
            std.Address = "USA";
            std.Department = "CS";

            //Using automapper
            var mapper = new Mapper(config);
            var stdDTO = mapper.Map<StudentDTO>(std);

            Console.WriteLine("Name:" + stdDTO.FullName + ", Address:" + stdDTO.Address + ", Department:" + stdDTO.Department);
            Console.ReadLine();
        }
    }

    public class Student
    {
        public string FullName { get; set; }
        public string Address { get; set; }
        public string Department { get; set; }
    }

    public class StudentDTO
    {
        public string FullName { get; set; }
        public string Address { get; set; }
        public string Department { get; set; }
    }
You can copy this code and run this. This will show accurate output.
How to map two properties having different names with automapper?
What if the source and destination class have conflict in property names. So you will not get appropriate output. If we have conflict in source class and destination class property names.
we have to use “ForMember” option to map conflicted properties of both class. Now let’s change the names of our classes properties.
I have changed the department and FullName property name of the destination class and implemented “ForMember” option. Here is the complete option.
class Program
    {
        static void Main(string[] args)
        {
            //Initialize the mapper
            var config = new MapperConfiguration(cfg =>
                    cfg.CreateMap<Student, StudentDTO>()
                    .ForMember(des => des.Name, a => a.MapFrom(source => source.FullName))
                    .ForMember(des => des.Dept, a => a.MapFrom(source => source.Department))
                );

            //Creating the source object
            Student std = new Student();
            std.FullName = "Shayan";
            std.Address = "USA";
            std.Department = "CS";

            //Using automapper
            var mapper = new Mapper(config);
            var stdDTO = mapper.Map<StudentDTO>(std);


            Console.WriteLine("Name:" + stdDTO.Name + ", Address:" + stdDTO.Address + ", Department:" + stdDTO.Dept);
            Console.ReadLine();
        }
    }

    public class Student
    {
        public string FullName { get; set; }
        public string Address { get; set; }
        public string Department { get; set; }
    }

    public class StudentDTO
    {
        public string Name { get; set; }
        public string Address { get; set; }
        public string Dept { get; set; }
    }
Now you will get the right output.
Conclusion:
Try this tutorial and if you do not understand anything or face any issue while applying this method. Do not hesitate to comment below. MYCODEBIT team will try to respond ASAP.


