How to Install Windows 11 on M1 Mac or Intel? Top 4 Easy Recommendations

how to install windows 11 on m1 mac

Parallels makes it easy to run Windows 11 on M1 Mac or Intel using a virtual machine. On an Intel Mac, you can easily run your favorite Windows programs alongside your Mac applications.

So, How to install Windows 11 on M1 Mac or Intel? Easy Steps to Follow

how to install windows 11 on m1 mac

Why Use Parallels?

Parallels is a virtual machine program, which means it runs a separate operating system in an emulated computer (called a virtual machine) on your Mac. With Parallels, you can run Windows apps side-by-side with Mac apps using a mode called Coherence, or you can easily open the Windows desktop to work with your Mac files in Windows apps.

This is in contrast to Boot Camp, which requires installing Windows on a separate partition on your Mac’s SSD or hard drive. With Boot Camp, you can only use one operating system at a time — Mac or Windows, but not both — and you have to reboot to switch between the two. Unlike Boot Camp, Parallels makes switching between Windows and Mac more flexible and fluid.

What You Need

Parallels 18 (currently the latest version) supports Windows 11 on macOS Catalina, Big Sur, and Monterey. The main version of the app costs $80, but if you already have an older version, upgrade for $50. Or you can try it for free for a certain period of time. Visit the Parallels website to get the version you need.

You will also need a license for Windows 11, which you can purchase from Microsoft after installing the operating system. In the case of Intel Macs, you can download the Windows 11 ISO file from Microsoft’s homepage.

System Requirements

Before you begin the installation process for Windows 11, it’s important to make sure your device meets the minimum system requirements. Here’s what you need to know:

  • Processor: Your device should have a compatible 64-bit processor with at least 1 GHz clock speed and 2 or more cores. For Intel-based devices, this means a compatible 8th generation or newer processor. For M1 Macs, you’ll need to use a third-party software like Parallels Desktop or Boot Camp to run Windows 11.
  • RAM: Your device should have at least 4 GB of RAM.
  • Storage: Your device should have at least 64 GB of available storage space for the 32-bit version or 128 GB for the 64-bit version.
  • Graphics Card: Your device should have a DirectX 12 compatible graphics card or integrated GPU with a WDDM 2.0 driver.
  • Display: Your device should have a minimum resolution of 720p and a 9-inch diagonal screen size.

Additionally, your device should have a reliable internet connection and meet other specific requirements for certain features, such as a camera, microphone, or Bluetooth.

It’s important to note that installing Windows 11 on an M1 Mac requires additional setup, including virtualization software like Parallels Desktop, Boot Camp, or CrossOver. These third-party tools allow you to create a virtual environment for Windows 11 on your Mac. However, this process can be more complex and may require technical expertise.

Before proceeding with the installation process, it’s a good idea to double-check that your device meets all the system requirements to ensure a smooth and successful installation. If you’re unsure about any of these requirements, you can check the official Microsoft website or seek guidance from a technical expert.

Step to install Windows 11 on M1 Mac or Intel

First, you need to download and install Parallels on your Mac. During the installation process, make sure you allow Parallels Desktop to access your Mac’s Desktop, Documents, and Downloads folders.

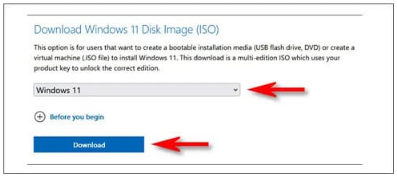
Next, if you’re running an Intel Mac, download the Windows 11 ISO from the Microsoft website. On the Download page, find the “Download Windows 11 Disk Image (ISO)” section, select “Windows 11”, then click “Download”.

how to install windows 11 on m1 mac

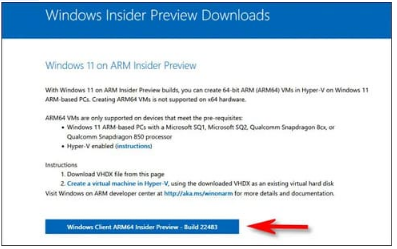
If you are using an M1/M2 Mac, you cannot use the Intel (x64) version of Windows 11. Instead, you will need to sign up for the Windows Insider Program, then Download Windows Client ARM64, this version will be in the VHDX image file.

Once you have the OS ISO file you need, open the Parallels application. For M1/M2 Macs, double-click the VHDX file you just downloaded and follow the on-screen instructions in Parallels to install Windows 11. Some of the steps will be similar to the Mac Intel installation process shown. details below.

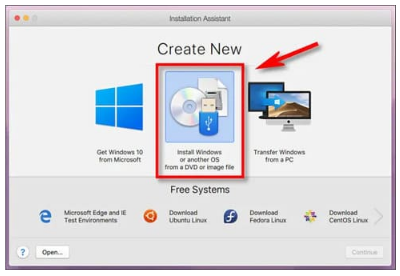
On an Intel Mac, open the Installation Assistant and select “Install Windows or another OS from a DVD or image file” and click “Continue”.

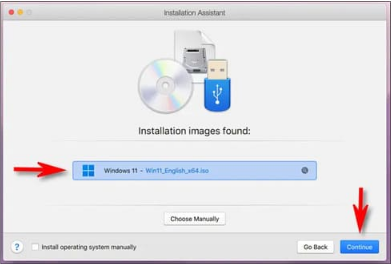
Parallels will automatically locate the Windows 11 ISO on your Mac. Select it from the list and click “Continue”.

Next, Parallels will ask you for a Windows License Key. If you have, you can import it now. Otherwise, uncheck “Enter Windows license key for faster installation” and click “Continue”.

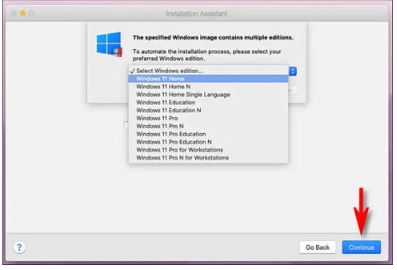
The Windows 11 ISO file contains installation information for various versions of Windows 11. Select the version you want to install from the menu (Such as “Windows 11 Home” or “Windows 11 Pro”) and click “Continue”. “. Remember that each version has its own price when you later purchase a Windows 11 license.

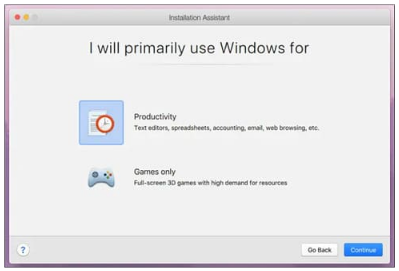
Next, Parallels will ask if you plan to use Windows primarily for work or gaming. Choose the one that suits your needs and click “Continue”.

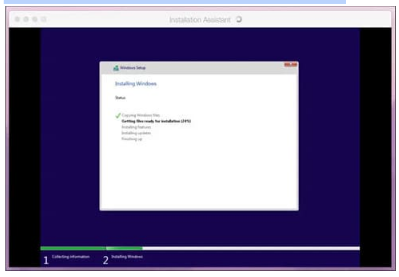
The Windows 11 installation will begin. Parallels handles it automatically, and you’ll see the progress in a small virtual machine window on your Mac.

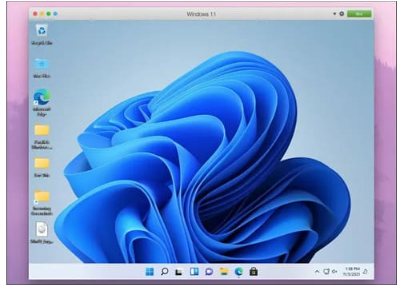
When the installation is complete on both the Mac M1 and Intel, you will see the message “Installation Complete.” Click inside the window to continue.

At this point, if you’re using the trial version of Parallels, the app will ask you to sign up for a Parallels account. Otherwise, you should see the Windows 11 screen and be ready to go.

To switch to seamless mode, where you can use Windows and Mac apps side-by-side, focus on the “Windows 11” window and choose View > Enter Coherence in the menu bar. Or you can press Ctrl + Command + C on your keyboard.

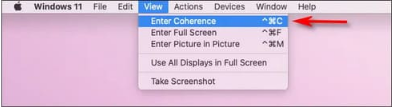
To exit Coherence mode, click the Windows logo icon in your Dock and choose View > Exit Coherence in the menu bar. Or you can press Ctrl + Command + C again.

Once you have purchased your Windows 11 license, run the Settings app in Windows 11 and click “System”. Click “Active Now”, then click “Open Store” and you will be able to purchase a Windows license in the Microsoft Store.

Troubleshooting

Even with careful preparation and attention to detail, you may still run into issues during the installation process for Windows 11. Here are some common problems that you may encounter and tips for troubleshooting them:

Installation errors

If you encounter errors during the installation process, such as “Windows could not install”, “Error code: 0x800704DD-0x90016”, or “Windows cannot be installed on this disk”, there are a few things you can try:

  • Check your internet connection to ensure it is stable and reliable.
  • Double-check that your device meets all the minimum system requirements for Windows 11.
  • Make sure you have enough storage space available on your device.
  • Try disabling any antivirus software or firewall temporarily during the installation process.

Compatibility issues

If you encounter compatibility issues with certain hardware or software after installing Windows 11, there are a few things you can try:

  • Check the compatibility of your hardware and software with Windows 11 before installing it.
  • Try updating your drivers and firmware to the latest version.
  • Check for any known compatibility issues or updates on the Microsoft support website or with your device manufacturer.

Booting errors

If you encounter booting errors, such as “BOOTMGR is missing” or “NTLDR is missing”, try the following:

  • Check the boot order in your BIOS to ensure that the device with the Windows 11 installation files is selected as the primary boot device.
  • Try repairing the boot sector with bootrec.exe or a similar tool.
  • Make sure there are no external storage devices connected to your device during the booting process.

Activation issues

If you encounter issues with activating your copy of Windows 11, try the following:

  • Make sure you have a valid product key for your version of Windows 11.
  • Check your internet connection to ensure it is stable and reliable.
  • Try activating Windows 11 over the phone by following the instructions provided during the activation process.

If you continue to experience issues during the installation process or with Windows 11 after installation, you may want to seek help from a technical expert or consult the Microsoft support website. By being patient and persistent, you can troubleshoot and resolve many common issues and enjoy the benefits of Windows 11 on your device.

Back up your data before installation

Before you begin the installation process for Windows 11, it’s crucial to back up any important data and files to an external storage device or cloud storage service. Here’s what you need to know:

Why back up your data?

Installing a new operating system can be risky, and there’s always a chance that something could go wrong during the installation process. If something does go wrong, it’s possible that you could lose some or all of your data, including important files, documents, and media. By backing up your data beforehand, you can protect yourself from these risks and ensure that your data remains safe and accessible.

How to back up your data?

There are several different ways to back up your data, depending on your preferences and needs. Some common methods include:

  • External hard drive: You can use an external hard drive to copy and store your important data and files. Simply connect the hard drive to your device, select the files you want to back up, and copy them to the hard drive.
  • Cloud storage service: You can also use a cloud storage service like Dropbox, Google Drive, or OneDrive to store your data and files online. Simply upload your files to the cloud storage service and access them from anywhere with an internet connection.
  • Time Machine (for Mac users): Mac users can use the built-in Time Machine feature to back up their data to an external hard drive. Simply connect the hard drive to your Mac, select Time Machine as the backup method, and let it do the rest.

Regardless of which method you choose, it’s important to make sure that your backup is complete and up-to-date before you begin the installation process.

How to restore your data?

After you have successfully installed Windows 11, you can restore your data from your backup. Simply connect your external hard drive or log in to your cloud storage service, select the files you want to restore, and copy them back to your device. If you used a cloud storage service, you can simply download your files from the cloud to your device.

Consider the risks of using third-party software

If you’re installing Windows 11 on an M1 Mac, you’ll need to use third-party virtualization software like Parallels Desktop or Boot Camp. While these tools can be very useful, it’s important to consider the risks and potential issues associated with using them. Here’s what you need to know:

  • Potential compatibility issues: Third-party virtualization software may not be fully compatible with all hardware or software, which can lead to issues during the installation process or after installation. For example, some applications may not work properly in a virtualized environment, or certain hardware components may not be supported.
  • Security risks: Third-party software can potentially introduce new security risks and vulnerabilities to your device. These risks can come from the virtualization software itself, or from the virtual environment created by the software.
  • Complexity: Using third-party virtualization software can be more complex and require more technical expertise than a standard installation of Windows 11. This can lead to a higher risk of errors or issues during the installation process, or difficulty troubleshooting any problems that arise.

If you decide to use third-party virtualization software to install Windows 11 on an M1 Mac, it’s important to take steps to minimize these risks. Some things to consider include:

  • Choosing a reputable software provider: Look for virtualization software that has a strong reputation and a track record of reliable performance.
  • Keeping your software up-to-date: Make sure you’re using the latest version of your virtualization software, and that you’re regularly installing any updates or security patches.
  • Following best practices: Be sure to follow any recommended best practices for installing and using virtualization software, such as configuring your virtual environment securely and disabling unnecessary features.

Check for updates after installation

After you’ve successfully installed Windows 11 on your device, it’s important to check for any updates and install them as soon as possible. Here’s what you need to know:

Why check for updates?

Updates to Windows 11 can contain important security fixes, bug fixes, and new features that can improve the performance and functionality of your device. By keeping your device up-to-date, you can ensure that it remains secure, stable, and optimized for the best possible performance.

How to check for updates: Checking for updates in Windows 11 is easy. Simply go to Settings > Update & Security > Windows Update, and click the Check for Updates button. Windows will then check for any available updates and prompt you to download and install them.

How often should you check for updates?

It’s a good idea to check for updates regularly, ideally at least once a week. This will ensure that you’re always up-to-date with the latest security patches and feature updates.

What to do if you encounter issues after an update: While updates can improve the performance and stability of your device, they can also sometimes introduce new issues or bugs. If you encounter any issues after installing an update, try restarting your device or rolling back the update to a previous version. You can also seek help from the Microsoft support website or a technical expert if you’re unsure how to proceed.

By checking for updates regularly and installing them as soon as possible, you can keep your device up-to-date with the latest features and security patches, and ensure that it remains secure, stable, and optimized for the best possible performance.

Consider the benefits and drawbacks of upgrading to Windows 11

Before you begin the installation process, it’s important to consider the benefits and drawbacks of upgrading to Windows 11. Here’s what you need to know:

  • Benefits of upgrading: Windows 11 offers many new features and improvements over Windows 10, including a redesigned Start menu, new snap controls, improved virtual desktops, and enhanced touch controls. It also offers better performance, improved security features, and enhanced compatibility with newer hardware.
  • Drawbacks of upgrading: Upgrading to Windows 11 may require additional hardware upgrades or may not be compatible with certain software or hardware. For example, older hardware may not support the new system requirements for Windows 11, and certain software may not work properly or may require updates to be compatible.
  • How to determine if your device is compatible: You can check your device’s compatibility with Windows 11 by using the PC Health Check app, which is available for download from the Microsoft website. The app will scan your device and provide a report on whether it meets the minimum system requirements for Windows 11.
  • How to prepare for the upgrade: If you decide to upgrade to Windows 11, it’s important to prepare your device and back up your data beforehand. This will ensure that you can easily restore your data if anything goes wrong during the installation process.
  • How to upgrade: Upgrading to Windows 11 is easy, and can be done through the Windows Update feature in Windows 10. Simply go to Settings > Update & Security > Windows Update, and click the Check for Updates button. If Windows 11 is available for your device, it will appear as an option for download and installation.

The above instruction has helped you how to install windows 11 on m1 mac easily. Hope you all succeed when trying these methods and see you in the next tech guides on our website.

Leave a Reply