

Instructions for sorting and cleaning junk files on Windows 10 help free up space and improve computer performance.
In this article, we will explain to you why we need to clean up junk files and how to classify these junk files for cleaning them in most basic and simple ways. Please follow along.
First of all, Why Do We Need to Clean Up Junk Files?

Junk files are like packages of chips, tissues or other items that we throw in the trash, they have no use value. Storing junk files in your computer will make the system as well as yourself more difficult to manage. If your computer is using a small SSD hard drive, junk files can also cause you performance and storage problems.

When you delete these unused junk files, you can organize and manage useful files more easily, save dozens of hard drive space, as well as improve computer speed because Every time you run into a job, your computer won’t have to bother looking through files you don’t need anymore.
Types of Junk Files of Windows OS

There are many things that can create junk files on your computer. It could be leftover files from apps you’ve uninstalled, or it could be those pretty wallpapers you downloaded last year but don’t use anymore, so leave it at that. But no matter what the cause, Windows 10’s junk files are divided into 4 types as follows:
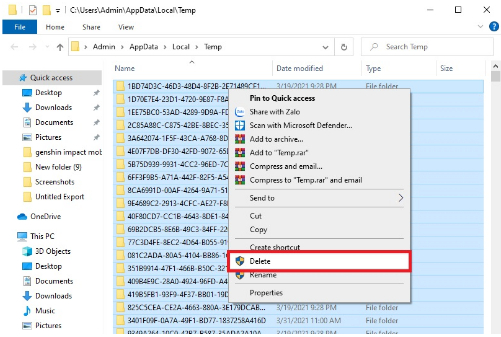
Files in Recycle Bin: These files are files you no longer use, so you put them in the Recycle Bin. However, it will not be deleted immediately, but stored in the Recycle Bin in case you want to restore it, and if you keep them forever in the trash, over time they can weigh up to several GB is normal.
Temporary files (Windows temporary files): These are files that have only temporary purposes and become junk files as soon as they expire.
Redundant files of Windows and 3rd party applications: When you uninstall an application, the associated files are not always imported.
Download folder: The download folder usually takes up a huge amount of your storage space because it often contains unused program installation files, as well as image files, videos and other documents. accumulate over time.
Thumbnails can also be considered junk files, but you don’t need to delete them unless absolutely necessary. Because when you delete thumbnails, the system will have to regenerate these thumbnails again, thereby slowing down the system.

Note (optional): before deleting junk files, you should create a restore point in case you mistakenly delete an important file that affects the system.
Ways to clean junk files on Windows 10
Method 1: Clean up the Recycle Bin

As we have shown in GVN 360 above, the files in the Recycle Bin are the files you have deleted but Windows still keeps them in case you need to restore them. To quickly empty the Recycle Bin, just right-click the Recycle Bin icon and select Empty Recycle Bin, the computer will ask if you are sure you want to permanently delete these files, then select Yes.
Method 2: Clean up temporary files
Temporary files are created to store information about a certain file being used. At the end of the purpose, these files should be deleted. Temporary files are stored in the Windows Temp folder, you can go here to manually delete these temporary files.
To delete the temporary file, press Windows + R. Then copy paste %temp% and then Enter.

When the Windows Temp folder is opened, press Ctrl + A to select all the files and then press the Delete key. If there is a file in use, just select Skip that file.
Method 3: Clean Up Junk Files with Disk Cleanup
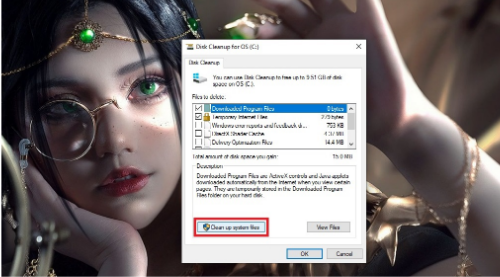
Using Windows 10’s Disk Cleanup tool, you can clean all junk files such as download files, temporary files, temporary Windows installation files, temporary network files, files in the Recycle Bin, and so on.
To use Disk Cleanup, open the Start Menu and type Disk Cleanup and then Enter. Next, select the drive you want to clean and then select OK. Then select the box of the file types you want to delete and then select Clean up system files to let Windows filter out temporary files.
Finally select OK and then select Delete files to start cleaning.
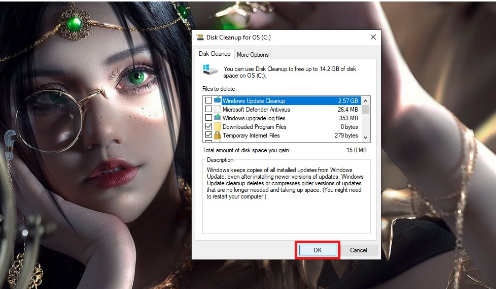
If possible, don’t check the box Thumbnail because as I said above, deleting Thumbnail will cause the system to have to create Thumbnail again, causing slow machine.
For more details and how to use Disk Cleanup, please refer to the article explaining Disk Cleanup that we used to do in GVN 360.
Method 4: Clean up old Restore Points
Restore Point can be an effective medicine to bring your computer back to the state it was in before the error. However, if you create too many Restore Points, it will take up unnecessary space on your hard drive. Therefore, you should delete old Restore Points that are no longer needed to free up the hard drive.
You can delete Restore Points with the Disk Cleanup tool. Here’s how to do it:
Step 1: Open Disk Cleanup and then select Cleanup system files.

Step 2: Select the hard drive that you use to store the Restore Points and then select OK (usually drive C).
Step 3: Select More Options. Then in the System Restore and Shadow Copies section, select Clean up. Finally select Delete to confirm.

The above article has instructed you how to clean up junk files on your Windows 10. Wish you all success with those steps and see you in the next tech guides at our tech blog.


![Async Await c# Error Handling [SOLVED!]](https://mycodebit.com/wp-content/uploads/2023/10/rich-tervet-q2GNdFmhxx4-unsplash-360x240.jpg)

![How to Handle Divide by Zero Error in c# [Complete Guide]](https://mycodebit.com/wp-content/uploads/2023/10/clement-helardot-95YRwf6CNw8-unsplash-360x240.jpg)
