
If you want to use a different language on Windows 11, you don’t need to reinstall the operating system. The article will give you instructions on how to change the language on Windows 11 computers.
During the initial setup, Windows 11 will allow you to select a language to apply system-wide. However, you can completely change the language of the system as you like without having to reinstall the operating system. Whatever your needs are, changing the default language on Windows 11 is pretty easy.
Let’s take a look at how you can change the language on your Windows 11 computer.
How to change the language on Windows 11 computers
Windows 11 supports many different languages. If you want to change the display language on your computer, you just need to download the language pack and apply it to the system. The steps are as follows:

Step 1: On the keyboard, press the Windows + X key combination and click the Settings option inside the menu that appears on the screen.
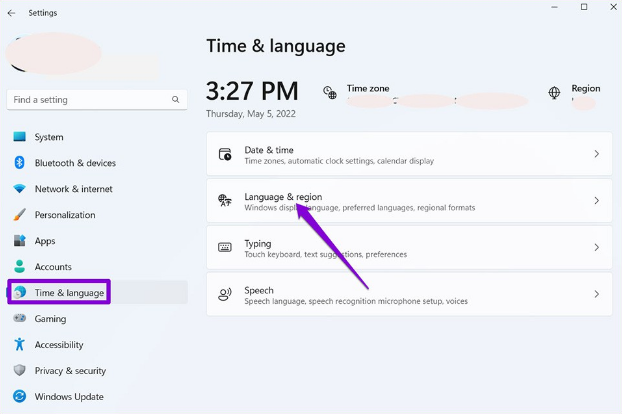
Step 2: A Settings window will appear on the screen. In there, search and select Language & region in the right pane of the window.
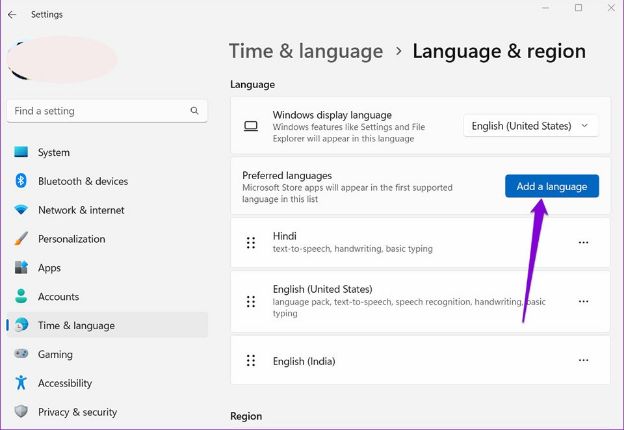
Step 3: Switch to the left pane, and click the Add a Language button inside the Preferred Languages section.
Understanding Language Settings in Windows 11
Language settings play a key role in customizing your computer settings. The good news is that Windows 11 offers a user-friendly interface that allows you to change your computer’s language without the need for a complete reinstallation.
You can access the language settings on your Windows 11 computer by following these steps:
- Click on the “Start” button located in the bottom left corner of your screen.
- Select the “Settings” icon, which resembles a gearwheel and is typically situated among your pinned apps.
- In the Settings window, click on “System” to open the system settings.
- From the left-hand menu, choose “Language & region” to access the language settings.
Default System Language vs. Display Language
Windows 11 distinguishes between two essential language settings: the default system language and the display language.
- Default System Language: This is the primary language your Windows 11 system uses for system messages, administrative prompts, and other important functions. It’s typically set during the initial setup of your computer.
- Display Language: The display language is the language in which your Windows interface, including menus, icons, and system apps, is displayed. This can be different from your default system language.
Installed Languages and Their Relevance
Windows 11 allows you to install and manage multiple languages on your computer. Here’s why this is beneficial:
- Multilingual Capabilities: Installing additional languages makes it possible to switch between them easily. This helps make your computer more versatile and user-friendly.
- Localization: Installing specific languages can enhance your computing experience by tailoring apps and content to your preferred language.
Challenges and Troubleshooting
When you have changed the language settings on Windows 11, it’s important to be prepared for potential challenges you may face. Here are some common issues and how you can avoid them:
Common Issues Users Face When Changing Language Settings
- Missing Language Packs: One of the most common challenges is encountering missing language packs for the language you wish to switch to. Windows 11 might not have all language packs readily available and this can cause issues. It is of course particularly common for less commonly used languages.
- Compatibility Issues: Certain software applications or drivers may in some cases not fully support your chosen language. This can lead to compatibility issues which causes certain apps or features to malfunction.
Troubleshooting Tips and Solutions
Downloading Missing Language Packs: If you encounter missing language packs, there’s a simple solution to this. Windows 11 provides the option to download additional language packs directly from the Settings menu. Here’s how:
- Return to the “Language & region” settings.
- Select the language you want to add.
- Click on “Options.”
- Under “Download language pack,” click “Download.”
Windows will then automatically download and install the missing language pack. This will allow you to set it as your display language.
Compatibility issues can be a bit more challenging to tackle, but not impossible. Consider the following steps:
Check for Software Updates: Ensure that your operating system and software applications are up-to-date. Developers often release updates to resolve compatibility issues with different languages.
Contact Software Support: If you encounter compatibility problems with specific applications, the best tip is to contact their respective support teams. They may be able to help with solutions or updates.
Use Compatibility Mode: Running an application in compatibility mode can sometimes help. Right-click on the application’s shortcut, go to Properties, and under the Compatibility tab. Now, choose a compatibility mode that suits your needs.
Consider Alternative Software: If you still struggle with compatibility issues, consider using alternative software that fully supports your desired language.
Using Third-Party Language Packs
Windows 11 offers a comprehensive selection of language options but there may be situations where you want language that’s not available. In these cases, the solution may be to look for third-party language packs.
Third-party language packs are language resources created by individuals or organizations outside of Microsoft’s official offerings. These packs can give you much greater possibilities in regards to the language capabilities of your Windows 11 operating system, giving you access to languages that would otherwise not be available in the default package.
How to Install and Use Third-Party Language Packs
Before you start looking for third-party language packs, we want to point out that it’s important to be cautious. To download third-party language packs safely, you should follow these steps:
- Source Reliability: Ensure that you download language packs from reputable sources. Avoid downloading from unverified websites or sources that seem dubious.
- Compatibility Check: Verify that the third-party language pack is compatible with your specific version of Windows 11. Using incompatible language packs can lead to system instability.
Installation Process:
- Download the third-party language pack to your computer.
- Access the “Language & region” settings in Windows 11.
- Click on “Add a language” and select “Install from a file.”
- Browse and select the downloaded language pack file. e. Follow the on-screen instructions to complete the installation.
Once installed, return to the language settings and set the third-party language as your display language.
There are some potential risks you should be aware of when looking for third-party language packs:
- Security Concerns: Downloading language packs from untrusted sources can expose your computer to security risks, including malware and viruses. Always prioritize security.
- Compatibility Issues: Third-party language packs may not be as rigorously tested as official Microsoft language packs, potentially leading to compatibility issues with certain applications.
- Lack of Support: You may not receive official support or updates for third-party language packs, which could pose long-term challenges in terms of system stability and security.
Tips for a Smooth Language Change Experience
Changing the language settings on your Windows 11 computer can greatly enhance your user experience. At the same time, it’s important that you do it safely and correctly to avoid any issues. Here are some practical tips for doing so::
Back up Important Data
Before you change your language settings, it’s a good idea to back up any critical data on your computer. While changing language settings should not affect your files, it’s always better to be safe than sorry. Use an external hard drive, cloud storage, or any other backup tool to save your data just in case.
Restart Your Computer
After you have changed your display language, it’s recommended that you restart your computer. This helps Windows 11 properly apply the new language settings across the system.
Stay Up to Date with Windows Updates
Windows 11 regularly releases updates to improve its system and performance. This is why it’s important to keep your operating system up to date. Windows updates often include patches that address language-related issues. Updating to the latest version can improve the user experience for the language functionality.
To check for updates:
- Go to the “Settings” app.
- Select “Windows Update.”
- Click on “Check for updates” and install any available updates.
Using Microsoft’s Official Language Resources
When changing your display language, I highly recommend relying on Microsoft’s official language resources whenever possible. Official language packs are thoroughly tested and supported by Microsoft and ensure a more stable and secure experience without risks.
To download official language packs:
- Access the “Language & region” settings.
- Choose “Add a language.”
- Browse the list of available languages and select the one you desire.
- Click “Next” and follow the prompts to download and install the official language pack.


![Async Await c# Error Handling [SOLVED!]](https://mycodebit.com/wp-content/uploads/2023/10/rich-tervet-q2GNdFmhxx4-unsplash-360x240.jpg)

![How to Handle Divide by Zero Error in c# [Complete Guide]](https://mycodebit.com/wp-content/uploads/2023/10/clement-helardot-95YRwf6CNw8-unsplash-360x240.jpg)
