
To speed up internet access on Windows 11, you have many ways to do it, but the simplest and most popular way is still to change DNS. If you don’t know how to do it, this article will help you the way for how to change DNS windows 11.
Windows 11 contains dozens of useful settings related to connecting to the Internet, and you can take advantage of them to best serve your needs. When you know how to change DNS Windows 11, you will see unexpected changes.
What is Windows 11 DNS?

You are an end user, so you don’t need to worry about DNS because your Internet service provider (ISP – Internet Service Provider) has already configured it. Even so, the ISP’s default DNS is often very slow – unreliable because it can be used by the ISP for tracking – with no privacy at all.
DNS is usually a free service that provides technology to help you type the name of a website in the address bar of your web browser and load it. If DNS didn’t exist, your surfing would not be possible as it is today because you need to remember the exact IP address of that website. In short, DNS helps you to translate the IP address of the website into the name of the website.
DNS has many advantages that you will be interested in such as:
- Speed up your Internet connection.
- Enhance your security and privacy when connecting to the Internet.
- Bypass content censored websites and help you access successfully.
By default, your computer automatically obtains your Internet service provider (ISP) DNS information. However, sometimes, the default DNS server may not work properly, blocking access to certain websites. At that time, changing the DNS server is a good thing to do. This also provides the following benefits to fix DNS errors. Increase the response time between the computer and the DNS Server. Ability to access blocked Web sites. Protect your information and computers from some form of cyber attack. How to change DNS Windows 11 is not complicated and I will guide you right below.
How to Change DNS Windows 11? The Simple Guide To Follow
In this way, you will make some changes in the system of Windows 11.
Step 1: Open Settings.
Step 2: Access to Network & internet.
Step 3: Click on Ethernet or Wi-Fi in the right column. If you choose Wi-Fi, you have to click on its properties to get to the network settings section.

Step 4: Click Edit in the DNS server assignment section.
Step 5: Select Manual in the new menu that appears.
Step 6: Turn on the IPv4 option. Step 7: Depending on your choice, you can use 1 of 3 DNS services from Cloudflare – Google Public DNS – OpenDNS. In the Preferred DNS box, enter 1.1.1.1 (Cloudflare) – 8.8.8.8 (Google Public DNS) – 208.67.222.222 (OpenDNS).
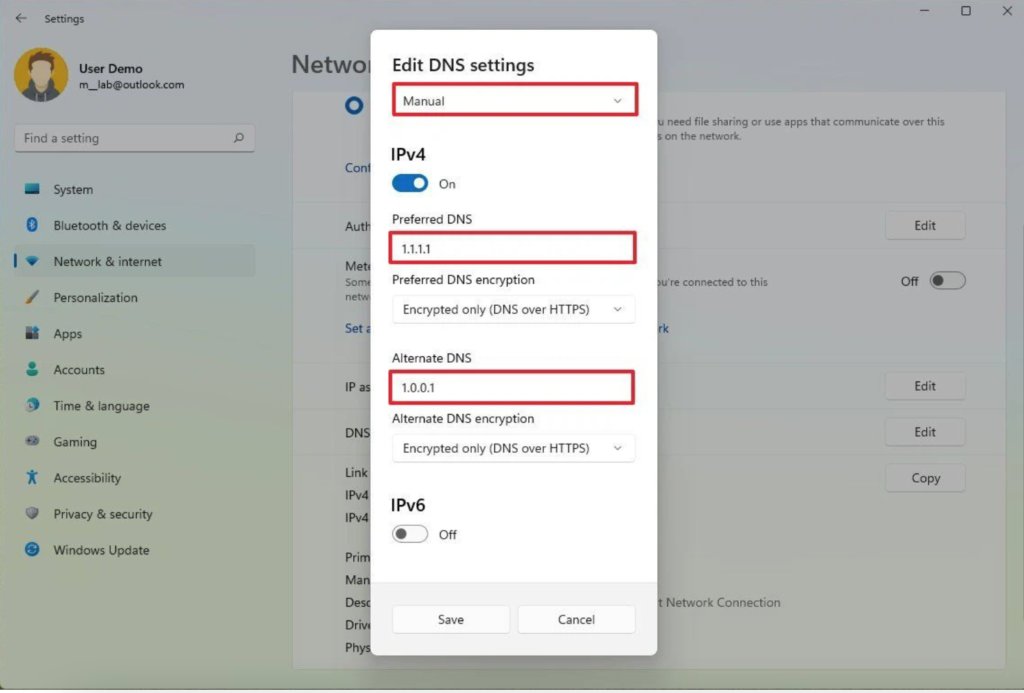
Step 8: In the Alternate DNS section right below, you can choose to add a secondary DNS corresponding to the DNS above as follows: 1.0.0.1 (Cloudflare) – 8.8.4.4 (Google Public DNS) – 208.67.220.220 (OpenDNS). Next, with Alternate DNS encryption, we will have options to encrypt the secondary DNS address and they include: Unencrypted only: DNS queries will not be encrypted. Encrypted only (DNS over HTTPS): DNS queries will be encrypted under the HTTPS protocol to enhance the security and privacy of the data sent. Encrypted preferred, unencrypted allowed: Both Encrypted DNS and Unencrypted DNS can work side-by-side. You can choose any of the three above.
Step 9: You can also change the IPv6 entry below to apply to IPv6 addresses. The steps will be the same as above, only different DNS addresses are as follows:
Preferred DNS IPv6: 2606:4700:4700::1111 (Cloudflare) – 2001:4860:4860::8888 (Google Public DNS) – 2620:119:35::35 (OpenDNS).
Alternate DNS IPv6: 2606:4700:4700::1001 (Cloudflare) – 2001:4860:4860::8844 (Google Public DNS) – 2620:119:53::53 (OpenDNS).
You can Also Change DNS on Windows 11 from Control Panel
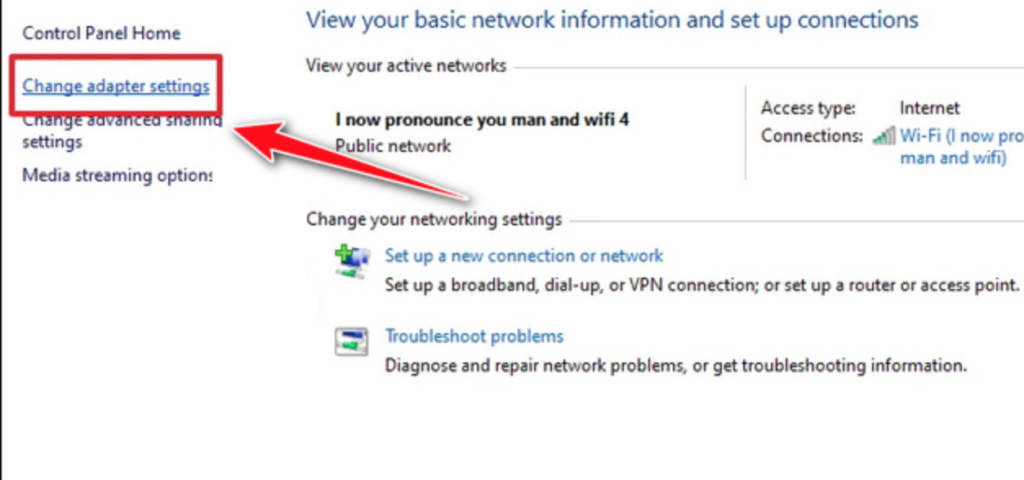
Step 1: Enter the keyword Control Panel into Windows Search and click on the corresponding search result. Step 2: In the Control Panel window, click Network and Sharing Center.

Step 3: Select Change adapter settings in the left panel.
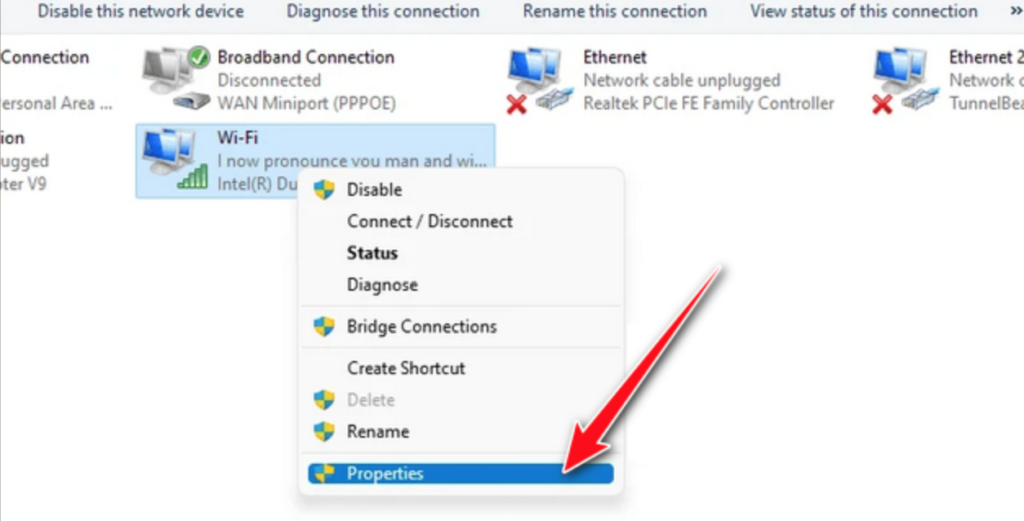
Step 4: Right-click the desired network connection and select Properties from the context menu.
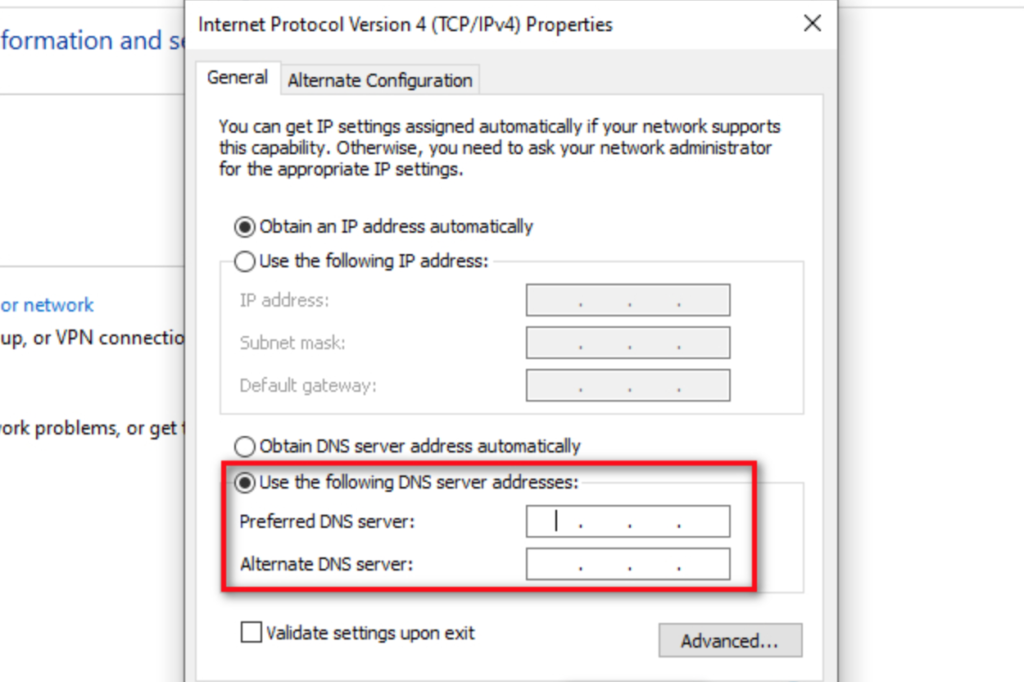
Step 5: From the Properties window, find and double-click the Internet Protocol Version 4 (TCP/IP4) option.
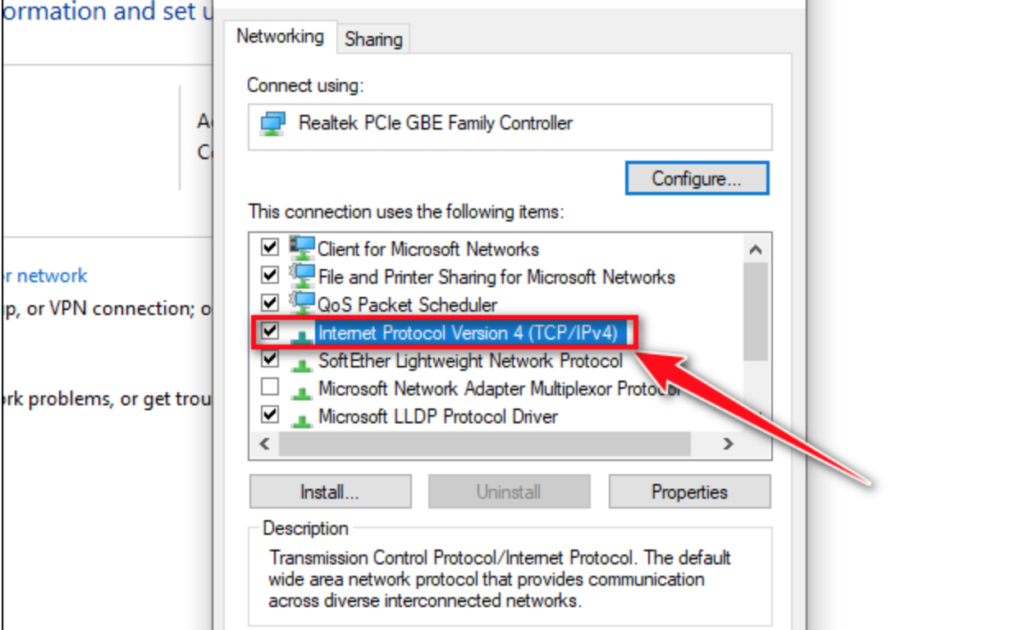
Step 6: In the Internet Protocol Version 4 (TCP/IP) Properties window, click the option “Use the following DNS server addresses“. Then, enter the desired DNS address in the Preferred DNS Server and Alternate DNS Server fields below. Finally, click OK to save the changes.
Note:
If you experience network problems after changing your DNS settings, double check that you entered the correct address. Incorrectly entered DNS address will result in inaccessible DNS server and broken internet connection status. If the address has been entered correctly but you are still having problems, try disabling the “IPv6” switch in the DNS server list. If you configure an IPv6 DNS server on a computer that does not have an IPv6 connection, this can also cause connection problems.
We have shared with you some information you need to know about DNS, some reliable DNS servers and how to change DNS Windows 11. In addition, you can also do a way to set a static IP on Windows 11 to share files in the LAN more easily.
Wish you success and do not forget to check our latest technology update frequently.


![Async Await c# Error Handling [SOLVED!]](https://mycodebit.com/wp-content/uploads/2023/10/rich-tervet-q2GNdFmhxx4-unsplash-360x240.jpg)

![How to Handle Divide by Zero Error in c# [Complete Guide]](https://mycodebit.com/wp-content/uploads/2023/10/clement-helardot-95YRwf6CNw8-unsplash-360x240.jpg)
