In this lesson we will start with hands-on content: create data tables in Sql Server, write code to connect and read-write data with ADO.NET. The goal of the article is to give you a first-hand feel of ADO.NET programming and how to work with databases from the program. It will make it easier for you to visualize ADO.NET when we discuss the theoretical content in the following article.
In the previous lesson we installed the necessary tools to learn ADO.NET. We also created a database called Contacts for practice and example. In this lesson we will create the necessary data tables. Then we will use ADO.NET to write a simple program that first reads and writes data to the Contacts database.
ADO.NET Programming: Creating Data Tables in SSMS and SQL Server
Structure of data tables
The contacts database created in the previous post is used to store customer contact information. Each record in the phonebook contains the following information:
contact name (contact name),
Nicknames (alias),
Last name + middle name (first name),
Last name,
birthday (birth day),
Email list, each email in the list includes email type (personal, work, organization) and corresponding email address.
List of phone numbers, each phone information includes type (personal, work), and corresponding phone number.
We will create tables with the following structure for the Contacts database.
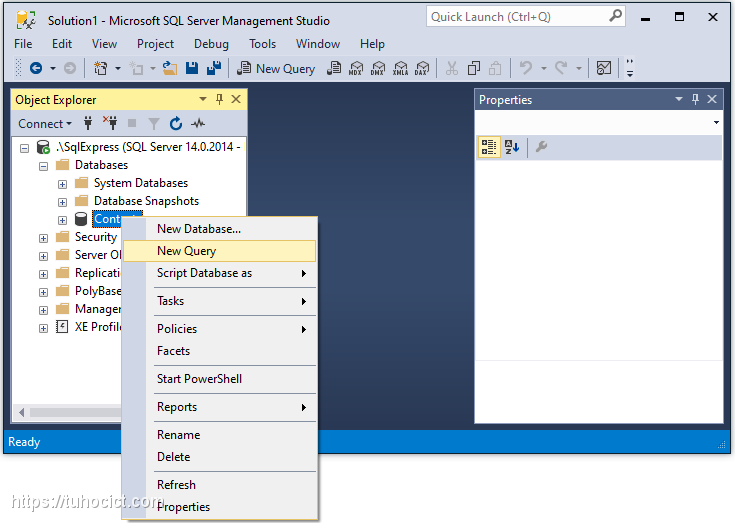
Generate data table from SSMS
Right click on the Contacts database and select New Query
Copy the following SQL code and paste it into the query window and press F5 to run it.
USE [Contacts] GO /****** Object: Table [dbo].[Contacts] ******/ SET ANSI_NULLS ON GO SET QUOTED_IDENTIFIER ON GO CREATE TABLE [dbo].[Contacts]( [Id] [int] IDENTITY(1,1) NOT NULL, [ContactName] [nvarchar](max) NULL, [Alias] [nvarchar](max) NULL, [FirstName] [nvarchar](max) NULL, [LastName] [nvarchar](max) NULL, [DateOfBirth] [datetime] NOT NULL, CONSTRAINT [PK_dbo.Contacts] PRIMARY KEY CLUSTERED ( [Id] ASC )WITH (PAD_INDEX = OFF, STATISTICS_NORECOMPUTE = OFF, IGNORE_DUP_KEY = OFF, ALLOW_ROW_LOCKS = ON, ALLOW_PAGE_LOCKS = ON) ON [PRIMARY] ) ON [PRIMARY] TEXTIMAGE_ON [PRIMARY] GO /****** Object: Table [dbo].[Emails] ******/ SET ANSI_NULLS ON GO SET QUOTED_IDENTIFIER ON GO CREATE TABLE [dbo].[Emails]( [Id] [int] IDENTITY(1,1) NOT NULL, [Type] [nvarchar](max) NULL, [EmailAddress] [nvarchar](max) NULL, [Contact_Id] [int] NULL, CONSTRAINT [PK_dbo.Emails] PRIMARY KEY CLUSTERED ( [Id] ASC )WITH (PAD_INDEX = OFF, STATISTICS_NORECOMPUTE = OFF, IGNORE_DUP_KEY = OFF, ALLOW_ROW_LOCKS = ON, ALLOW_PAGE_LOCKS = ON) ON [PRIMARY] ) ON [PRIMARY] TEXTIMAGE_ON [PRIMARY] GO /****** Object: Table [dbo].[Phones] ******/ SET ANSI_NULLS ON GO SET QUOTED_IDENTIFIER ON GO CREATE TABLE [dbo].[Phones]( [Id] [int] IDENTITY(1,1) NOT NULL, [Type] [nvarchar](max) NULL, [Number] [nvarchar](max) NULL, [Contact_Id] [int] NULL, CONSTRAINT [PK_dbo.Phones] PRIMARY KEY CLUSTERED ( [Id] ASC )WITH (PAD_INDEX = OFF, STATISTICS_NORECOMPUTE = OFF, IGNORE_DUP_KEY = OFF, ALLOW_ROW_LOCKS = ON, ALLOW_PAGE_LOCKS = ON) ON [PRIMARY] ) ON [PRIMARY] TEXTIMAGE_ON [PRIMARY] GO ALTER TABLE [dbo].[Emails] WITH CHECK ADD CONSTRAINT [FK_dbo.Emails_dbo.Contacts_Contact_Id] FOREIGN KEY([Contact_Id]) REFERENCES [dbo].[Contacts] ([Id]) GO ALTER TABLE [dbo].[Emails] CHECK CONSTRAINT [FK_dbo.Emails_dbo.Contacts_Contact_Id] GO ALTER TABLE [dbo].[Phones] WITH CHECK ADD CONSTRAINT [FK_dbo.Phones_dbo.Contacts_Contact_Id] FOREIGN KEY([Contact_Id]) REFERENCES [dbo].[Contacts] ([Id]) GO ALTER TABLE [dbo].[Phones] CHECK CONSTRAINT [FK_dbo.Phones_dbo.Contacts_Contact_Id] GO
Similarly, enter some data using the following script:
USE [Contacts] GO SET IDENTITY_INSERT [dbo].[Contacts] ON INSERT INTO [dbo].[Contacts] ([Id], [ContactName], [Alias], [FirstName], [LastName], [DateOfBirth]) VALUES (1, N'Donald Trump', N'trump', N'Trump', N'Donald', N'2019-06-26 12:21:29') INSERT INTO [dbo].[Contacts] ([Id], [ContactName], [Alias], [FirstName], [LastName], [DateOfBirth]) VALUES (2, N'Barack Obama', N'obama', N'Obama', N'Barack', N'2019-06-26 12:22:00') SET IDENTITY_INSERT [dbo].[Contacts] OFF GO SET IDENTITY_INSERT [dbo].[Emails] ON INSERT INTO [dbo].[Emails] ([Id], [Type], [EmailAddress], [Contact_Id]) VALUES (1, N'Work', N'trump@gmail.com', 1) INSERT INTO [dbo].[Emails] ([Id], [Type], [EmailAddress], [Contact_Id]) VALUES (2, N'Home', N'donald@gmail.com', 1) INSERT INTO [dbo].[Emails] ([Id], [Type], [EmailAddress], [Contact_Id]) VALUES (3, N'Work', N'obama@gmail.com', 2) INSERT INTO [dbo].[Emails] ([Id], [Type], [EmailAddress], [Contact_Id]) VALUES (4, N'Home', N'barack@gmail.com', 2) SET IDENTITY_INSERT [dbo].[Emails] OFF SET IDENTITY_INSERT [dbo].[Phones] ON INSERT INTO [dbo].[Phones] ([Id], [Type], [Number], [Contact_Id]) VALUES (1, N'Work', N'0123.456.789', 1) INSERT INTO [dbo].[Phones] ([Id], [Type], [Number], [Contact_Id]) VALUES (2, N'Home', N'0987.654.321', 1) SET IDENTITY_INSERT [dbo].[Phones] OFF GO
Please note that this is not a SQL document so we don’t have to spend time explaining the above SQL code blocks. We assume that by following this course you have learned and mastered the basics of relational databases and the SQL language.
Practice 1 – Programming the First ADO.NET Application
This first ADO.NET application program will read the number of contacts in the database and print it to the screen.
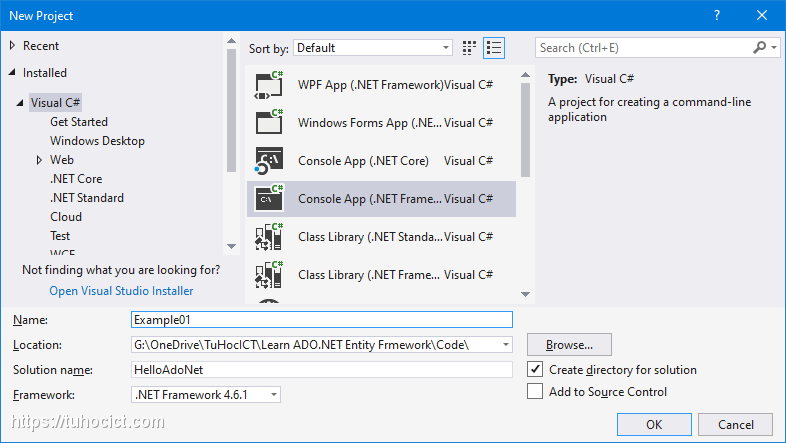
Create a new solution named HelloAdoNet with a project of type Console App (.NET framework) like below
Open the Program.cs file and write the following code:
using System; using System.Data.SqlClient; namespace Example01 { internal class Program { private static void Main(string[] args) { // object đảm nhiệm việc kết nối var connection = new SqlConnection { // chuỗi ký tự chứa tham số phục vụ kết nối ConnectionString = @"Data Source=.sqlexpress;Initial Catalog=Contacts;Integrated Security=True" }; // object đảm nhiệm việc thực thi truy vấn var command = new SqlCommand() { Connection = connection, CommandText = "SELECT COUNT(*) FROM CONTACTS" }; // thử mở kết nối connection.Open(); // thực thi truy vấn và lấy kết quả var res = (int)command.ExecuteScalar(); // đóng kết nối connection.Close(); Console.WriteLine($"{res} contacts found in the database"); Console.ReadLine(); } } }
Translate and test the program
First ado.net program: read record number from database
Congratulations on writing your first program with ADO.NET. The program demonstrates how to work with the database through ADO.NET to read a single value.
SqlCommand’s ExecuteScalar method returns only one value of type object. Therefore, it is only suitable for reading statistical values from Sql Server.
The program is very simple and the code does not perform any checks at all. For the time being, we will not analyze the program’s code. In the next lessons when learning the theory of ADO.NET we will return to the detailed analysis.
Practice 2 – Read Records from Database
Create a second project of type Console App (.NET Framework) in the same solution and name it Example02. Set up Example02 as a startup project.
Open the Program.cs file and code as follows:
using System; using System.Data; using System.Data.SqlClient; namespace Example02 { internal class Program { private static void Main(string[] args) { var connectionString = @"Data Source=.sqlexpress;Initial Catalog=Contacts;Integrated Security=True"; var connection = new SqlConnection(connectionString); var command = new SqlCommand("SELECT * FROM CONTACTS", connection); connection.Open(); var dataReader = command.ExecuteReader(CommandBehavior.CloseConnection); if (dataReader.HasRows) { while (dataReader.Read()) { var id = dataReader.GetInt32(0); var contactName = dataReader.GetString(1); var alias = dataReader.GetString(2); Console.WriteLine($"[{id}] {contactName} ({alias})"); } } Console.ReadLine(); } } }
Translate and run the program:
Ado.NET program reads records from database
Congratulations, you have built a program that is able to fully read records from SQL Server data tables. This program is different in that it reads all records from a data table.
You may have noticed that the initial steps (like preparing the connection string, creating an object connection, commanding, opening the connection) are not different from Example 1. It’s just that we use other overloads. of the constructor for illustrative purposes.
At the data read stage, instead of using ExecuteScalar method, we use SqlCommand’s ExecuteReader method to read the whole record. To read the information of each field in the record we use the ordinal number of the data column and convert to the corresponding data type of .NET through the Get methods (GetInt32, GetString).
Practice 3 – DataAdapter and DataTable
We create a third project named Example03 similar to the two examples above and the code is as follows:
using System; using System.Data; using System.Data.SqlClient; namespace Example03 { internal class Program { private static void Main(string[] args) { var connectionString = @"Data Source=.sqlexpress;Initial Catalog=Contacts;Integrated Security=True"; var dataTable = new DataTable(); using (var connection = new SqlConnection(connectionString)) { var command = connection.CreateCommand(); command.CommandText = "SELECT * FROM CONTACTS"; var dataAdapter = new SqlDataAdapter(command); dataAdapter.Fill(dataTable); } foreach (DataRow r in dataTable.Rows) { var id = (int)r["Id"]; var contactName = (string)r["ContactName"]; var alias = (string)r["Alias"]; Console.WriteLine($"[{id}] {contactName} ({alias})"); } Console.ReadLine(); } } }
Translating and running the program will get the same result as Example 2.
Here we have used a completely different working model. The two examples above we use the Connected model of ADO.NET, and in this example we use the Disconnected model. The difference between these two models will be explained in detail in the following article – ADO.NET architecture.
Understanding ADO.NET Architecture
ADO.NET is an essential component of the .NET Framework, providing developers with a set of classes and tools for developing database-driven applications. Understanding the architecture of ADO.NET is critical in developing efficient and effective database applications.
ADO.NET is a set of classes that allow developers to access and manipulate data stored in various data sources. The primary role of ADO.NET is to provide a unified programming model for working with data from different databases, XML documents, and other data sources.
Explanation of the architecture of ADO.NET
The architecture of ADO.NET consists of several key components, each playing a unique role in the data access process.
- Data Providers
Data providers are responsible for connecting to the data source and executing queries. ADO.NET provides a set of built-in data providers for common data sources such as SQL Server, Oracle, and MySQL, as well as a generic data provider for other data sources.
- Connection Pooling
Connection pooling is a technique used by ADO.NET to improve performance by reusing existing database connections. When a connection is closed, it is not immediately terminated but returned to the connection pool, ready for reuse.
- DataSets and Data Readers
DataSets and Data Readers are two key components of ADO.NET used for working with data. DataSets are in-memory representations of data retrieved from the data source, while Data Readers are forward-only, read-only cursors that provide fast access to data from the data source.
Code samples and explanations
To understand ADO.NET architecture better, here is a code sample that illustrates the use of Data Providers, Connection Pooling, and DataSets:
// Create a connection object using SQL Server data provider
SqlConnection connection = new SqlConnection(“Data Source=SERVER_NAME;Initial Catalog=DATABASE_NAME;Integrated Security=True”);
// Open the connection
connection.Open();
// Create a command object
SqlCommand command = new SqlCommand(“SELECT * FROM Customers”, connection);
// Create a data adapter object using the command object
SqlDataAdapter adapter = new SqlDataAdapter(command);
// Create a DataSet object
DataSet dataSet = new DataSet();
// Fill the DataSet with data from the data adapter
adapter.Fill(dataSet);
// Close the connection
connection.Close();
In this code sample, we create a SqlConnection object using the SQL Server data provider to connect to a database. We then create a SqlCommand object to execute a SELECT statement, and a SqlDataAdapter object to fill a DataSet with the results. Finally, we close the connection to the database.
Working with Data Providers
Data providers are a critical component of ADO.NET, responsible for connecting to data sources and executing queries. ADO.NET provides several built-in data providers for common data sources, including SQL Server, Oracle, MySQL, and others. Understanding how to work with data providers is essential to developing database-driven applications.
Data providers are responsible for connecting to a data source and executing queries against it. They provide a standardized way of communicating with various data sources and hide the complexities of working with different databases and data formats.
In ADO.NET, data providers implement the IDbConnection, IDbCommand, IDbDataAdapter, and IDataParameter interfaces, providing a uniform way of accessing and manipulating data from different data sources.
Different data providers available in ADO.NET
ADO.NET provides several built-in data providers for working with different data sources. Here are some of the commonly used data providers in ADO.NET:
- SQL Server Data Provider
The SQL Server Data Provider is used to connect to Microsoft SQL Server databases. It provides high-performance access to SQL Server databases and supports features such as connection pooling, transaction management, and parameterized queries.
- OLE DB Data Provider
The OLE DB Data Provider is used to connect to various data sources, including Microsoft Access, Excel, and Oracle databases. It supports a wide range of data sources and provides high-performance access to them.
- Oracle Data Provider
The Oracle Data Provider is used to connect to Oracle databases. It provides high-performance access to Oracle databases and supports features such as connection pooling, transaction management, and parameterized queries.
Code samples and explanations
Here’s an example of using the SQL Server Data Provider to connect to a database and execute a SELECT statement:
// Create a connection object using SQL Server data provider
SqlConnection connection = new SqlConnection(“Data Source=SERVER_NAME;Initial Catalog=DATABASE_NAME;Integrated Security=True”);
// Open the connection
connection.Open();
// Create a command object
SqlCommand command = new SqlCommand(“SELECT * FROM Customers”, connection);
// Execute the command and retrieve the results
SqlDataReader reader = command.ExecuteReader();
// Loop through the results and print them to the console
while (reader.Read())
{
Console.WriteLine(“CustomerID: {0} \t CompanyName: {1}”, reader[“CustomerID”], reader[“CompanyName”]);
}
// Close the reader and the connection
reader.Close();
connection.Close();
In this code sample, we create a SqlConnection object using the SQL Server data provider to connect to a database. We then create a SqlCommand object to execute a SELECT statement and a SqlDataReader object to retrieve the results. Finally, we loop through the results and print them to the console.
Using Connection Pooling
Connection pooling is a technique used by ADO.NET to improve performance by reusing existing database connections. When a connection is closed, it is not immediately terminated but returned to the connection pool, ready for reuse. Understanding how to use connection pooling in ADO.NET is essential to developing high-performance database applications.
Connection pooling is a technique used to reduce the overhead associated with creating and destroying database connections. By reusing existing connections, connection pooling can significantly improve the performance of database applications.
When a connection is closed, it is returned to the connection pool, where it can be reused for subsequent requests. When a new connection is requested, it is taken from the connection pool if one is available. If not, a new connection is created and added to the connection pool for future use.
Steps in enabling connection pooling in ADO.NET
Enabling connection pooling in ADO.NET is a simple process that involves setting up connection strings and configuring the connection pool.
- Setting up connection strings
Connection strings are used to specify the details required to connect to a database. To enable connection pooling, we need to add the “Pooling=True” attribute to the connection string, as shown in the following example:
// Create a connection string with pooling enabled
string connectionString = “Data Source=SERVER_NAME;Initial Catalog=DATABASE_NAME;Integrated Security=True;Pooling=True”;
- Configuring the connection pool
ADO.NET provides several properties that can be used to configure the connection pool, such as “Min Pool Size”, “Max Pool Size”, and “Connection Lifetime”. These properties can be set in the connection string or programmatically.
Here’s an example of configuring the connection pool programmatically:
// Create a connection object
SqlConnection connection = new SqlConnection(“Data Source=SERVER_NAME;Initial Catalog=DATABASE_NAME;Integrated Security=True;Pooling=True”);
// Set connection pool properties
connection.MinimumPoolSize = 10;
connection.MaximumPoolSize = 100;
connection.ConnectionLifetime = 300;
// Open the connection
connection.Open();
// Use the connection
// …
// Close the connection
connection.Close();
In this example, we create a SqlConnection object with connection pooling enabled. We then set the minimum and maximum pool sizes and the connection lifetime properties. Finally, we open and close the connection.
Code samples and explanations
Here’s an example of using connection pooling in ADO.NET:
// Create a connection object with pooling enabled
SqlConnection connection = new SqlConnection(“Data Source=SERVER_NAME;Initial Catalog=DATABASE_NAME;Integrated Security=True;Pooling=True”);
// Open the connection
connection.Open();
// Use the connection
// …
// Close the connection
connection.Close();
In this example, we create a SqlConnection object with connection pooling enabled. We then open and close the connection.
Working with DataSets and Data Readers
DataSets and Data Readers are two key components of ADO.NET used for working with data. DataSets are in-memory representations of data retrieved from the data source, while Data Readers are forward-only, read-only cursors that provide fast access to data from the data source. Understanding how to work with DataSets and Data Readers is essential to developing efficient and effective database-driven applications.
A DataSet is an in-memory representation of data retrieved from a data source. It provides a disconnected view of the data, allowing it to be manipulated without a continuous connection to the data source. A DataSet can contain multiple DataTables, each representing a subset of the data.
A Data Reader is a forward-only, read-only cursor that provides fast access to data from a data source. Unlike a DataSet, a Data Reader maintains a continuous connection to the data source and does not store the data in memory. Data Readers are used for retrieving large amounts of data quickly and efficiently.
Steps in using DataSets and Data Readers in ADO.NET
Working with DataSets and Data Readers in ADO.NET involves several steps, including creating and populating DataSets and using Data Readers for fast data access.
- Creating and populating DataSets
To create a DataSet, we first need to create a data adapter and use it to fill the DataSet with data from the data source. Here’s an example:
// Create a connection object
SqlConnection connection = new SqlConnection(“Data Source=SERVER_NAME;Initial Catalog=DATABASE_NAME;Integrated Security=True”);
// Create a command object
SqlCommand command = new SqlCommand(“SELECT * FROM Customers”, connection);
// Create a data adapter object using the command object
SqlDataAdapter adapter = new SqlDataAdapter(command);
// Create a DataSet object
DataSet dataSet = new DataSet();
// Fill the DataSet with data from the data adapter
adapter.Fill(dataSet, “Customers”);
In this example, we create a SqlConnection object and a SqlCommand object to execute a SELECT statement. We then create a SqlDataAdapter object using the SqlCommand object and a DataSet object. Finally, we fill the DataSet with data from the data adapter.
- Using Data Readers for faster data access
To use a Data Reader, we first need to create a command object and execute the command. Here’s an example:
// Create a connection object
SqlConnection connection = new SqlConnection(“Data Source=SERVER_NAME;Initial Catalog=DATABASE_NAME;Integrated Security=True”);
// Open the connection
connection.Open();
// Create a command object
SqlCommand command = new SqlCommand(“SELECT * FROM Customers”, connection);
// Execute the command and retrieve the results
SqlDataReader reader = command.ExecuteReader();
// Loop through the results and print them to the console
while (reader.Read())
{
Console.WriteLine(“CustomerID: {0} \t CompanyName: {1}”, reader[“CustomerID”], reader[“CompanyName”]);
}
// Close the reader and the connection
reader.Close();
connection.Close();
In this example, we create a SqlConnection object and a SqlCommand object to execute a SELECT statement. We then create a SqlDataReader object and use it to retrieve the results. Finally, we loop through the results and print them to the console.
Code samples and explanations
Here’s an example of using DataSets and Data Readers in ADO.NET:
// Create a connection object
SqlConnection connection = new SqlConnection(“Data Source=SERVER_NAME;Initial Catalog=DATABASE_NAME;Integrated Security=True”);
// Create a command object
SqlCommand command = new SqlCommand(“SELECT * FROM Customers”, connection);
// Create a data adapter object using the command object
SqlDataAdapter adapter = new SqlDataAdapter(command);
// Create a DataSet object
DataSet dataSet = new DataSet();
Conclusion
In this article, we took the first step to familiarize ourselves with ADO.NET programming by performing some simple illustrative examples. These examples are only intended to give you an initial feel for ADO.NET programming.
You should spend some time “playing” with the above code such as changing parameters, testing different overloads of constructors, trying to connect and work with other databases (if any).
In the next article, we will go into each specific problem of ADO.NET programming in turn.