50+ Most Useful WordPress Tips and Tricks That Every Webmaster Needs to Know
Have you ever wondered if there are any WordPress tips and tricks that many WordPress masters are using? In this article, we will share some great tips and tricks related to WordPress. We believe they will help you master WordPress like the pros. If you are self-taught or want to understand more about WordPress, don’t forget to take note of the WordPress tips and tricks we mentioned in the article. Now, let’s get started.
1. Use Customized Homepage
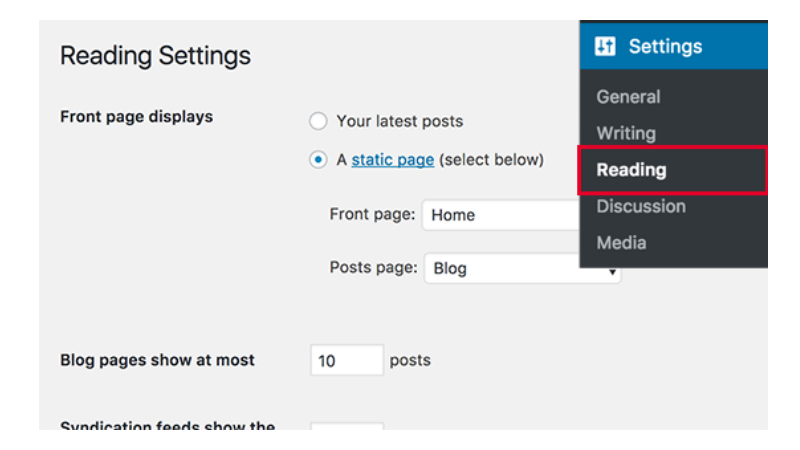
By default, WordPress displays your latest posts on the homepage of your website. You can change this and use any page as the homepage of your website. First, you need to create a new page in WordPress and you can give it a name. Next, you need to create another page and call this blog page as the page you will use to display blog posts. Now go to your Settings -> Reading WordPress admin page and in the “Front page displays” option, switch to “A static page”. You can then select the pages you just created as your homepage and blog pages.
You can also create custom homepage templates to use for your homepage. Simply create a new file on your computer using a plain text editor and add this code above.
<?php /* Template Name: Custom Homepage */ ?>
Save this file as custom-homepage.php on your desktop. Next, you need to connect to your site using an FTP client and go to /wp-content/themes/your-current-theme/ folder. Now load the file you created earlier into your theme folder. Go back to the WordPress admin area and edit the homepage. You can choose your custom homepage template under the metabox page property.
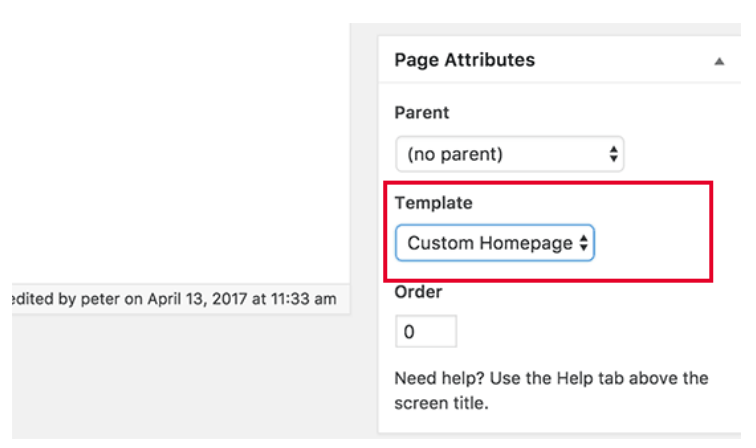
Now this page will be completely empty and it will display nothing. You can customize HTML/CSS and WordPress template tags to build your own page layouts. You can also use a page builder plugin to easily create pages with drag and drop.
2.Installing Google Analytics in WordPress
Google Analytics is one of the essential tools for WordPress site owners. It allows you to see where your users are coming from and what they are doing on your site. The best way to install Google Analytics is to use the Monster Insights plugin. You can insert the Google Analytics code in your theme files, but it will disappear when you update or switch themes.
3. Password Protect WordPress Admin Directory
The WordPress admin directory is where you do all the administrative tasks on your site. It is already password protected as users are required to enter a username and password before they can access the admin area. However, by adding another layer of authentication, you can make it difficult for hackers to gain access to your WordPress site. Here’s how to enable password protection for your WordPress admin directory. Log in to the cPanel dashboard of your WordPress hosting account. In the security section, you need to click on the “Password Protect Directories” icon.

Next, you will be asked to select the folders you want to protect. Select /wp-admin/ folder and next, create username and password.
That’s it. Now when you try to access the wp-admin folder you will see a box asking for authentication like this:

4. Display images in Rows and Columns
By default, when you add multiple images to a WordPress post, they will appear right next to each other or on top of each other. This doesn’t look good since your users will have to scroll a lot to see it all.

This can be solved by displaying the thumbnails in a grid layout. This allows your website to look neat and improves the user experience.
5. Allow users to follow comments

Usually when a user leaves a comment on your site, they will have to manually visit the same post again to see if you or another user has responded to the comment. It’s also not better if users receive email notifications about new comments on posts they’re following. So, here’s how to add this feature to your site. Just install and activate the Subscribe to Comments Reloaded plugin. Upon activation, you need to visit Settings » Subscribe for comments to be configured in the plugin settings.
6. Limit the number of logins

By default, WordPress users can make an unlimited number of login attempts to a WordPress site. This allows anyone to try and guess your password until they get it right. To control this, you need to install and activate the Login LockDown plugin. It allows you to set limits on the number of failed login attempts a user can make to log in.
7. Show excerpt (Post Summary) on Homepage and Archives
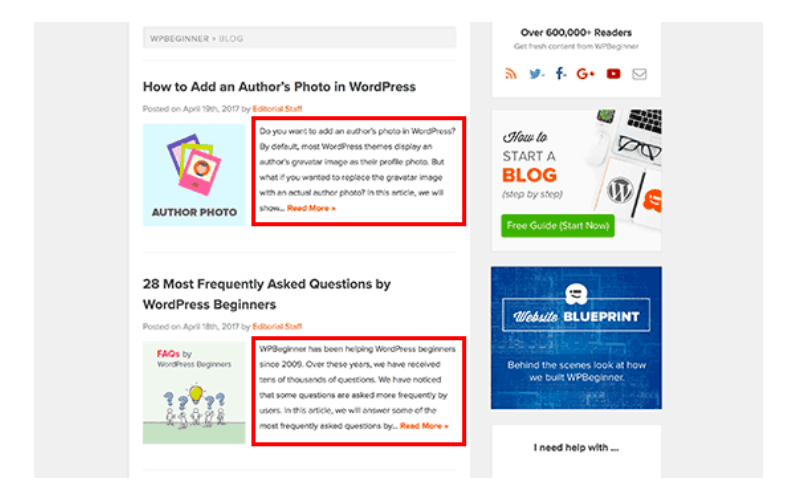
You may have noticed that all the popular blogs display article summaries instead of the full article on their homepage and archive pages. This makes those pages load faster, increases page views, and avoids duplicate content on your site.
8. Add custom Gravatar images
WordPress uses Gravatar to display user profile pictures in WordPress. If the user does not have a Gravatar, WordPress will use the default image called “Mystery person”. This default Gravatar image will appear multiple times in your WordPress comments; simply because a lot of users don’t have a Gravatar image associated with their email address. You can easily replace this default gravatar with your own custom gravatar image. First, you need to upload the image you want to use as your default Gravatar image for the WordPress gallery. Next, you need to copy the image file URL.

Now you need to add the following code to your theme’s functions.php file.
add_filter( 'avatar_defaults', 'wpb_new_gravatar' );
function wpb_new_gravatar ($avatar_defaults) {
$myavatar = 'http://example.com/wp-content/uploads/2017/01/wpb-default-gravatar.png';
$avatar_defaults[$myavatar] = "Default Gravatar";
return $avatar_defaults;
}
Don’t forget to replace the $myavatar value with the URL of the custom Gravatar image you uploaded earlier. You can now visit Settings » Discussion page, and you will notice your custom avatar added to the default avatar’s choices.
9.Add Custom CSS to WordPress Theme
As a WordPress site owner, you may need to add custom CSS to your site from time to time. CSS allows you to change the appearance of things on your WordPress site like colors, margins, font sizes, etc. The easiest way to add custom CSS to any WordPress theme is by visiting Appearance » Customize page in the WordPress admin. This will launch the WordPress theme customization and you will see a preview of your website in the right side panel.
Now click on the “Additional CSS” menu in the left panel to expand it.

You will see a text box where you can add your custom CSS.
Translation results
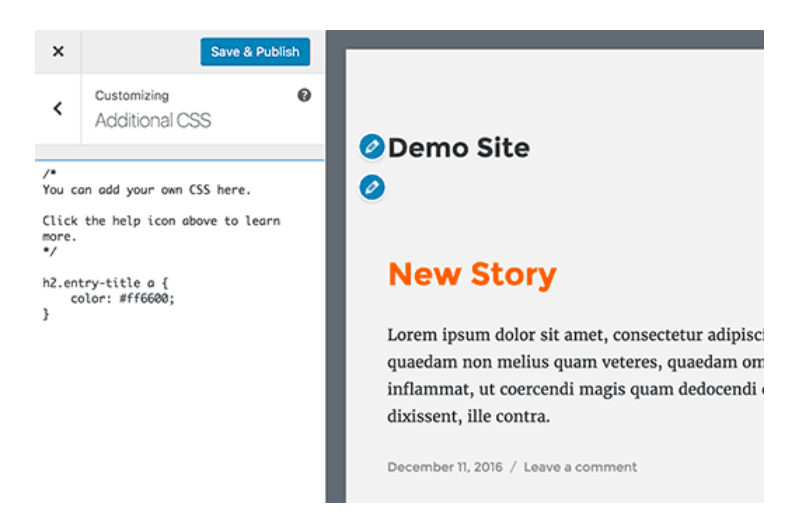 Don’t forget to click the “Save & Publish” button at the top of the page when you’re done. 10. Use the Inspect Element tool to Customize WordPress Adding custom CSS sounds great, but how do you know which CSS classes to edit? How do you debug it without having to write CSS? Using the Inspect Element tool, you can edit the HTML, CSS or JavaScript code for any web page and view your changes online (only on your computer). For DIY website owners, these tools can help you preview what your website design will look like. Simply point and right-click on any element on the page, then select “Inspect” from the browser menu.
  This will split your browser window, and you will be able to view the HTML and CSS source code of the page.
 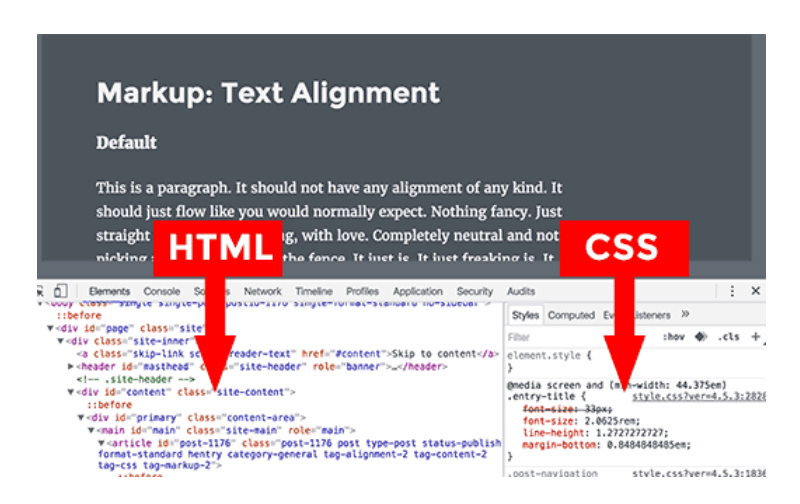 Any changes you make here will be immediately visible on the page above. Note, however, that these changes only happen in your browser, and you don’t actually edit the page either. This allows you to figure out what you need to edit and how to edit. You can then go ahead and change the theme files or customize the CSS code. 11. Add a profile picture of Facebook Facebook may automatically pull an image from your posts when they are shared by you or anyone else. Often it chooses the featured image of an article. However, sometimes it can choose a random image from the post that doesn’t seem appropriate as the post’s profile picture. If you are using the Yoast SEO plugin then you can select a Facebook thumbnail in the Yoast SEO metabox on the post edit screen.
  You can also choose a Facebook profile picture for your homepage by visiting SEO » Social page.
 12.Add Featured Image or Post to RSS Feed As you know, WordPress RSS feeds allow you to display a list of your most recent posts. If you are showing the full article in the feed then all the images inside will be displayed. However, it does not include images or featured posts in the article. To work around this issue, you can add the following code to your theme’s functions.php file.
function rss_post_thumbnail($content) {
global $post;
if(has_post_thumbnail($post->ID)) {
$content = '<p>' . get_the_post_thumbnail($post->ID) .
'</p>' . get_the_content();
}
return $content;
}
add_filter('the_excerpt_rss', 'rss_post_thumbnail');
add_filter('the_content_feed', 'rss_post_thumbnail');
13. Show citations in RSS Feed
By default, WordPress displays your full posts in the RSS feed. This allows RSS citations to automatically fetch and use the content of your full articles. It also prevents your RSS feed subscribers from accessing your website. To fix this problem, go to Settings » Reading and scroll to “For each article in a feed, show”. Select “Summary” and then click the save changes button.

14. Use Shortcodes in Text Widgets
Shortcodes allow you to easily add small functions to your WordPress posts and pages. However, they don’t work in text widgets. To run shortcodes in the sidebar text widget, you need to add this code to your theme’s functions.php file.
add_filter(‘widget_text’, ‘do_shortcode’);
You can also use the Shortcode Widget plugin to add a shortcode enabled text widget to your WordPress site.
15. Adding Images in the WordPress Sidebar
WordPress is more than a simple way to load and display images on the sidebar (although that is expected to change in an upcoming version). At this point if you want to add an image then you need to add the HTML code for it.
First, you need to upload the image to WordPress using the media loader and copy its URL. Next, go to Appearance » Widgets and add a text widget to your sidebar. In the text widget you will need to add HTML in the form like this.
<img src=”Paste image URL here” alt=”Alternate text” />
You can now save extension settings and preview the website.
16. Add content to articles in RSS feeds
You want to add action to your RSS feeds by adding content to your posts that’s only visible to your RSS feed subscribers? Add the following code to your theme’s functions.php file. function lamvt_postrss($content) { if(is_feed()){ $content = ‘This article was written by mycodebit ‘.$content.’Read more at mycodebit.com’; } return $content; } add_filter(‘the_excerpt_rss’, ‘lamvt_postrss’); add_filter(‘the_content’, ‘lamvt_postrss’); This code displays the text “This article was written by mycodebit” before the article and ‘See more at mycodebit.com’ after the article.
17. Schedule posts in RSS Feeds
Have you ever accidentally published an article that you never intended to publish right away? Because you still want to continue editing it or you have some specific purpose with that article, right? However, even if you haven’t published the article, RSS readers and email subscribers may already have it in their inbox. There is an easy fix to prevent draft posts from appearing in your RSS feed. Add the following code to your website theme’s functions.php file.
function publish_later_on_feed($where) {
global $wpdb;
if ( is_feed() ) {
 // timestamp in WP-format
 $now = gmdate('Y-m-d H:i:s');
// value for wait; + device
 $wait = '10'; // integer
// http://dev.mysql.com/doc/refman/5.0/en/date-and-time-functions.html#function_timestampdiff
 $device = 'MINUTE'; //MINUTE, HOUR, DAY, WEEK, MONTH, YEAR
// add SQL-sytax to default $where
 $where .= " AND TIMESTAMPDIFF($device, $wpdb->posts.post_date_gmt, '$now') > $wait ";
 }
 return $where;
 }
add_filter('posts_where', 'publish_later_on_feed');
This code will delay published posts from appearing in RSS feed for 10 minutes.
18. Display random header image in WordPress
Do you want to display random header images on your WordPress site? Most WordPress themes come with built-in support for displaying header images on your website. However, you can also upload multiple header images and allow your theme to display random header images. Go to Appearance » Customize page and then click on the “Header” section to expand it. Now upload all the header images that you want to use and then click the “Randomize header images” button.

19. Add an image icon to the Links category menu
![]()
Do you want to display an image icon next to the links in the navigation menu? The simplest solution is to use Menu Image plugin. After installing the plugin, simply go to Appearance » Menu, and you will see the option to add an image corresponding to each item in your current menu. If for some reason you do not want to use the plugin and want to do it manually, you can refer to the steps below: First you need to go to Appearance » Menus and then click on the “Screen Options” button in the top right corner of the screen.
![]()
This will bring down a menu for you to check the box next to the CSS class option. Then scroll down to your navigation menu and click on an item to expand it. You will see an option to add CSS classes. Enter another CSS class for each menu item.
![]()
Don’t forget to click the save menu button to store your changes. Next, you need to upload image icons to your WordPress site by visiting Media » Add Media page. After uploading the image files, remember to copy their URLs as you will need them in the next step. You can now add an image icon to your navigation menu by adding custom CSS. Here is a sample CSS that you can use.
.homepage {
background-image: url('https://www.example.com/wp-content/uploads/2014/12/home.png');
background-repeat: no-repeat;
background-position: left;
padding-left: 5px;
20. Open navigation menu link in new window
Sometimes you need to create a navigation menu link that opens in a new window. The problem is that you don’t see an option to do that when adding menu items. In fact, the option is hidden to reduce clutter from the screen. You will need to click on the screen options button in the top right corner of the screen and check the “link target” option.
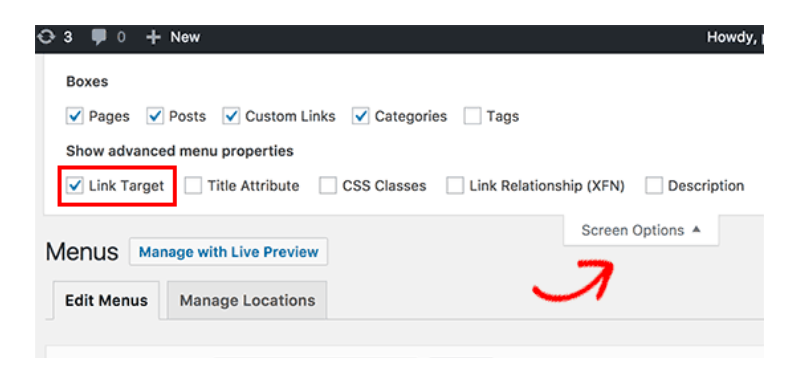
Next, you need to scroll down to the menu item that you want to open in a new window. Click on the menu item to expand it and you will see the option to open the link in a new tab.
Don’t forget to click the save menu button to store your changes.
21. Add Full Screen Search overlay in WordPress

If you click on the search icon in the top right corner of any page on mycodebit.com, you will see a full-screen search overlay appear. It improves the search experience and makes it more engaging. Likewise, you can also add to your WordPress site. The easiest way to do this is to install and activate the WordPress Full Screen Search Overlay plugin. The plugin works without limits and there are no settings to configure. When activated, it will turn any default search field on WordPress into a fullscreen search overlay.
22. Add a Sticky Floating Navigation Menu
Sticky floating navigation menu means to fix the navigation menu bar in one position on the website, so that when the user scrolls down the website, the navigation menu bar still floats and is fixed at the top position. Some WordPress themes have this feature as an option in their settings. If your theme doesn’t have this option then you can try this method. First, you need to install and activate Sticky menu (or Anything) on Scroll plugin. Upon activation, visit the plugin’s settings page Settings » Sticky Menu. Add the CSS class of the navigation menu and save the changes.
23. Add multiple authors to a single WordPress post

Do you want to add multiple authors to an article on your website? By default, WordPress posts are assigned to a single author. However, if you want to add more than one author to your post then you can do it our way. You need to install and activate the Co-Authors Plus plugin.. Now go ahead and edit the post or page that you want multiple authors to know about. On the post edit screen, you will see a new “Authors” box just below the post editor.
24. Add categories for WordPress sites
Want to add categories and tags to your WordPress pages? By default, they are only available for posts. Mainly because pages are considered static standalone content. If you want to add categories and tags then just add this code in your website theme’s functions.php file.
// add tag and category support to pages
function tags_categories_support_all() {
register_taxonomy_for_object_type('post_tag', 'page');
register_taxonomy_for_object_type('category', 'page');
}
// ensure all tags and categories are included in queries
function tags_categories_support_query($wp_query) {
if ($wp_query->get('tag')) $wp_query->set('post_type', 'any');
if ($wp_query->get('category_name')) $wp_query->set('post_type', 'any');
}
// tag and category hooks
add_action('init', 'tags_categories_support_all');
add_action('pre_get_posts', 'tags_categories_support_query');
25. Create a Local WordPress Site on Your Computer
Many WordPress owners and developers install WordPress on their computers. It allows you to develop a local WordPress site, try out plugins and themes, and learn the basics of WordPress.
26. Show Total Comments in WordPress
Comments are an easy way for users to interact with the content on your site. Show total comments that can be used as social proof and encourage more users to participate in discussions. The easiest way to do this is to install the Simple Blog Stats plugin. Upon activation, you can add the shortcode [sbs_apoproved] to any post or page to display the total number of comments.
27. Show Total Number of Registered Users in WordPress

If you allow users to register on your WordPress site, then displaying the total number of registered users can encourage more users to trust and sign up. The easiest way to do this is to install the Simple Blog Stats plugin. Upon activation, you can add the shortcode [sbs_users] to any post or page to display the total number of registered users.
28. Create new image sizes in WordPress
When you upload an image to your blog, WordPress automatically creates some form of copy of the image. Your WordPress theme and plugin can also add new image sizes. To create new image sizes in WordPress, you need to add the following code to your theme’s functions.php file
add_image_size( 'sidebar-thumb', 120, 120, true ); // Hard Crop Mode
add_image_size( 'homepage-thumb', 220, 180 ); // Soft Crop Mode
add_image_size( 'singlepost-thumb', 590, 9999 ); // Unlimited Height Mode
This code adds three new image sizes. Don’t forget to change the image size and name name as per your requirement.
29. Add Category Icons in WordPress
Adding category icons or images next to category names in WordPress will make your category pages look attractive and is also an effective way to improve user experience. First you need to install and activate the Taxonomy Images plugin in WordPress. Upon activation, go to Posts » Categories and click the “+” button below the blank image above each item.
![]()
30. Convert category to tag or vice versa
Often there are quite a few people who do not understand how to properly use categories and tags in WordPress. Sometimes you can create a category but it should actually be a tag or vice versa. Actually, it can be fixed very easily. Go to Tools » Import and then install “Categories and Tags Converter”.

Once installed, click the import link to continue. On the conversion page, you can convert between category to tag or tag convert to category. Next, select the items you want to convert and then click the convert button.

31. Change category or tag for multiple post types at the same time
Sometimes you may misclassify articles. Especially, after your website has been active for a while, you will receive this. At this point, the number of posts is too large. Changing categories for a large number of posts will take up a lot of your precious time.
In fact, there is a plugin that helps you do this. Just install and activate the Bulk Move plugin. Upon activation, go to Tools » Bulk Move to move your posts.

32. Show last update date

By default, most WordPress themes will display the date a post was published. This should work for most websites and blogs. However, if you regularly update old content, you may want to show users the date the article was last updated. Otherwise, the user will not notice the post being modified and adding new information. This can be done by adding the following code:
function wpb_last_updated_date( $content ) {
$u_time = get_the_time('U');
$u_modified_time = get_the_modified_time('U');
if ($u_modified_time >= $u_time + 86400) {
$updated_date = get_the_modified_time('F jS, Y');
$updated_time = get_the_modified_time('h:i a');
$custom_content .= '<p>Last updated on '. $updated_date . ' at '. $updated_time .'</p>';
}
<br data-mce-bogus="1">
$custom_content .= $content;
return $custom_content;
}
add_filter( 'the_content', 'wpb_last_updated_date' );
33. How to display Relative Date in WordPress
Want to display relative time like yesterday, 10 hours ago, or a week ago for a post in WordPress? Relative Date tells the user the amount of time since the post was published. To add a Relative Date, you need to install and activate the Meks Time Ago plugin. Upon activation, you need to visit Settings » General page and scroll down to the “Meks Time Ago Options” section.

You can choose when and how to display it. Don’t forget to click the save changes button to save your settings.
34. Remove WordPress Version Number
By default, WordPress will add the WordPress version to the site title. Some people think it has to do with security, but our answer is that it keeps WordPress up to date. However, if you want to remove the WordPress version number, you can simply add the following code to your website theme’s functions.php file.
function wpbeginner_remove_version() {
return '';
}
add_filter('the_generator', 'wpbeginner_remove_version');
35. Update WordPress URL When WP-Admin Can’t Access

Occasionally, when moving your WordPress site to a new domain or due to misconfiguration, you may need to update your WordPress URL. These URLs tell WordPress where to display the site and where the important WordPress files are located. Incorrect installation errors can lock you out of the WordPress admin area or redirect you to the old site. The easiest way to update WordPress URLs is to add this code to your existing theme’s functions.php file.
update_option( 'siteurl', 'http://example.com' );
update_option( 'home', 'http://example.com' );
Replace example.com with your own domain name. Once you visit your WordPress site, go to Settings » General page and update the URLs there. Then you need to remove the code that you added to the functions.
36. Deactivate all Plugins when WP-admin cannot be accessed
When troubleshooting WordPress errors, you will be asked to disable all WordPress plugins. You just need to go to Plugins page and disable all plugins. But what if you are locked on your WordPress site? Here’s how you can easily disable a plugin when you can’t access the admin area. First connect to your WordPress site using an FTP client and go to /wp-content/ folder. You will find the plugin folder inside.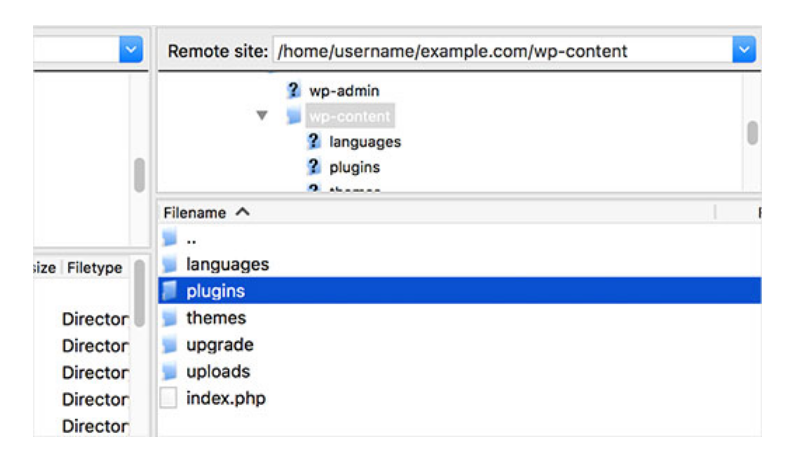 Now you just need to rename the plugin folder to plugins.old and WordPress will automatically deactivate all plugins. 37. Unlink Default Image in WordPress By default, when you upload an image using the media loader, WordPress will ask you to choose how you want to link to an image. If you don’t want to link to an image, you can choose None. A better way to solve this problem is to add the following code in your web theme’s functions.php file.
function wpb_imagelink_setup() {
$image_set = get_option( 'image_default_link_type' );

if ($image_set !== 'none') {
update_option('image_default_link_type', 'none');
}
}
add_action('admin_init', 'wpb_imagelink_setup', 10);
This code will automatically set the default image link option to none.
38. Include category in post URL
You may have noticed that a lot of WordPress sites use categories in their post URLs. This allows them to add a lot of useful information to a URL that matches user experience and SEO. If you want to add category names to your post URLs then go to Settings » Permalinks page. Click on custom structure and add /%category%/%postname%/ in the field next to it.

39. Display random posts in WordPress Do you want to display random posts in WordPress sidebar? Random posts give users a chance to discover articles they might never see. First, you need to install and activate the Advanced Random Posts Widget plugin. Upon activation, go to Appearance » Widgets page and then add the Random Posts widget to the Sidebar. 40. Enable user registration on your WordPress site WordPress comes with a user management system with different roles and capabilities. If you want to allow visitors to register as users on your website, this is how you can enable it. Go to Settings » General and check the “Anyone can register” line next to the Membership option. Below is the default role for new users. If you are not sure, you can leave the default “Subscriber”. 41. Create Custom User Registration Form in WordPress When you open the user registration feature on your website, users will use the default WordPress registration form. You can replace it with a custom user registration form to improve the user experience. First, you will need to install and activate the WPForms plugin. Upon activation, go to WPForms » Addons page to install and activate the user registration addons. Then you need to create a new form by going to WPForms » Add New page. This will launch the WPForms builder for you to choose User Registration Form as your template.
 After creating the form, you need to click on the embed button to copy the embed code. You can now add this code to any WordPress post or page to display your custom user registration form. 42. Exclude specific categories from RSS feed Sometimes you need to exclude specific categories from your WordPress RSS feed. The easiest way to do that is to install and activate the Ultimate Category Excluder plugin. Upon activation, go to Settings » Category Exclusion page to configure plugin settings.
 Select the categories you want to exclude and then click the save changes button to save your settings.
43. Change quote length in WordPress The default WordPress snippet length is often too short to summarize a post. To change the snippet length, you can add the following code to your theme’s functions.php file.
// Changing excerpt length
function new_excerpt_length($length) {
return 100;
}
add_filter('excerpt_length', 'new_excerpt_length');

// Changing excerpt more
function new_excerpt_more($more) {
return '...';
}
add_filter('excerpt_more', 'new_excerpt_more');
-
Show Copyright Date
To add the copyright date to the WordPress footer, simply edit the footer template in your theme and add the copyright notice. However, the year you use in this code will need to be updated manually next year. Instead, you can use the following code to automatically display the current year in your copyright notice. © 2009 – <?php echo date(‘Y’); ?> YourSite.com
45. How to change username in WordPress
WordPress allows you to easily change the user’s name, but you cannot change the username. To do this, the simplest way is to use a plugin called Username Changer. After activating the plugin, go to User » Username Changer page in your WordPress Admin.
Select the username you want to change, then enter the new username.
46. Allow users to Like or Dislike comments

How many sites like YouTube have you seen, allowing users to like and dislike other people’s comments. This stimulates more user engagement and interaction for discussions on the site.
First you need to install and activate the Comments Like Dislike plugin. Upon activation, you need to go to Comments » Comments Like Dislike section to configure plugin settings.

47. Duplicate Post or Page.
The manual way to duplicate a post is to create a new post or page and then copy the content from the old post. However, this will not duplicate post settings like category, featured image, tags, etc. A more efficient way to do this is to use the Duplicate Post plugin. Simply install and activate the plugin and then go to Posts » All Posts section.

You will see the option to duplicate a post or create a new draft.
48. Allow users to submit posts to your WordPress site
Authors on your WordPress site can simply log in to their account and write articles. But do you want your users to be able to submit posts directly without creating an account? The best way to do this is to create a blog post form. You will need to install and activate the WPForms plugin. You will need the pro version of the plugin to access the posting addon. Upon activation, go to WPForms » Addons page to download and activate the posting addon. You can then go to WPForms » Add New page and select “Blog post submit form” as your template.
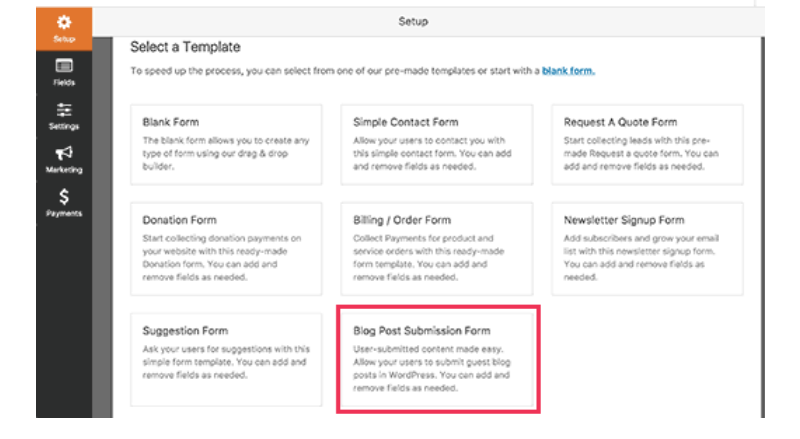
When you’re done editing, click the embed button to copy the template’s embed code. Now you can paste this code in any WordPress post or page to display the blog post submission form. User-submitted posts will be stored in your WordPress posts as pending. You can then review, edit and publish them.
49. Turn off email notifications with comments in WordPress
WordPress will automatically send email notifications when someone leaves a comment or when a comment is pending moderation. This may seem interesting when you start blogging, but it becomes very annoying after a short while. The good news is that you can easily turn off these notifications. Go to Settings » Discussion page on WordPress Admin and then scroll down to “Email Me Whenever” section. Uncheck both options and then click the save changes button.

50. Change Sender Name in WordPress Email
By default, when WordPress sends an email notification it uses “WordPress” as the sender name. This may seem unprofessional and you may want to change it to your actual person’s name or website title. You can easily change it by adding this code in the functions file of your website theme.
// Function to change email address

function wpb_sender_email( $original_email_address ) {
return 'tim.smith@example.com';
}

// Function to change sender name
function wpb_sender_name( $original_email_from ) {
return 'Tim Smith';
}

// Hooking up our functions to WordPress filters
add_filter( 'wp_mail_from', 'wpb_sender_email' );
add_filter( 'wp_mail_from_name', 'wpb_sender_name' );
51. Change the Author of a WordPress Post
Have you ever wanted to change the author of a WordPress post? By default, the option to change post author is hidden on the post edit screen. You will need to edit the post for which you want to change the author name and then click the Screen Options button in the top right corner of the screen. Check the box next to the author option.

This will bring up the author box on the post edit screen so you can choose a different author for the post.
52. Rearrange the post edit page in WordPress
Sometimes you may feel that the categories are too far on the post edit screen or that the featured image box should be higher up. Many users don’t notice it, but the boxes on the post edit screen are quite flexible. You can click to collapse and even drag and drop them to arrange the post edit screen.
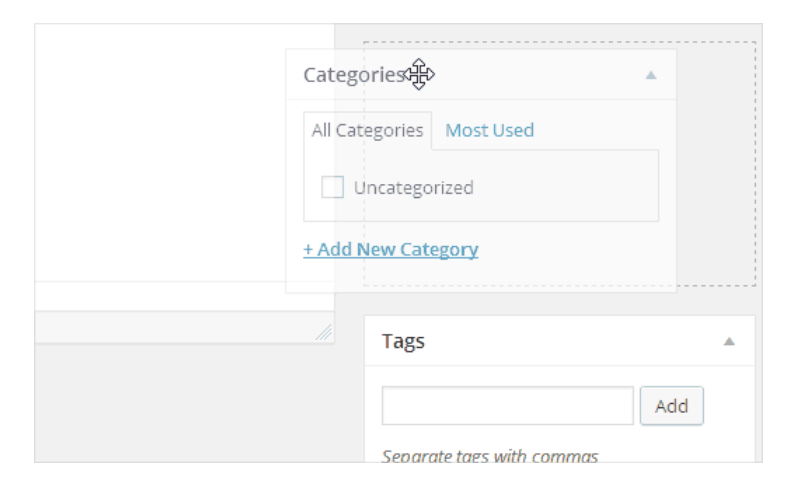
53. Change the number of posts displayed on the Blog page
By default WordPress displays 10 posts on your blog and archive pages. You can change it to any number you want. You need to go to Settings » Reading page and then scroll down to “Blog pages show at most”. Enter the number of posts you want to display and click the save changes button.

54. Automatically close comments on old posts
Sometimes you will notice that some very old posts on your site start receiving frequent spam comments. One way to deal with this is to close comments on older posts. WordPress allows you to automatically turn off comments on old posts. You need to go to Settings » Discussion and scroll down to the “Other comment settings” section.
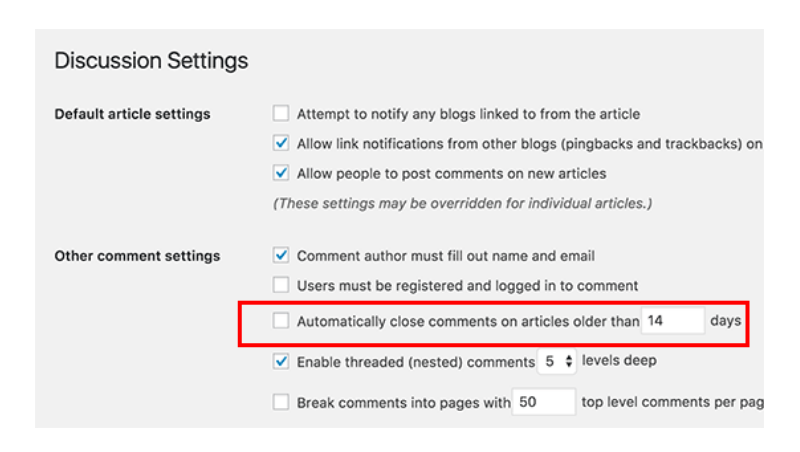
55. Split long posts into pages
You will probably want to split long posts into pages so users can easily navigate them without scrolling too much. This is very easy with WordPress just add the tracking code where you want to split the post to the next page.
<! – nextpage ->
WordPress will add a break page at this paragraph and the rest of the article will appear on the next page. You can add this code again when you want to start another page. For now, this is all we can share with you.
We hope this article helped you find some new WordPress tips and tricks. In the near future, we will have more articles about WordPress, hope the articles will really help you. Please share to give us more motivation to write.


![Async Await c# Error Handling [SOLVED!]](https://mycodebit.com/wp-content/uploads/2023/10/rich-tervet-q2GNdFmhxx4-unsplash-360x240.jpg)

![How to Handle Divide by Zero Error in c# [Complete Guide]](https://mycodebit.com/wp-content/uploads/2023/10/clement-helardot-95YRwf6CNw8-unsplash-360x240.jpg)
