
If unfortunately, if your Windows 11 lacks a Wi-Fi option, there are some solutions for you that can help to fix Wi-Fi errors on Windows 11 Operating System.
Recently, there have been many reports of computers running Windows 11 not showing the option to connect to Wi-Fi, even though the computer does. In general, there are many causes for this situation, including damaged Wi-Fi drivers, hardware problems or even a faulty Windows operating system itself.
Besides, there are cases where the Wi-Fi option is still available, but the connection quality is very bad even though other devices still use the same connection at full speed. So, what should you do if you encounter this situation?
Here are Some Ways that Can Help you Fix Wi-Fi Errors on Windows 11, Specifically as Follows
1. Use The Built-in Troubleshooter Toolkit
Windows 11 provides a set of diagnostics and troubleshooting tools for common problems that users can use at any time and includes a network connection checker and fixer called Internet Connection Troubleshooter. Usage is as follows.
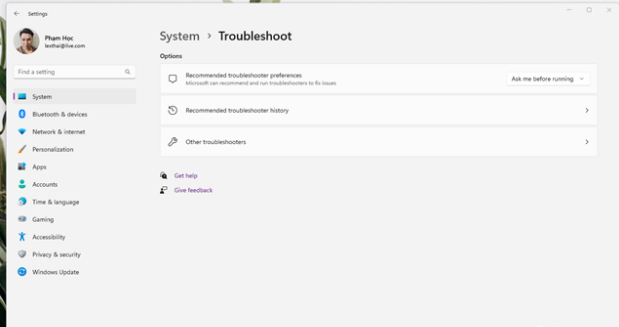
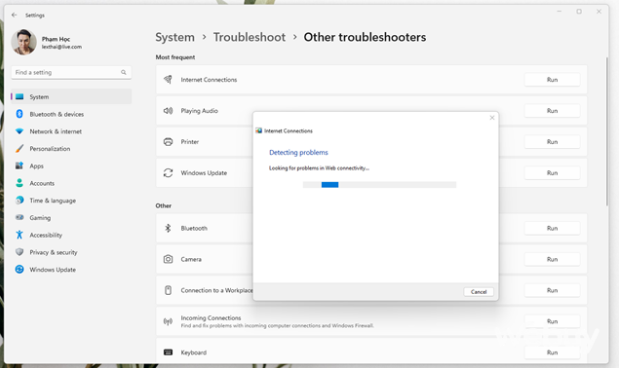
Step 1: Open Settings and go to System, find the Troubleshooter option and go to it, select Other troubleshooters.
Step 2: Click “RUN” in the “Internet Connections” option. The launch window of the Internet connection error finder and troubleshooter will appear. Click on the option “Troubleshoot my connection to the Internet”. The tool will scan your system for problems and suggest options to help you fix them.
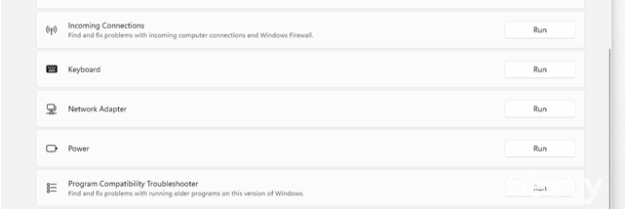
In case if the problem is still not fixed, please click on “RUN” in the Network Adapter option and follow the instructions on the screen.
2. Check and Re-enable the Wi-Fi Adapter Option in Network Connections
In many cases, Windows 11 will not display the Wi-Fi option if the Wi-Fi Adapter in Network Connections is turned off. Therefore, try to check and re-enable the Wi-Fi Adapter as follows.
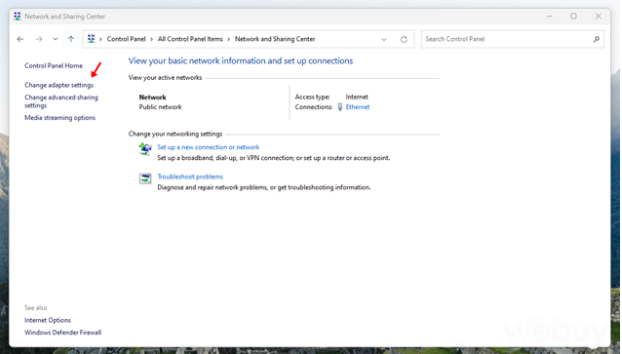
Enter the keyword “control” in the search box and click on the Control Panel result. After the Control Panel opens, go to Network and Internet > Network and Sharing Center and click on “Change adapter settings”.
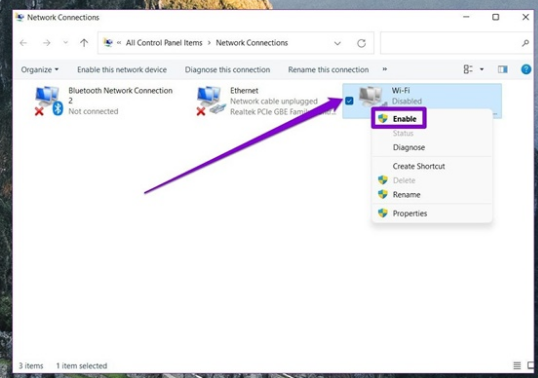
A list of connection protocols will appear, go to the Wi-Fi option and right-click it, select Enable to re-enable.
If this option is already enabled, use the “Diagnose” command to run a test and troubleshoot for it.
3. Update Wi-Fi Driver
If you have recently performed operating system upgrade options, Windows may not have updated to install the latest network drivers. Therefore, a faulty old network driver can also be the cause of Wi-Fi connection problems. Therefore, try updating the network driver to the latest version to solve this problem.
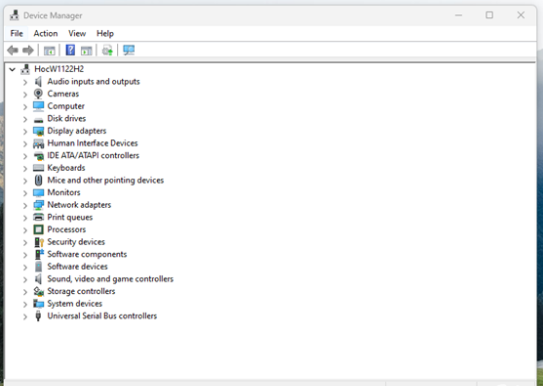
Updating is also quite simple, open Device Manager and find “Network adapters”, right-click on the name of the Wi-Fi device in use and select Update driver. Then follow the on-screen instructions to update.
4. Reinstall the Windows Hardware Detector

Also in Device Manager, you can use the “Uninstall device” option to uninstall the Wi-Fi hardware identification driver, then click the “Scan for hardware changes” icon to let Windows scan and install. Wi-Fi hardware recognition driver can also solve the problem.
5. Perform Network Settings Reset in Windows
Windows 11 provides a built-in option to perform a network reset. This process will remove and reinstall the network adapter options. In addition, other network components will be restored to their default state, thereby correcting problems caused by incorrect network configuration.
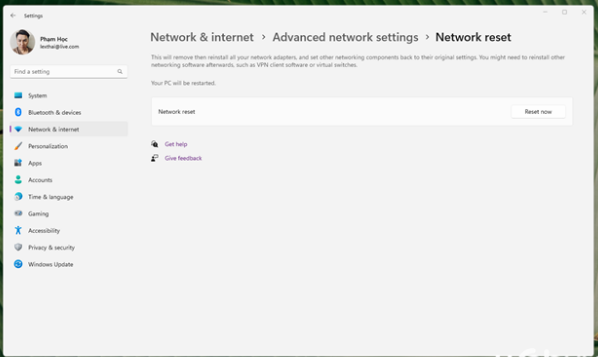
To enable the Reset network settings option in Windows, open Settings and go to Network & Internet > Advanced network settings. Then click on the option Network reset > Reset now.
Once the reset is complete, you should be able to restore the Wi-Fi connection. However, you may need to reinstall and reconfigure other software and network equipment after the reset.
6. Reset network settings using commands in Windows Terminal
If you don’t like the hassle, you can take advantage of the Windows Terminal to reset Windows 11’s network settings in the “Coder” style.
netsh int ip reset
netsh advfirewall reset
netsh winsock reset
ipconfig /flushdns
ipconfig /release
ipconfig /renew
These commands have the effect of completely resetting the previous network settings, thereby fixing the Wi-Fi error in the article.
7. Check for Windows Update
In many cases, Windows 11 will not install hardware updates on its own. Therefore, if your Wi-Fi driver has a new update but has not been installed, it could also be the cause of the problem.
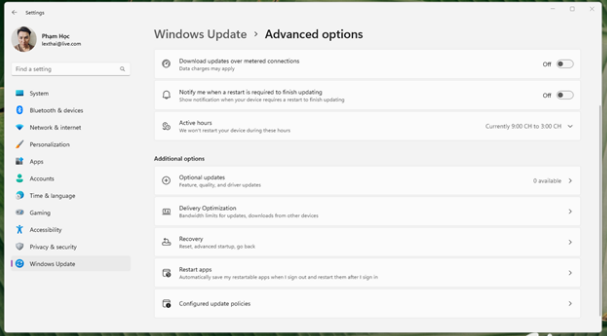
To check and install the new Wi-Fi driver in time, open Windows Update and go to Windows update > Advanced options > Optional updates > Driver updates. Find the driver update section for your device and click on it. Download & install.
Then, restart your computer for the change to take effect.
Conclude
In general, Wi-Fi on Windows 11 can stop working for a number of reasons. However, you can usually fix this problem by using the built-in Internet Connection Troubleshooter tool. Also, reinstall or update the network driver to fix the problem.
If the operating system still doesn’t recognize your Wi-Fi, check your Wi-Fi device for a possible hardware problem. If possible, try replacing the Wi-Fi hardware with new hardware. Good luck and do not forget to follow our site for more tech tips.


![Async Await c# Error Handling [SOLVED!]](https://mycodebit.com/wp-content/uploads/2023/10/rich-tervet-q2GNdFmhxx4-unsplash-360x240.jpg)

![How to Handle Divide by Zero Error in c# [Complete Guide]](https://mycodebit.com/wp-content/uploads/2023/10/clement-helardot-95YRwf6CNw8-unsplash-360x240.jpg)
