
File compression is a solution to help you save storage space on your computer or share content with others over the network more easily. So, do you know how to compress files on Windows 11 yet? If not, the following article is for you.
Zip is one of the most popular file formats today. You can find this format anywhere on the Internet, especially on software or document sharing sites. Typically, you will use Zip files to store unnecessary files, compress files to save space on your hard drive, or send lots of photos and documents over the Internet. Although you can find many free programs to compress files online, Windows 11 has a built-in tool to compress files quickly. In this article, I will show you how to compress files on Windows 11 without installing any other software.
So, How to Compress Files on Windows 11 Without Installing Software?
In Windows 11, file compression is a built-in feature that removes most of the redundant data of a file to reduce file size and save hard drive space. Better yet, the compression algorithm used by Windows 11 won’t lose any important data. To compress files on Windows 11, you can follow these steps:
Open the File Explorer folder manager on your computer.
Access the folder containing the data files that you need to compress.
On the File Explorer toolbar, click the New > Compressed (zipped) Folder option to create a new compressed file. Currently, this compressed file will not have any data or files inside.

Then, type a name for the archive and press Enter to apply the name.
Use the Ctrl or Shift keys on your keyboard to select multiple data files that you want to compress.
When you have selected the data files to be compressed, select the Cut option (scissors icon) on the toolbar of File Explorer or in the function menu of the right mouse.

Next, double-click the newly created Zip file above.
On the File Explorer toolbar or the right-click function menu, click the Paste option to paste the files to be compressed inside the Zip file.

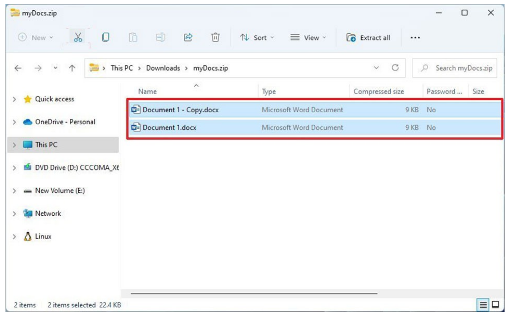 The compressed file will contain the files you just pasted in
After you complete the above steps, you will have a compressed file containing all the files you just selected. In addition, Windows 11 also allows you to compress files and folders together by selecting the file (folder or both) to be compressed, then right-clicking and selecting Compress to ZIP.
Tips: If you accidentally pasted some data files into the compressed file and want to delete them, you can access the extracted file again and select the data file to delete, then press the Delete button on the keyboard.
If you find it useful, don’t forget to leave a like and share to friends to support is in the following posts. Thank you very much for viewing the article and do not forget to check our blog for latest tips update.


![Async Await c# Error Handling [SOLVED!]](https://mycodebit.com/wp-content/uploads/2023/10/rich-tervet-q2GNdFmhxx4-unsplash-360x240.jpg)

![How to Handle Divide by Zero Error in c# [Complete Guide]](https://mycodebit.com/wp-content/uploads/2023/10/clement-helardot-95YRwf6CNw8-unsplash-360x240.jpg)
